As a Java developer, you must have come across various scenarios where you needed to interact with users through dialogs, alerts, or prompts. JavaFX, the rich client platform, offers an intuitive and user-friendly way to create and manage dialogs through its built-in Dialogs API. In this article, we will explore JavaFX dialogs, their common usages, and provide concise code examples to help you integrate them seamlessly into your applications.

with hands-on learning.
get the skills and confidence to land your next move.
What are JavaFX Dialogs?
Dialogs in JavaFX are lightweight windows that allow developers to communicate with users in a modal or non-modal fashion. Modal dialogs block user interaction with other parts of the application until the dialog is dismissed, whereas non-modal dialogs do not block interaction and allow users to interact with other elements.
JavaFX provides a built-in Dialog class and its subclasses, such as Alert, TextInputDialog, and ChoiceDialog, which cover most use cases. Additionally, developers can create custom dialogs by extending the Dialog class, making it highly flexible. However, we will cover creating custom dialogs in another article.
Alert Dialogs
JavaFX provides built-in Alert dialogs, which are useful for displaying information, warnings, errors, and getting user confirmations. These dialogs help in creating interactive and user-friendly applications.
Information Alert
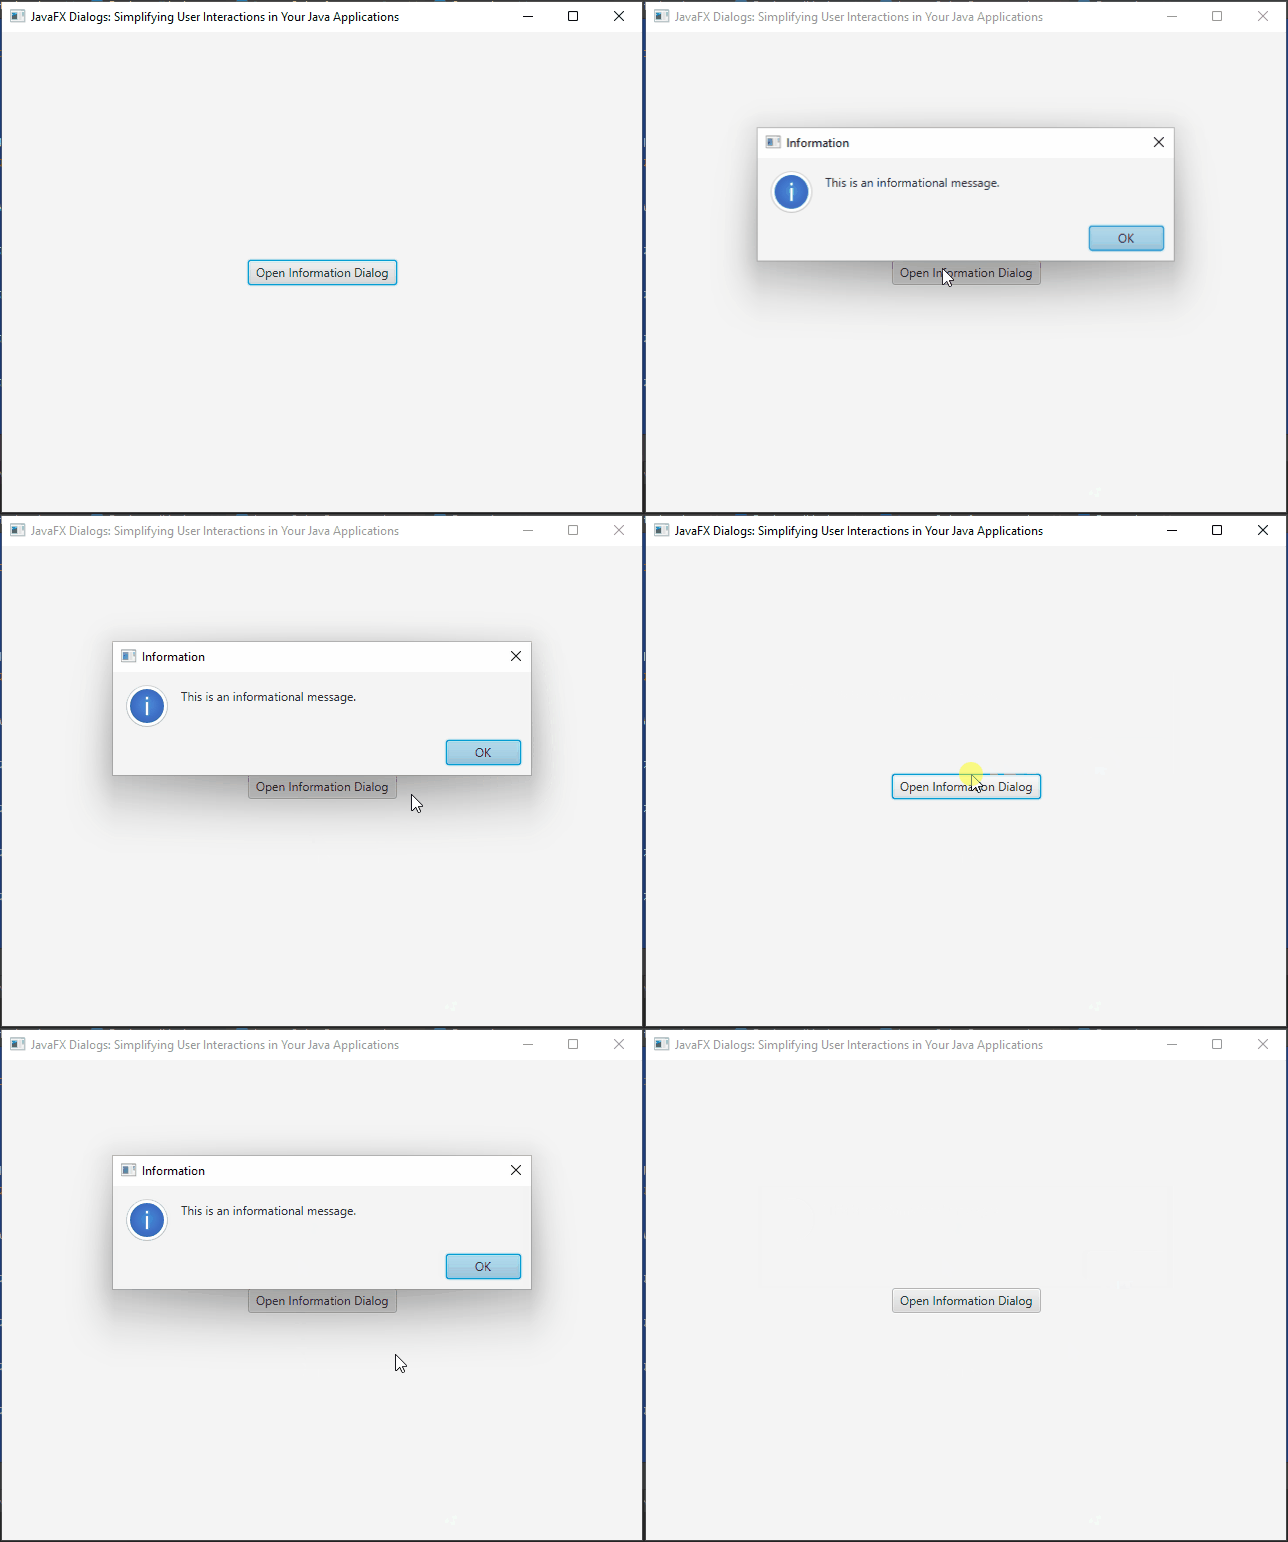
An information Alert is used to display general messages or information to users. It typically contains a header, a message, and a single “OK” button to close the dialog. Let’s see how to create an Information Alert in JavaFX:
import javafx.application.Application;
import javafx.event.ActionEvent;
import javafx.scene.Scene;
import javafx.scene.control.Alert;
import javafx.scene.control.Button;
import javafx.scene.layout.*;
import javafx.stage.Stage;

public class Main extends Application {

    private final BorderPane parent = new BorderPane();

    @Override
    public void start(Stage stage) throws Exception {
        this.setupStage(stage);
    }

    @Override
    public void init() throws Exception {
        super.init();
        this.buildUI();
    }

    private void buildUI() {

        Button button = new Button("Open Information Dialog");

        button.setOnAction(this::openDialog);

        this.parent.setCenter(button);

    }

    private void openDialog(ActionEvent actionEvent) {

        Alert alert = new Alert(Alert.AlertType.INFORMATION);

        alert.setTitle("Information");

        alert.setHeaderText(null);

        alert.setContentText("This is an informational message.");

        alert.showAndWait();

    }

    private void setupStage(Stage stage) {

        Scene scene = new Scene(this.parent, 640.0, 480.0);

        // Set the stage title
        stage.setTitle("JavaFX Dialogs: Simplifying User Interactions in Your Java Applications");

        // Set the stage scene
        stage.setScene(scene);

        // Center the stage on the screen
        stage.centerOnScreen();

        // Show the stage on the screen
        stage.show();

    }

}
Warning Alert
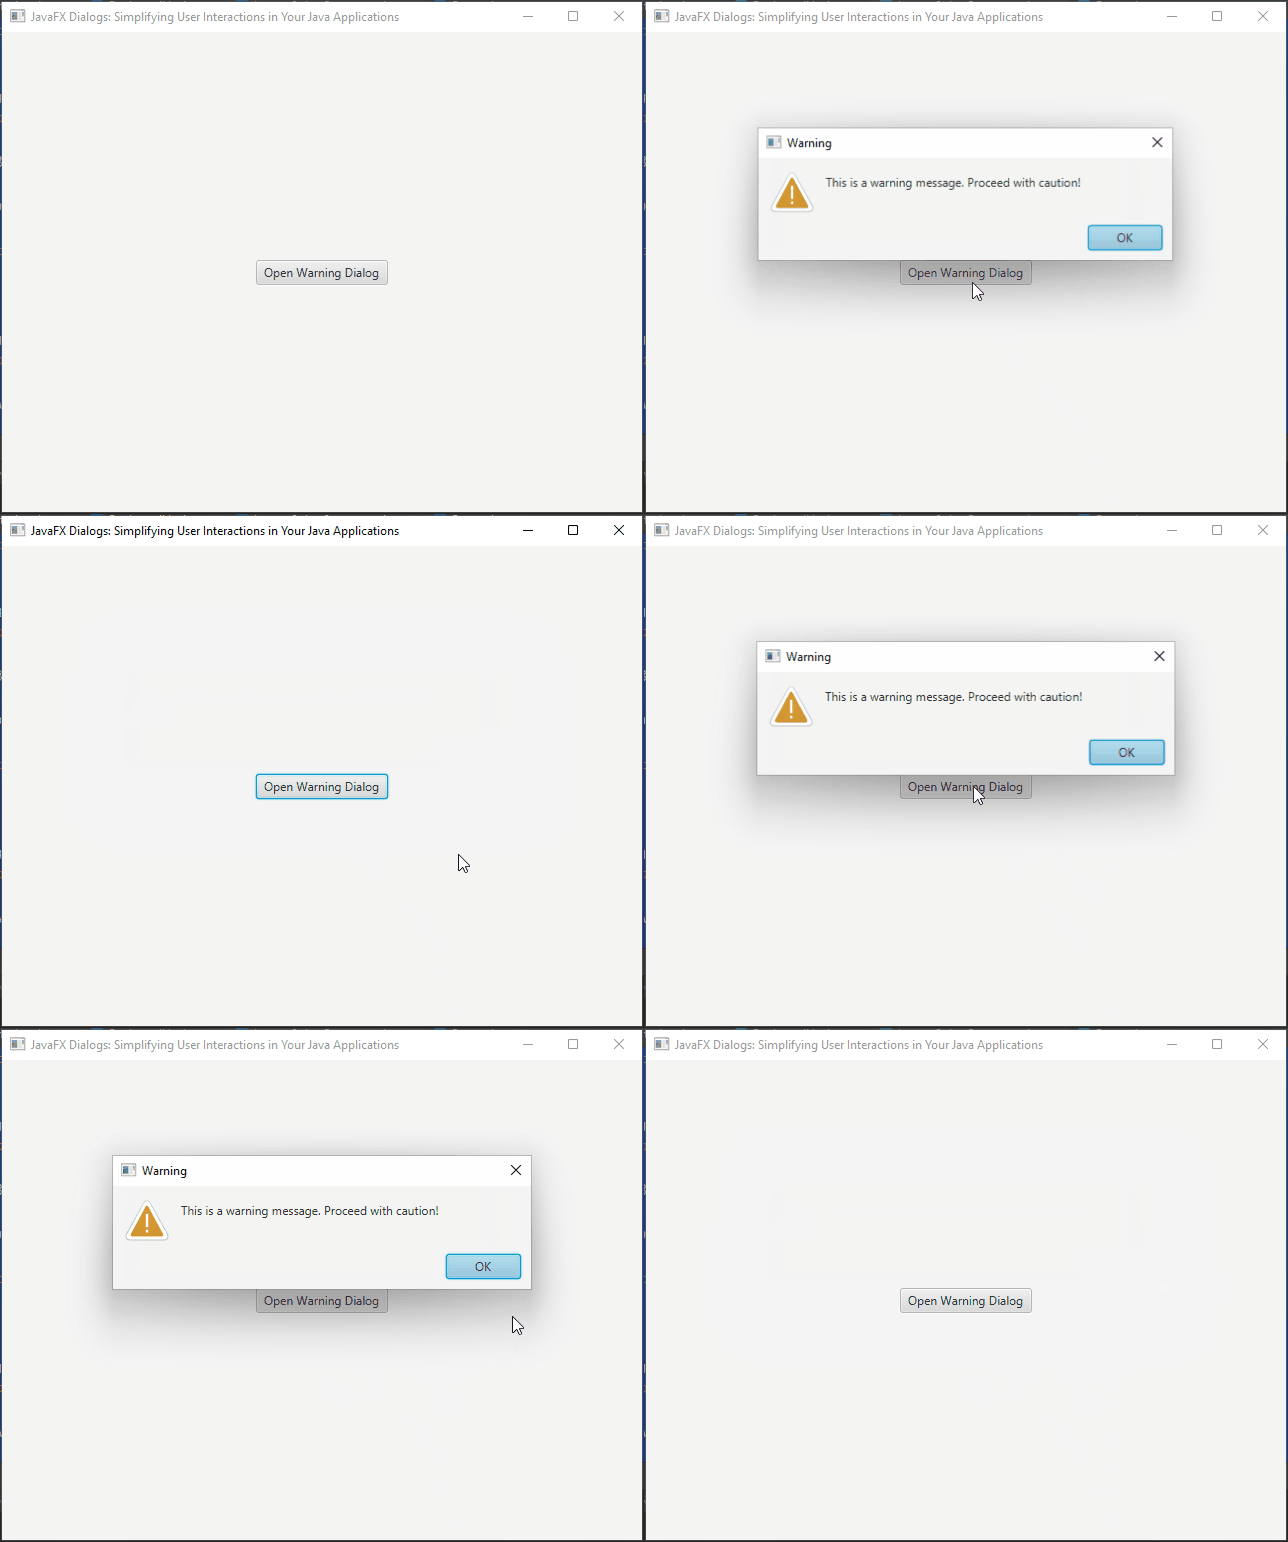
A warning Alert is used to notify users about potential issues or actions that require their attention. It typically contains a header, a warning message, and a single “OK” button to close the dialog. Let’s see how to create a Warning Alert in JavaFX:
import javafx.application.Application;
import javafx.event.ActionEvent;
import javafx.scene.Scene;
import javafx.scene.control.Alert;
import javafx.scene.control.Button;
import javafx.scene.layout.*;
import javafx.stage.Stage;

public class Main extends Application {

    private final BorderPane parent = new BorderPane();

    @Override
    public void start(Stage stage) throws Exception {
        this.setupStage(stage);
    }

    @Override
    public void init() throws Exception {
        super.init();
        this.buildUI();
    }

    private void buildUI() {

        Button button = new Button("Open Warning Dialog");

        button.setOnAction(this::openDialog);

        this.parent.setCenter(button);

    }

    private void openDialog(ActionEvent actionEvent) {

        Alert alert = new Alert(Alert.AlertType.WARNING);

        alert.setTitle("Warning");

        alert.setHeaderText(null);

        alert.setContentText("This is a warning message. Proceed with caution!");

        alert.showAndWait();

    }

    private void setupStage(Stage stage) {

        Scene scene = new Scene(this.parent, 640.0, 480.0);

        // Set the stage title
        stage.setTitle("JavaFX Dialogs: Simplifying User Interactions in Your Java Applications");

        // Set the stage scene
        stage.setScene(scene);

        // Center the stage on the screen
        stage.centerOnScreen();

        // Show the stage on the screen
        stage.show();

    }

}
Error Alert
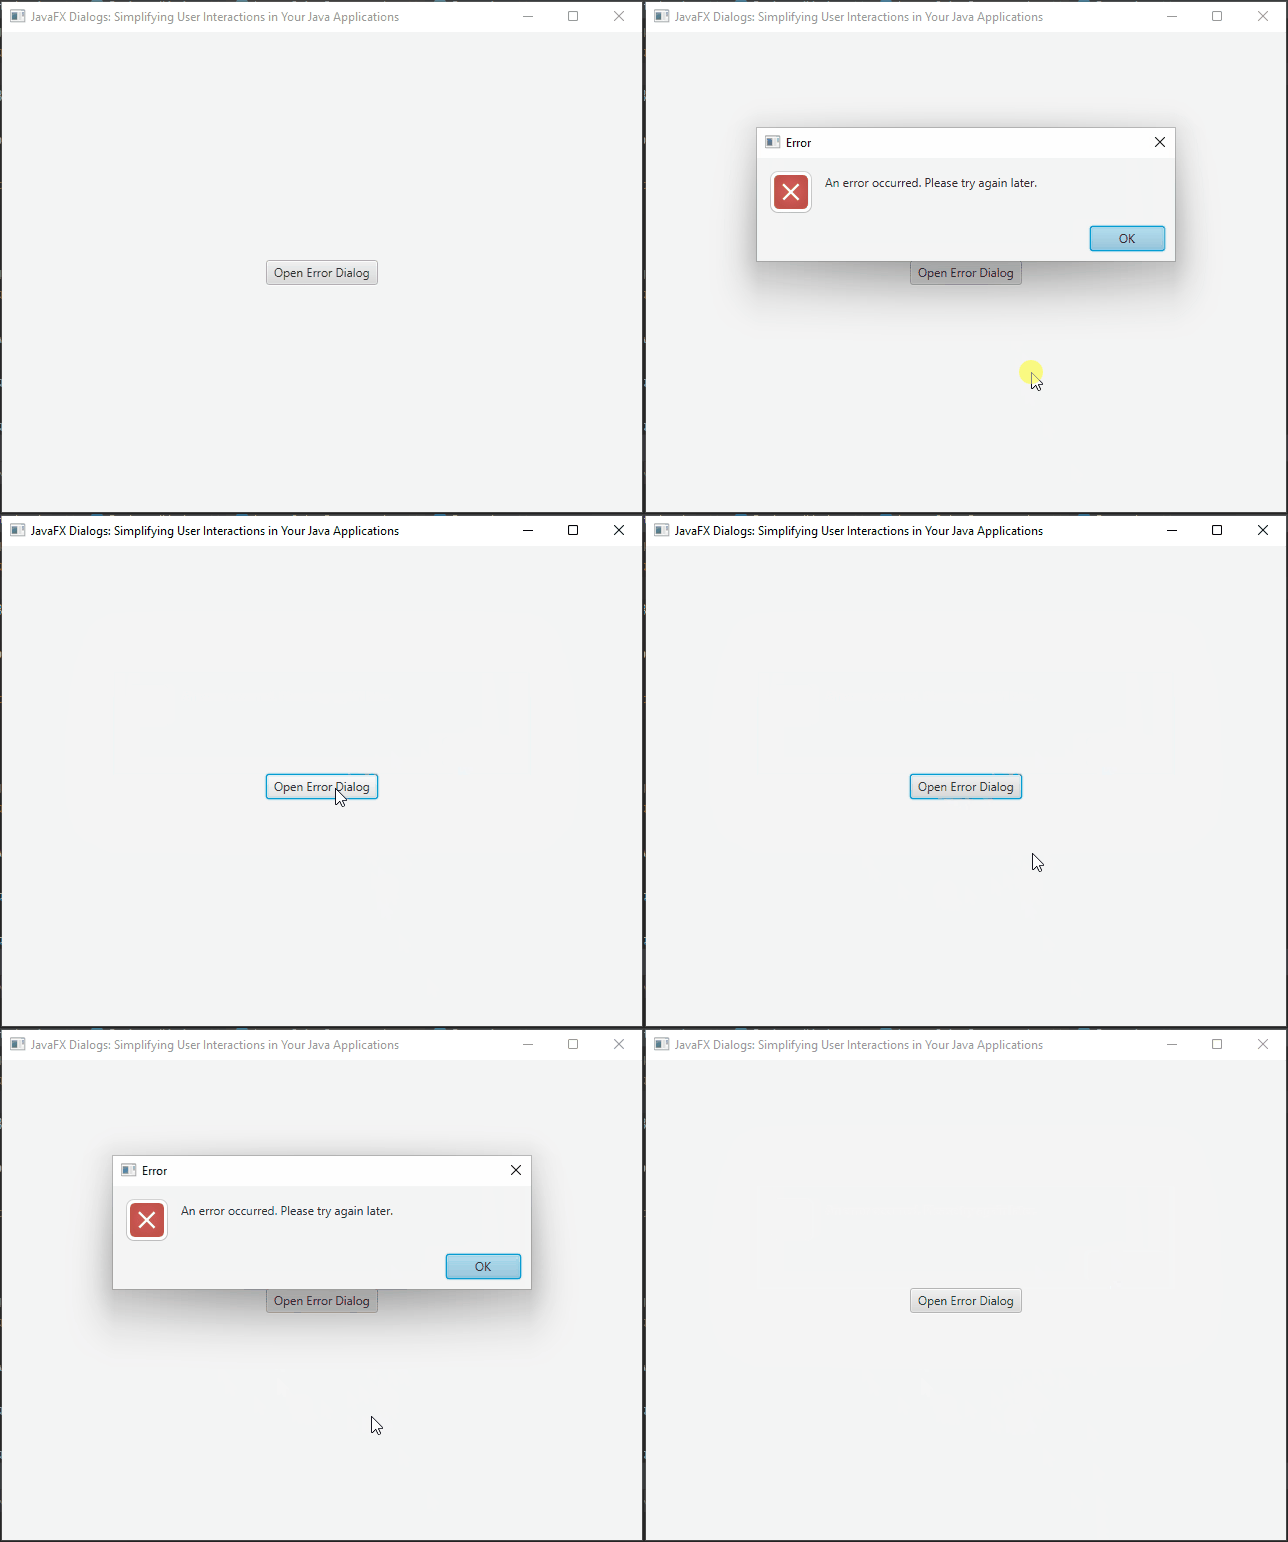
An error Alert is used to inform users about critical errors or issues that require immediate attention. It typically contains a header, an error message, and a single “OK” button to close the dialog. Let’s see how to create an Error Alert in JavaFX:
import javafx.application.Application;
import javafx.event.ActionEvent;
import javafx.scene.Scene;
import javafx.scene.control.Alert;
import javafx.scene.control.Button;
import javafx.scene.layout.*;
import javafx.stage.Stage;

public class Main extends Application {

    private final BorderPane parent = new BorderPane();

    @Override
    public void start(Stage stage) throws Exception {
        this.setupStage(stage);
    }

    @Override
    public void init() throws Exception {
        super.init();
        this.buildUI();
    }

    private void buildUI() {

        Button button = new Button("Open Error Dialog");

        button.setOnAction(this::openDialog);

        this.parent.setCenter(button);

    }

    private void openDialog(ActionEvent actionEvent) {

        Alert alert = new Alert(Alert.AlertType.ERROR);

        alert.setTitle("Error");

        alert.setHeaderText(null);

        alert.setContentText("An error occurred. Please try again later.");

        alert.showAndWait();

    }

    private void setupStage(Stage stage) {

        Scene scene = new Scene(this.parent, 640.0, 480.0);

        // Set the stage title
        stage.setTitle("JavaFX Dialogs: Simplifying User Interactions in Your Java Applications");

        // Set the stage scene
        stage.setScene(scene);

        // Center the stage on the screen
        stage.centerOnScreen();

        // Show the stage on the screen
        stage.show();

    }

}
Confirmation Alert
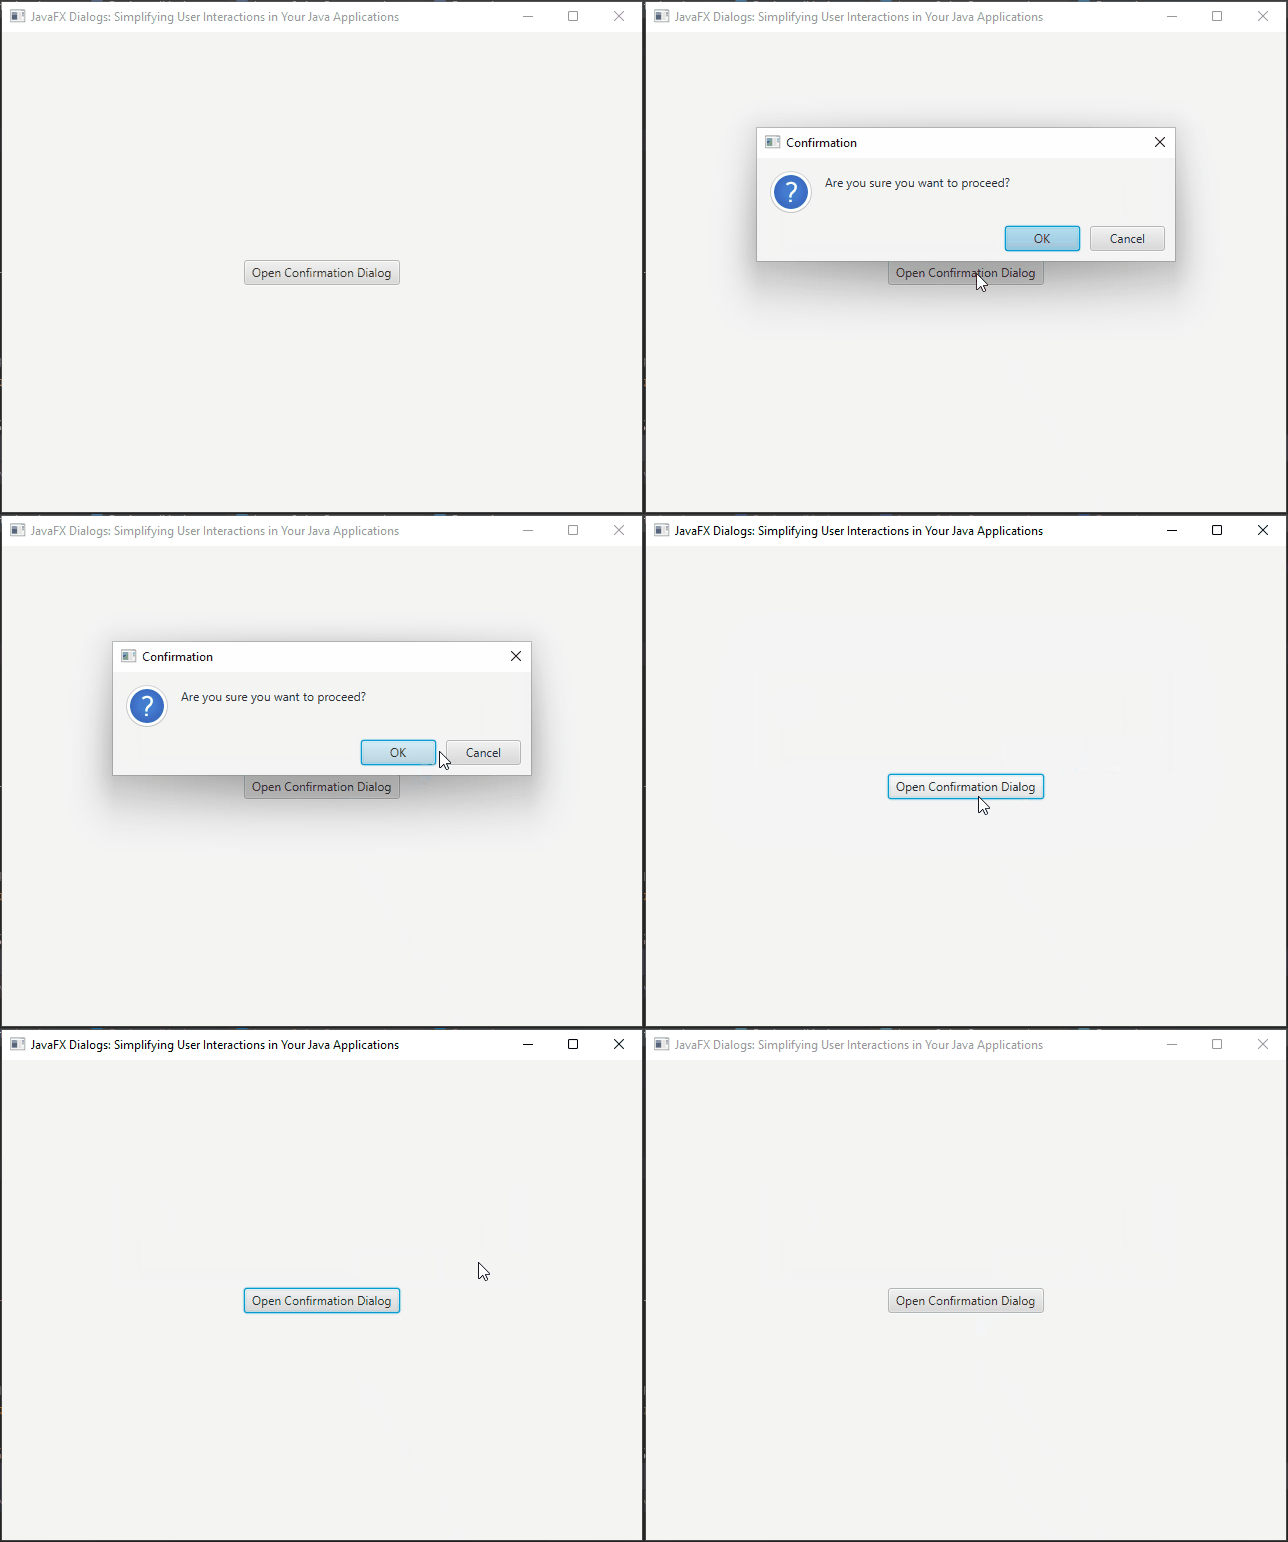
A confirmation Alert is used to prompt users to confirm an action before proceeding. It typically contains a header, a confirmation message, and both “OK” and “Cancel” buttons to handle user responses. Let’s see how to create a Confirmation Alert in JavaFX:
import javafx.application.Application;
import javafx.event.ActionEvent;
import javafx.scene.Scene;
import javafx.scene.control.Alert;
import javafx.scene.control.Button;
import javafx.scene.control.ButtonType;
import javafx.scene.layout.*;
import javafx.stage.Stage;

public class Main extends Application {

    private final BorderPane parent = new BorderPane();

    @Override
    public void start(Stage stage) throws Exception {
        this.setupStage(stage);
    }

    @Override
    public void init() throws Exception {
        super.init();
        this.buildUI();
    }

    private void buildUI() {

        Button button = new Button("Open Confirmation Dialog");

        button.setOnAction(this::openDialog);

        this.parent.setCenter(button);

    }

    private void openDialog(ActionEvent actionEvent) {

        Alert alert = new Alert(Alert.AlertType.CONFIRMATION);

        alert.setTitle("Confirmation");

        alert.setHeaderText(null);

        alert.setContentText("Are you sure you want to proceed?");

        // Handling the user's response
        alert.showAndWait().ifPresent(buttonType -> {

            if (buttonType == ButtonType.OK) {

                // Code to execute when the user clicks the OK button (confirmation action)
                System.out.println("OK Button...");

            } else {

                // Code to execute when the user clicks the Cancel button (cancel action)
                System.out.println("Cancel Button...");

            }

        });

    }

    private void setupStage(Stage stage) {

        Scene scene = new Scene(this.parent, 640.0, 480.0);

        // Set the stage title
        stage.setTitle("JavaFX Dialogs: Simplifying User Interactions in Your Java Applications");

        // Set the stage scene
        stage.setScene(scene);

        // Center the stage on the screen
        stage.centerOnScreen();

        // Show the stage on the screen
        stage.show();

    }

}
TextInput Dialog
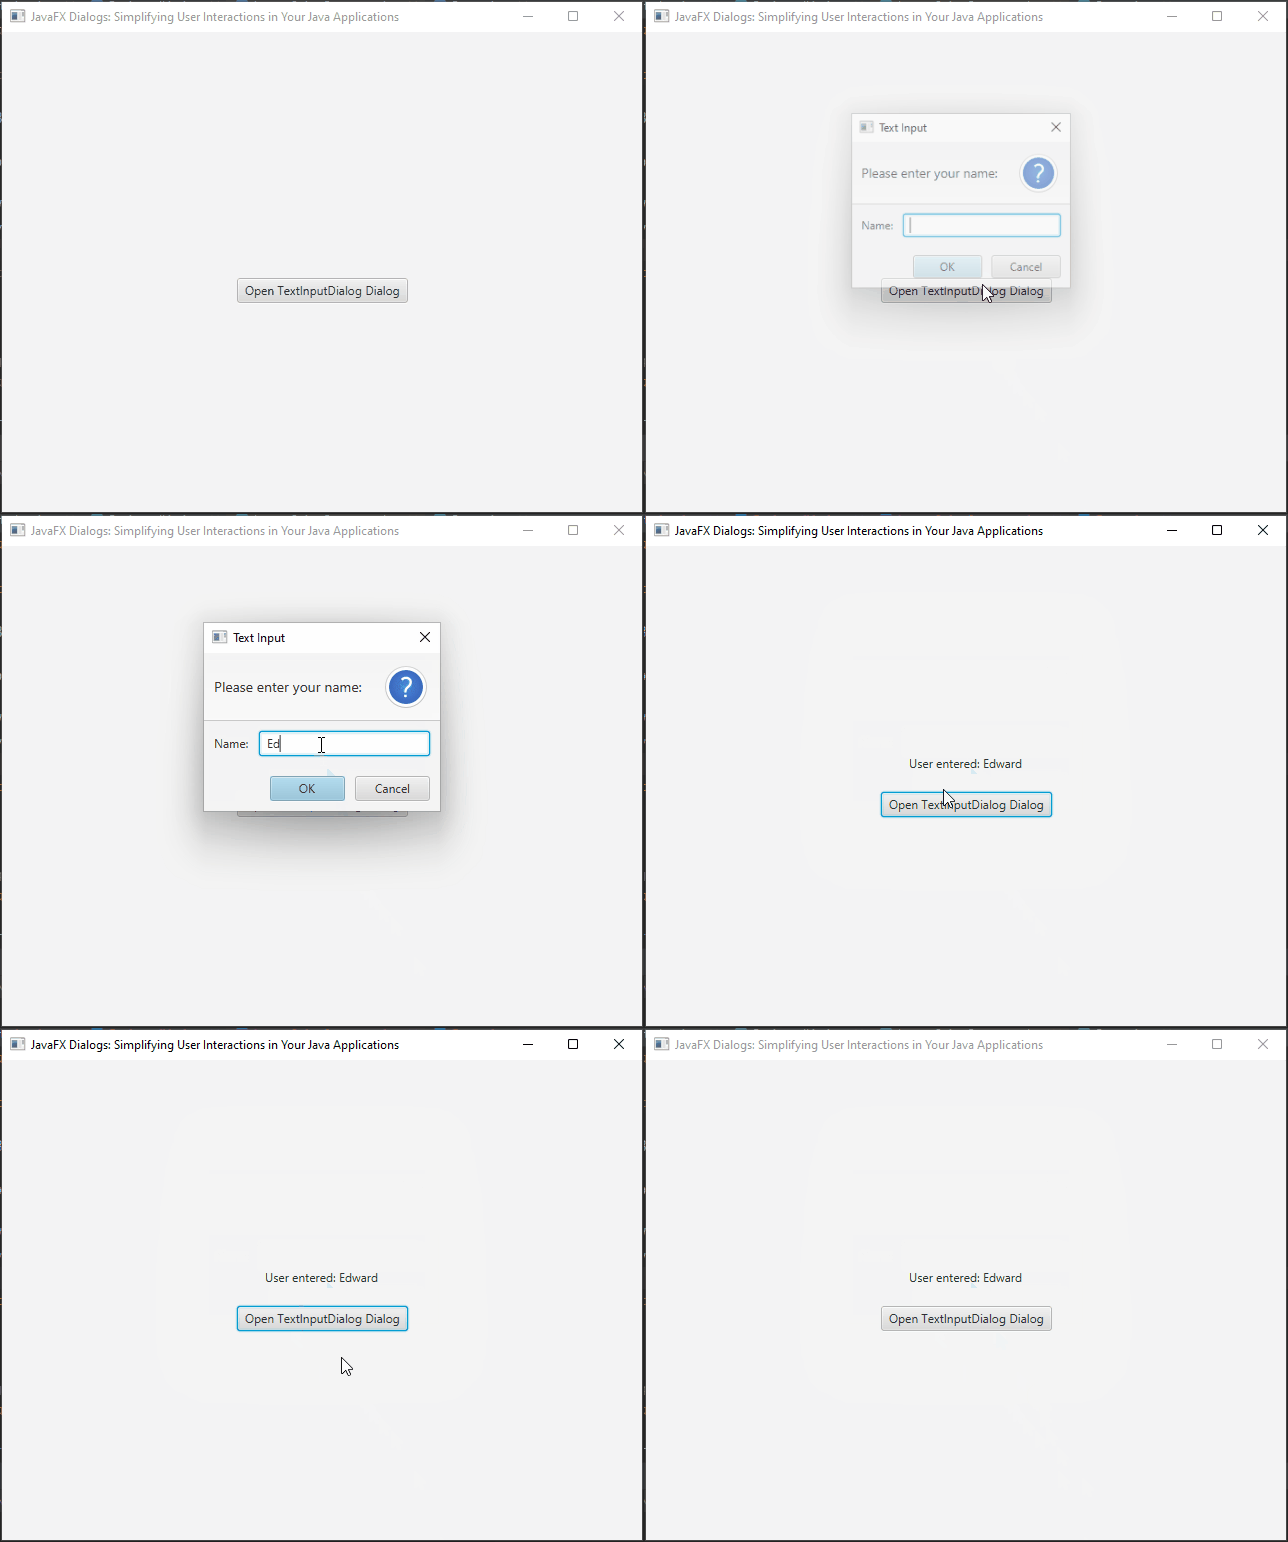
TextInputDialog is a versatile JavaFX component that allows developers to capture user input in the form of text. It is particularly useful when you need to get textual information from the user, such as a username, password, or any other custom input.
Creating a Basic TextInputDialog
import javafx.application.Application;
import javafx.event.ActionEvent;
import javafx.geometry.Pos;
import javafx.scene.Scene;
import javafx.scene.control.Button;
import javafx.scene.control.Label;
import javafx.scene.control.TextInputDialog;
import javafx.scene.layout.*;
import javafx.stage.Stage;

public class Main extends Application {

    private final BorderPane parent = new BorderPane();

    private Label label;

    @Override
    public void start(Stage stage) throws Exception {
        this.setupStage(stage);
    }

    @Override
    public void init() throws Exception {
        super.init();
        this.buildUI();
    }

    private void buildUI() {

        this.label = new Label();

        Button button = new Button("Open TextInputDialog Dialog");

        button.setOnAction(this::openDialog);

        VBox vBox= new VBox(20, this.label, button);
        vBox.setAlignment(Pos.CENTER);

        this.parent.setCenter(vBox);

    }

    private void openDialog(ActionEvent actionEvent) {

        TextInputDialog dialog = new TextInputDialog();

        dialog.setTitle("Text Input");
        dialog.setHeaderText("Please enter your name:");
        dialog.setContentText("Name:");

        // Get the result of the dialog (user input) and display it
        dialog.showAndWait().ifPresent(name -> this.label.setText("User entered: " + name));

    }

    private void setupStage(Stage stage) {

        Scene scene = new Scene(this.parent, 640.0, 480.0);

        // Set the stage title
        stage.setTitle("JavaFX Dialogs: Simplifying User Interactions in Your Java Applications");

        // Set the stage scene
        stage.setScene(scene);

        // Center the stage on the screen
        stage.centerOnScreen();

        // Show the stage on the screen
        stage.show();

    }

}
Setting a Default Value:
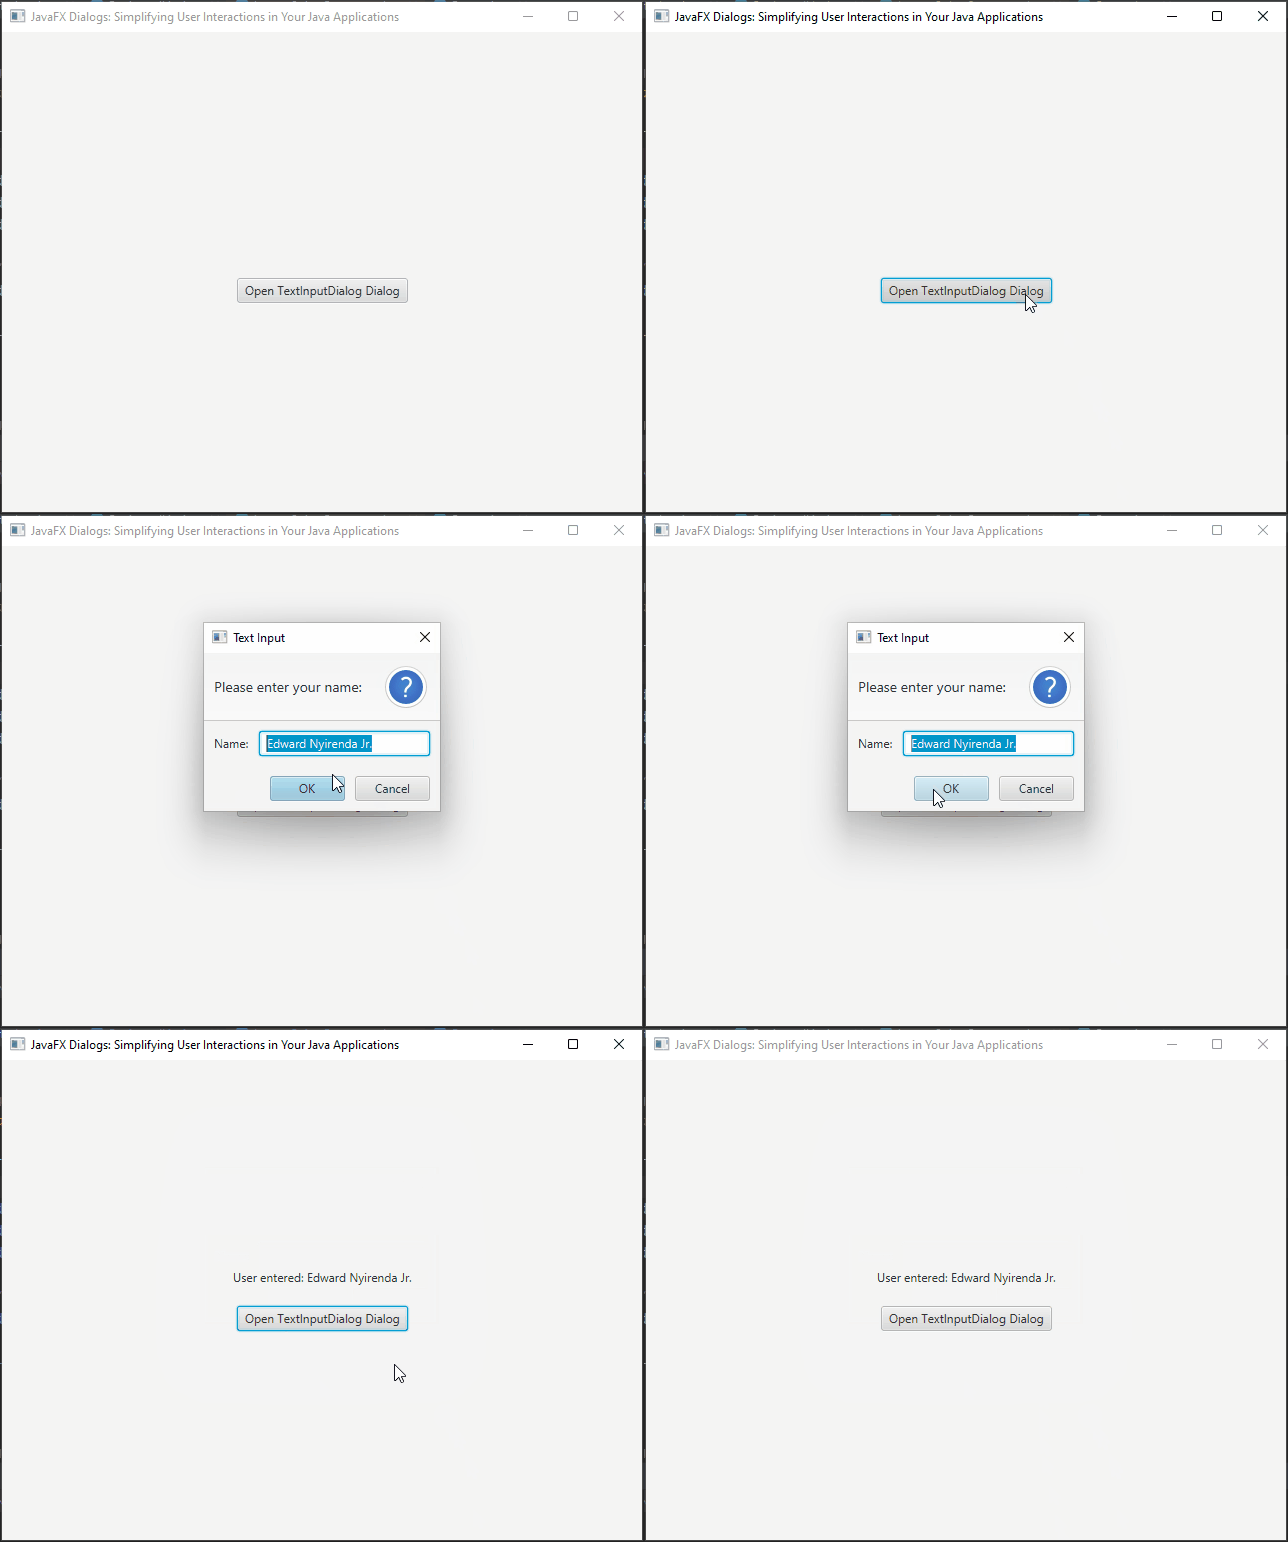
You can set a default value in the TextInputDialog to provide users with a pre-filled input field. Follow these steps to do so:
import javafx.application.Application;
import javafx.event.ActionEvent;
import javafx.geometry.Pos;
import javafx.scene.Scene;
import javafx.scene.control.Button;
import javafx.scene.control.Label;
import javafx.scene.control.TextInputDialog;
import javafx.scene.layout.*;
import javafx.stage.Stage;

public class Main extends Application {

    private final BorderPane parent = new BorderPane();

    private Label label;

    @Override
    public void start(Stage stage) throws Exception {
        this.setupStage(stage);
    }

    @Override
    public void init() throws Exception {
        super.init();
        this.buildUI();
    }

    private void buildUI() {

        this.label = new Label();

        Button button = new Button("Open TextInputDialog Dialog");

        button.setOnAction(this::openDialog);

        VBox vBox= new VBox(20, this.label, button);
        vBox.setAlignment(Pos.CENTER);

        this.parent.setCenter(vBox);

    }

    private void openDialog(ActionEvent actionEvent) {

        // Create TextInputDialog and set default value
        TextInputDialog dialog = new TextInputDialog("Edward Nyirenda Jr.");

        dialog.setTitle("Text Input");
        dialog.setHeaderText("Please enter your name:");
        dialog.setContentText("Name:");

        // Get the result of the dialog (user input) and display it
        dialog.showAndWait().ifPresent(name -> this.label.setText("User entered: " + name));

    }

    private void setupStage(Stage stage) {

        Scene scene = new Scene(this.parent, 640.0, 480.0);

        // Set the stage title
        stage.setTitle("JavaFX Dialogs: Simplifying User Interactions in Your Java Applications");

        // Set the stage scene
        stage.setScene(scene);

        // Center the stage on the screen
        stage.centerOnScreen();

        // Show the stage on the screen
        stage.show();

    }

}
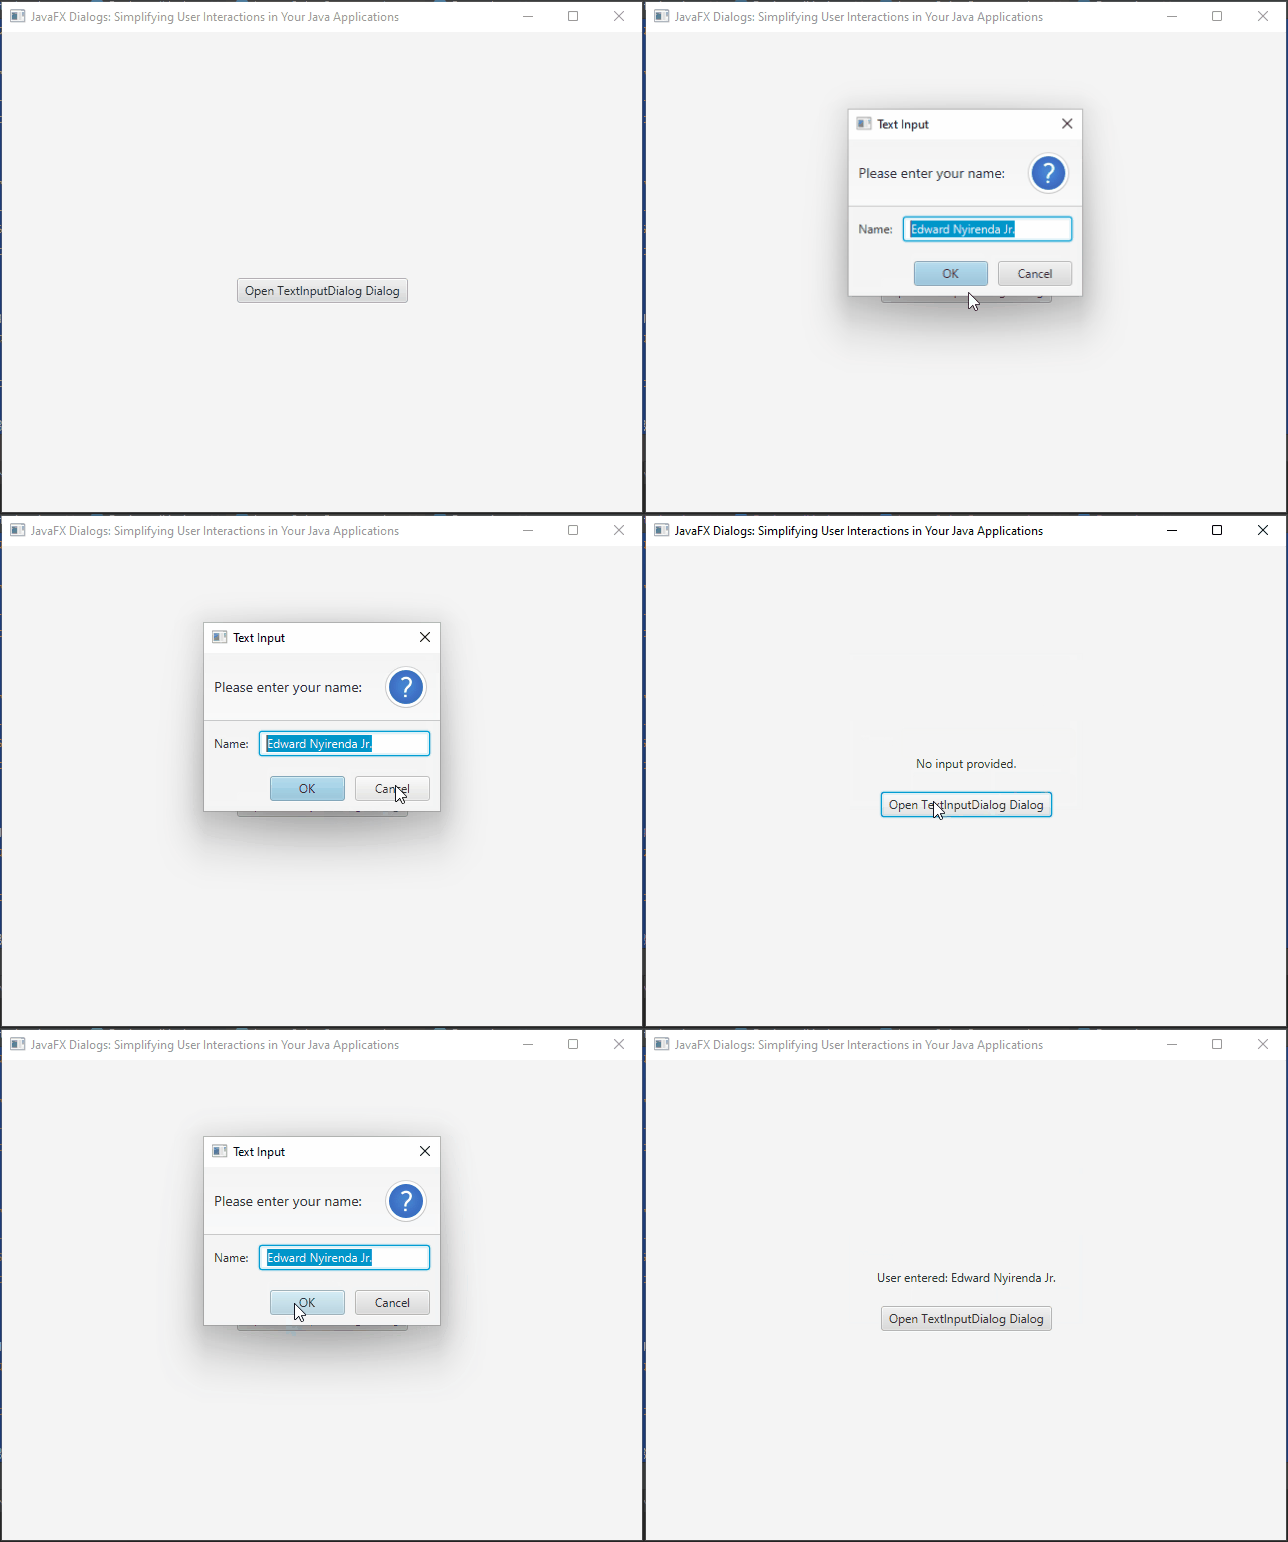
Handling Cancel Button
You can handle the scenario when the user clicks the “Cancel” button in the TextInputDialog. By default, if the user cancels, the result of the dialog will be null. You can add a check for null and handle the case accordingly:
import javafx.application.Application;
import javafx.event.ActionEvent;
import javafx.geometry.Pos;
import javafx.scene.Scene;
import javafx.scene.control.Button;
import javafx.scene.control.Label;
import javafx.scene.control.TextInputDialog;
import javafx.scene.layout.*;
import javafx.stage.Stage;

import java.util.Optional;

public class Main extends Application {

    private final BorderPane parent = new BorderPane();

    private Label label;

    @Override
    public void start(Stage stage) throws Exception {
        this.setupStage(stage);
    }

    @Override
    public void init() throws Exception {
        super.init();
        this.buildUI();
    }

    private void buildUI() {

        this.label = new Label();

        Button button = new Button("Open TextInputDialog Dialog");

        button.setOnAction(this::openDialog);

        VBox vBox= new VBox(20, this.label, button);
        vBox.setAlignment(Pos.CENTER);

        this.parent.setCenter(vBox);

    }

    private void openDialog(ActionEvent actionEvent) {

        // Create TextInputDialog and set default value
        TextInputDialog dialog = new TextInputDialog("Edward Nyirenda Jr.");

        dialog.setTitle("Text Input");

        dialog.setHeaderText("Please enter your name:");

        dialog.setContentText("Name:");

        // Get the result of the dialog (user input) and display it
        Optional<String> name = dialog.showAndWait();

        if(name.isPresent()) {

            this.label.setText("User entered: " + name.get());

        } else {

            this.label.setText("No input provided.");

        }

    }

    private void setupStage(Stage stage) {

        Scene scene = new Scene(this.parent, 640.0, 480.0);

        // Set the stage title
        stage.setTitle("JavaFX Dialogs: Simplifying User Interactions in Your Java Applications");

        // Set the stage scene
        stage.setScene(scene);

        // Center the stage on the screen
        stage.centerOnScreen();

        // Show the stage on the screen
        stage.show();

    }

}
Choice Dialog
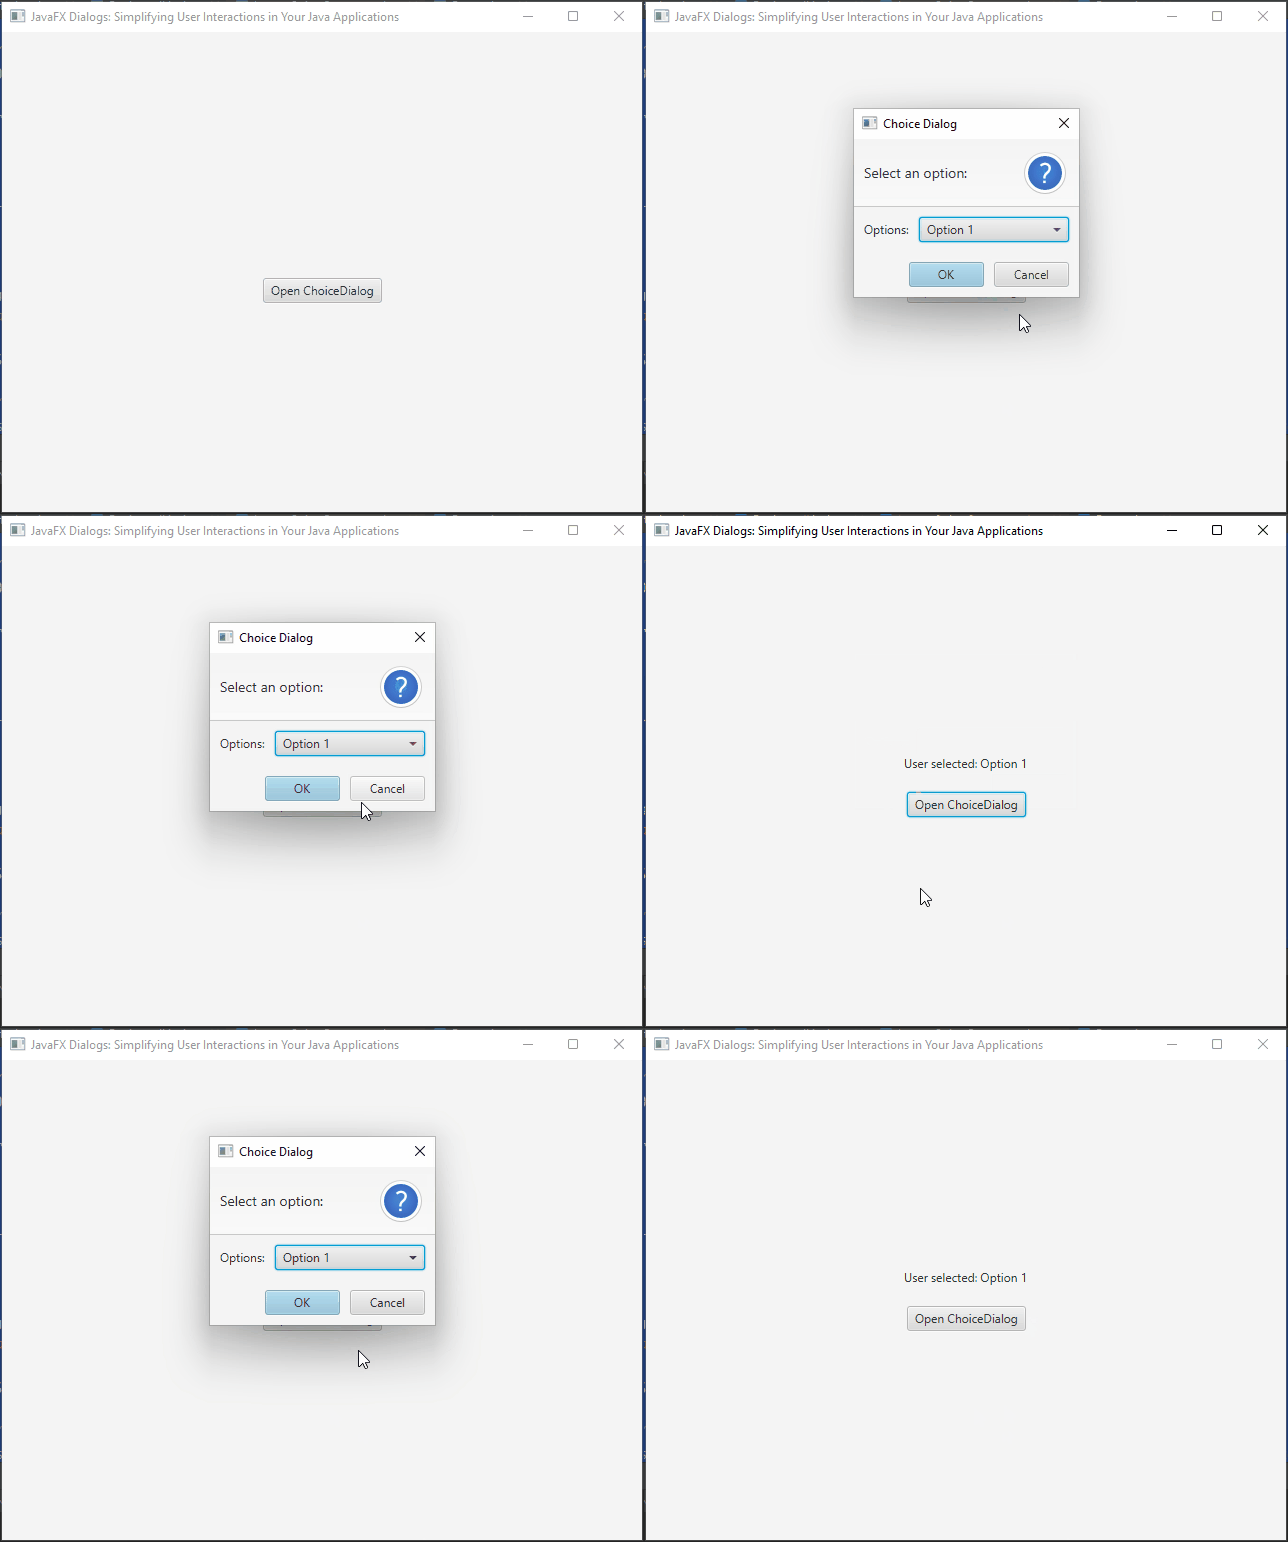
JavaFX provides the ChoiceDialog class, which allows developers to present users with a list of choices and retrieve their selected option. ChoiceDialog is an excellent tool for scenarios where users need to make decisions from a predefined set of options.
Creating a Basic ChoiceDialog
import javafx.application.Application;
import javafx.event.ActionEvent;
import javafx.geometry.Pos;
import javafx.scene.Scene;
import javafx.scene.control.Button;
import javafx.scene.control.ChoiceDialog;
import javafx.scene.control.Label;
import javafx.scene.layout.*;
import javafx.stage.Stage;

import java.util.ArrayList;
import java.util.List;
import java.util.Optional;

public class Main extends Application {

    private final BorderPane parent = new BorderPane();

    private Label label;

    @Override
    public void start(Stage stage) throws Exception {
        this.setupStage(stage);
    }

    @Override
    public void init() throws Exception {
        super.init();
        this.buildUI();
    }

    private void buildUI() {

        this.label = new Label();

        Button button = new Button("Open ChoiceDialog");

        button.setOnAction(this::openDialog);

        VBox vBox= new VBox(20, this.label, button);
        vBox.setAlignment(Pos.CENTER);

        this.parent.setCenter(vBox);

    }

    private void openDialog(ActionEvent actionEvent) {

        List<String> choices = new ArrayList<>();

        choices.add("Option 1");
        choices.add("Option 2");
        choices.add("Option 3");

        ChoiceDialog<String> dialog = new ChoiceDialog<>("Option 1", choices);

        dialog.setTitle("Choice Dialog");
        dialog.setHeaderText("Select an option:");
        dialog.setContentText("Options:");

        // Get the result of the dialog (user selection) and display it
        Optional<String> result = dialog.showAndWait();

        result.ifPresent(choice -> {

            this.label.setText("User selected: " + choice);

        });

    }

    private void setupStage(Stage stage) {

        Scene scene = new Scene(this.parent, 640.0, 480.0);

        // Set the stage title
        stage.setTitle("JavaFX Dialogs: Simplifying User Interactions in Your Java Applications");

        // Set the stage scene
        stage.setScene(scene);

        // Center the stage on the screen
        stage.centerOnScreen();

        // Show the stage on the screen
        stage.show();

    }

}
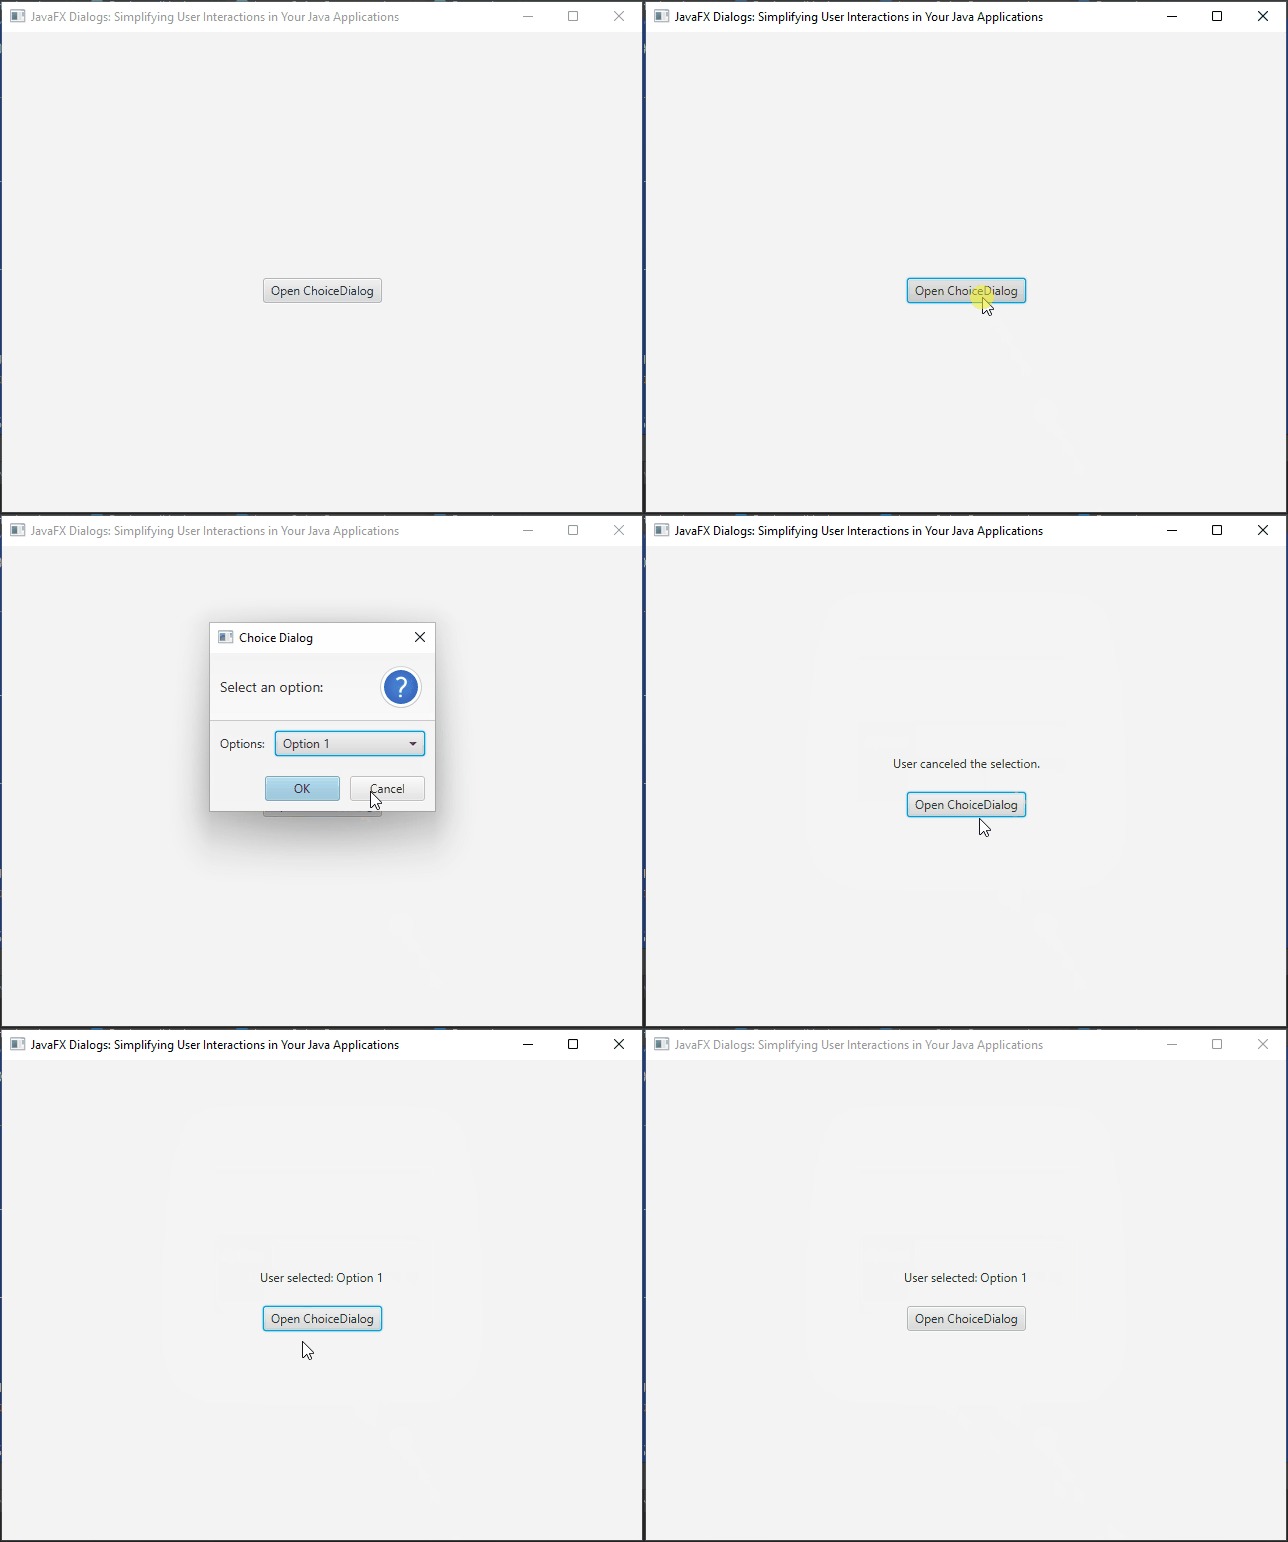
Handling User Cancellation
You can handle the scenario when the user cancels the ChoiceDialog. By default, if the user cancels, the result of the dialog will be empty. You can check for the presence of a result and handle the case accordingly:
import javafx.application.Application;
import javafx.event.ActionEvent;
import javafx.geometry.Pos;
import javafx.scene.Scene;
import javafx.scene.control.Button;
import javafx.scene.control.ChoiceDialog;
import javafx.scene.control.Label;
import javafx.scene.layout.*;
import javafx.stage.Stage;

import java.util.ArrayList;
import java.util.List;
import java.util.Optional;

public class Main extends Application {

    private final BorderPane parent = new BorderPane();

    private Label label;

    @Override
    public void start(Stage stage) throws Exception {
        this.setupStage(stage);
    }

    @Override
    public void init() throws Exception {
        super.init();
        this.buildUI();
    }

    private void buildUI() {

        this.label = new Label();

        Button button = new Button("Open ChoiceDialog");

        button.setOnAction(this::openDialog);

        VBox vBox= new VBox(20, this.label, button);
        vBox.setAlignment(Pos.CENTER);

        this.parent.setCenter(vBox);

    }

    private void openDialog(ActionEvent actionEvent) {

        List<String> choices = new ArrayList<>();

        choices.add("Option 1");
        choices.add("Option 2");
        choices.add("Option 3");

        ChoiceDialog<String> dialog = new ChoiceDialog<>("Option 1", choices);

        dialog.setTitle("Choice Dialog");
        dialog.setHeaderText("Select an option:");
        dialog.setContentText("Options:");

        // Get the result of the dialog (user selection) and display it
        Optional<String> result = dialog.showAndWait();

        if (result.isPresent()) {

            this.label.setText("User selected: " + result.get());

        } else {

            this.label.setText("User canceled the selection.");

        }

    }

    private void setupStage(Stage stage) {

        Scene scene = new Scene(this.parent, 640.0, 480.0);

        // Set the stage title
        stage.setTitle("JavaFX Dialogs: Simplifying User Interactions in Your Java Applications");

        // Set the stage scene
        stage.setScene(scene);

        // Center the stage on the screen
        stage.centerOnScreen();

        // Show the stage on the screen
        stage.show();

    }

}
Using Custom Data Types
You can also use custom data types with ChoiceDialog, allowing users to select complex objects. In this example, we will use the Pair class from javafx.util to present name-value pairs to the user:
import javafx.application.Application;
import javafx.event.ActionEvent;
import javafx.geometry.Pos;
import javafx.scene.Scene;
import javafx.scene.control.Button;
import javafx.scene.control.ChoiceDialog;
import javafx.scene.control.Label;
import javafx.scene.layout.*;
import javafx.stage.Stage;
import javafx.util.Pair;

import java.util.ArrayList;
import java.util.List;
import java.util.Optional;

public class Main extends Application {

    private final BorderPane parent = new BorderPane();

    private Label label;

    @Override
    public void start(Stage stage) throws Exception {
        this.setupStage(stage);
    }

    @Override
    public void init() throws Exception {
        super.init();
        this.buildUI();
    }

    private void buildUI() {

        this.label = new Label();

        Button button = new Button("Open ChoiceDialog");

        button.setOnAction(this::openDialog);

        VBox vBox= new VBox(20, this.label, button);
        vBox.setAlignment(Pos.CENTER);

        this.parent.setCenter(vBox);

    }

    private void openDialog(ActionEvent actionEvent) {

        List<Pair<String, Integer>> choices = new ArrayList<>();

        choices.add(new Pair<>("Option 1", 1));
        choices.add(new Pair<>("Option 2", 2));
        choices.add(new Pair<>("Option 3", 3));

        ChoiceDialog<Pair<String, Integer>> dialog = new ChoiceDialog<>(choices.get(0), choices);

        dialog.setTitle("Choice Dialog");
        dialog.setHeaderText("Select an option:");
        dialog.setContentText("Options:");

        // Get the result of the dialog (user selection) and display it
        Optional<Pair<String, Integer>> result = dialog.showAndWait();

        result.ifPresent(choice -> {
            this.label.setText("User selected: " + choice.getKey() + " (Value: " + choice.getValue() + ")");
        });

    }

    private void setupStage(Stage stage) {

        Scene scene = new Scene(this.parent, 640.0, 480.0);

        // Set the stage title
        stage.setTitle("JavaFX Dialogs: Simplifying User Interactions in Your Java Applications");

        // Set the stage scene
        stage.setScene(scene);

        // Center the stage on the screen
        stage.centerOnScreen();

        // Show the stage on the screen
        stage.show();

    }

}
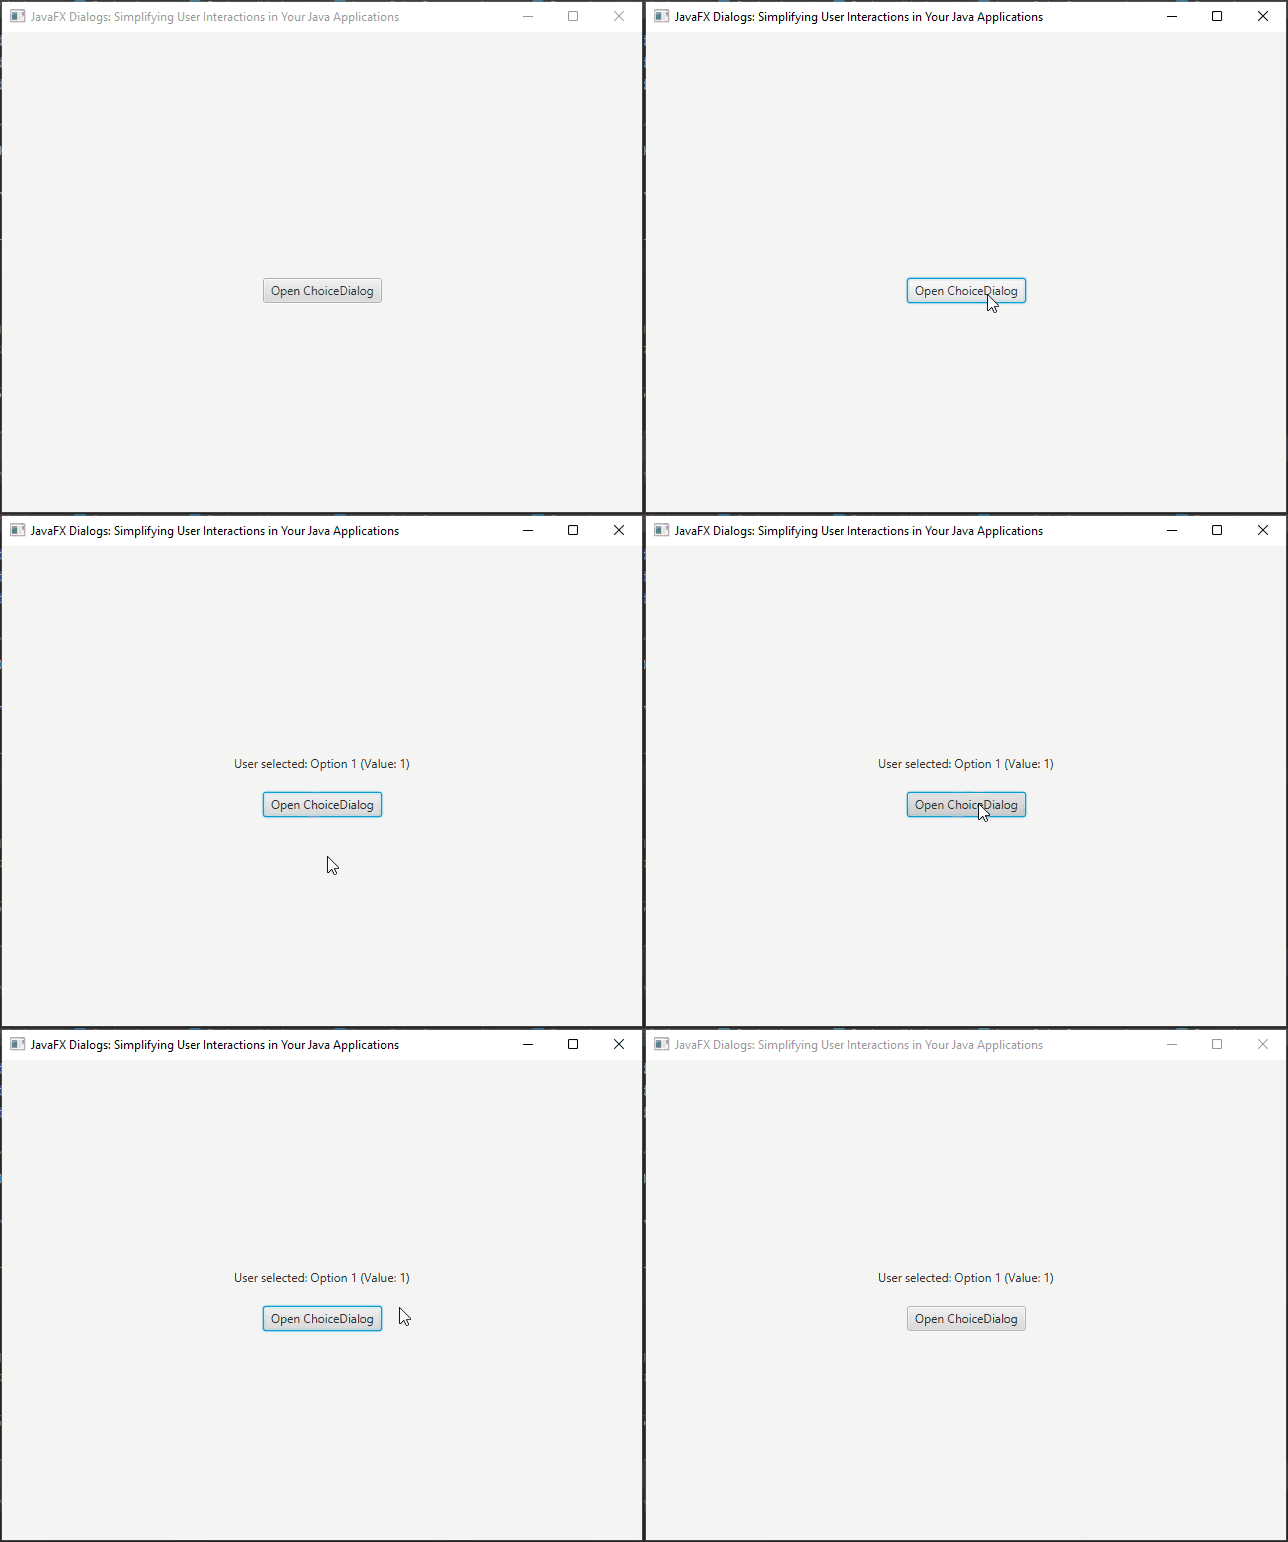
It’s important to note when using ChoiceDialog with custom data types, the string representation of the objects will be displayed as options
Conclusion
In this article, we explored the power and versatility of JavaFX Dialogs in simplifying user interactions within Java applications. JavaFX provides a range of built-in Dialog subclasses, including Alert, TextInputDialog, and ChoiceDialog, which cater to various common user interaction scenarios such as displaying messages, capturing user input, and presenting choices.
We started by demonstrating how to use different types of built-in Alert dialogs for presenting information, warnings, errors, and obtaining user confirmations. These dialogs enable developers to effectively communicate with users and ensure a smooth user experience.
Next, we delved into TextInputDialog, which allows developers to capture textual input from users. By utilizing this class, we can easily prompt users to provide their names, addresses, or any other custom information required for our applications.
Furthermore, we explored ChoiceDialog, a powerful tool for presenting users with a list of choices. This simplifies the process of allowing users to select options from a predefined set, enhancing application interactivity.
In conclusion, JavaFX Dialogs provide an essential toolkit for simplifying user interactions within Java applications. From built-in dialogs to the ability to create custom dialogs, JavaFX empowers developers to craft intuitive and interactive user interfaces. By effectively using these features, developers can enhance user engagement, improve user satisfaction, and create exceptional Java applications. With the knowledge gained from this article, developers are well-equipped to incorporate JavaFX Dialogs into their projects and deliver exceptional user experiences.
Related Links:
I hope you found this code informative and useful. If you would like to receive more content, please consider subscribing to our newsletter!


