In the world of mathematics, visualization plays a pivotal role in understanding complex concepts and solving intricate problems. One effective way to enhance mathematical understanding is by creating a graphical calculator. In this article, we will explore how to build a graphical calculator using JavaFX, a powerful framework for building interactive user interfaces. We will also use the org.mariuszgromada.math.mxparser library to handle mathematical expressions. By the end of this article, you will have a fully functional graphical calculator at your fingertips.

with hands-on learning.
get the skills and confidence to land your next move.
The Power of Visualization
Visualization plays a pivotal role in comprehending mathematical concepts. It transforms abstract numbers and equations into tangible representations, making it easier for students, engineers, and mathematicians to grasp complex ideas. With a graphical calculator, you can visualize functions, equations, and mathematical relationships in real-time, enhancing your understanding of mathematical principles.
The Backbone
To create our graphical calculator, we’ll need a robust mathematical expression parser. Fortunately, we can use the org.mariuszgromada.math.mxparser library for this purpose. mxparser is an open-source Java library that simplifies the evaluation of mathematical expressions. It can parse complex expressions, handle variables, and perform a wide range of mathematical operations.
You can download the mxparser library from the official website MathParser or include it as a Maven dependency in your project. Once you have it set up, you’re ready to start building your graphical calculator.
Building a Basic Calculator
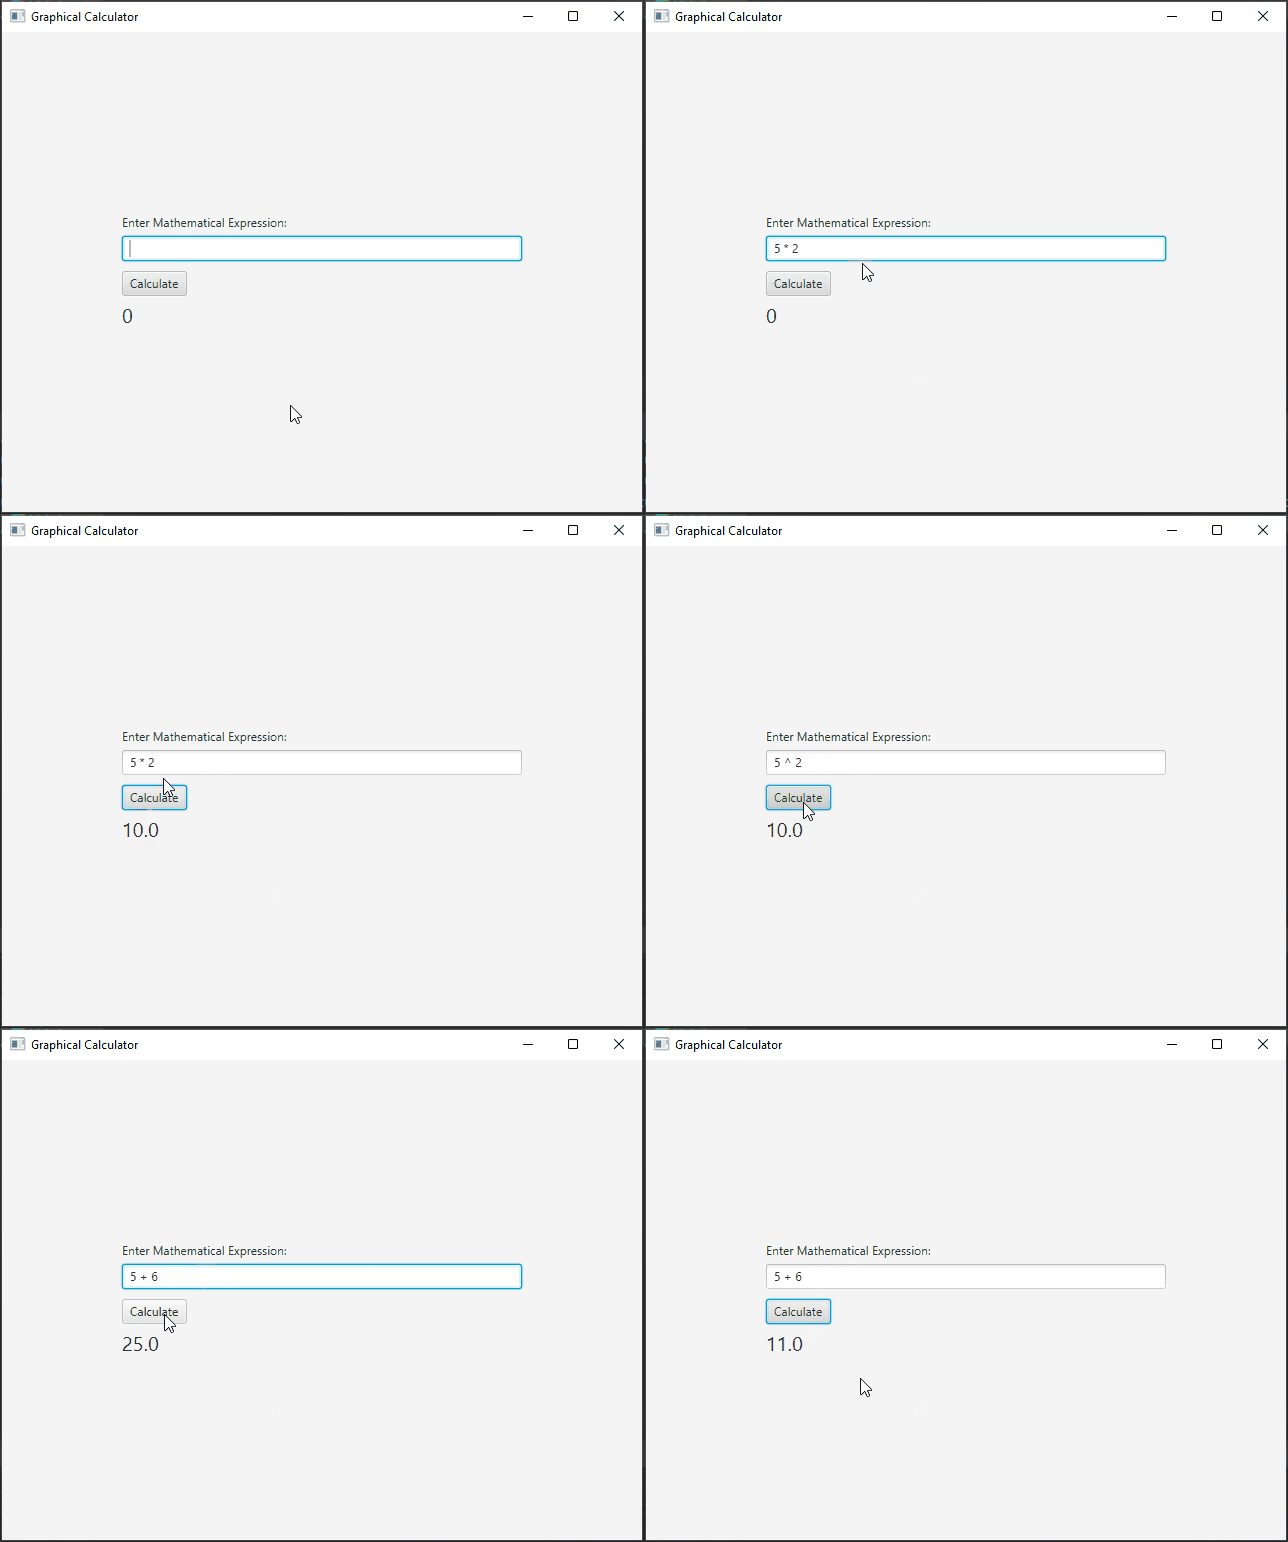
To start our journey into mathematical visualization, let’s create a basic calculator using JavaFX. We’ll build a graphical user interface (GUI) that allows users to input mathematical expressions and see the results. Here’s the code for our basic calculator:
import javafx.application.Application;
import javafx.geometry.Pos;
import javafx.scene.Scene;
import javafx.scene.control.Button;
import javafx.scene.control.Label;
import javafx.scene.control.TextField;
import javafx.scene.layout.*;
import javafx.scene.text.Font;
import javafx.stage.Stage;
import org.mariuszgromada.math.mxparser.Expression;

public class Main extends Application {

    // The parent layout manager
    private final StackPane parent = new StackPane();

    @Override
    public void init() throws Exception {
        super.init();
        buildUI();
    }

    private void buildUI() {

        // Create labels, text field, and button
        Label prompt = new Label("Enter Mathematical Expression:");
        TextField expression = new TextField();
        Button calculate = new Button("Calculate");

        Label result = new Label("0");
        result.setFont(Font.font(20.0));

        // Define an action event handler for the "Calculate" button
        calculate.setOnAction(event -> this.onCalculate(expression, result));

        // Create a vertical layout container
        VBox container = new VBox(
                10,
                new VBox(5, prompt, expression),  // Input label and text field
                new VBox(5, calculate, result)   // Calculate button and result label
        );

        container.setMaxWidth(400.0);
        container.setAlignment(Pos.CENTER);

        // Add the container to the parent StackPane
        this.parent.getChildren().add(container);
    }

    private void onCalculate(TextField expressionTextField, Label resultLabel) {

        String expressionText = expressionTextField.getText();

        // Use the mxparser library to evaluate the mathematical expression
        Expression expression = new Expression(expressionText);
        double result = expression.calculate();

        // Display the result in the resultLabel
        resultLabel.setText(String.valueOf(result));

    }

    @Override
    public void start(Stage stage) throws Exception {

        // Create a scene with the StackPane as the root
        Scene scene = new Scene(parent, 640, 480);

        // Set the stage title
        stage.setTitle("Graphical Calculator");

        // Set the scene for the stage
        stage.setScene(scene);

        // Center the stage on the screen
        stage.centerOnScreen();

        // Display the stage
        stage.show();
    }

}
In this code, we create a JavaFX application with a text field for input, a button to calculate the result, and a label to display the output. When the “Calculate” button is clicked, we use org.mariuszgromada.math.mxparser.Expression to evaluate the mathematical expression entered by the user.
Adding Graph Plotting Functionality
Now that we have a basic calculator up and running, let’s take it a step further by adding the ability to plot mathematical functions. We’ll use JavaFX’s charting capabilities to accomplish this. Here’s the code to extend our calculator:
import javafx.application.Application;
import javafx.geometry.Insets;
import javafx.geometry.Pos;
import javafx.scene.Scene;
import javafx.scene.chart.LineChart;
import javafx.scene.chart.NumberAxis;
import javafx.scene.chart.XYChart;
import javafx.scene.control.Button;
import javafx.scene.control.Label;
import javafx.scene.control.TextField;
import javafx.scene.layout.*;
import javafx.stage.Stage;
import org.mariuszgromada.math.mxparser.Argument;
import org.mariuszgromada.math.mxparser.Expression;

public class Main extends Application {

    // The parent layout manager
    private final BorderPane parent = new BorderPane();

    LineChart<Number, Number> lineChart;

    @Override
    public void init() throws Exception {
        super.init();
        buildUI();
    }

    private void buildUI() {

        // Create chart for graph plotting
        NumberAxis xAxis = new NumberAxis();
        NumberAxis yAxis = new NumberAxis();

        this.lineChart = new LineChart<>(xAxis, yAxis);
        this.lineChart.setTitle("Function Plot");

        // Add the chart to the center of the parent layout
        this.parent.setCenter(this.lineChart);

        Label prompt = new Label("Enter Mathematical Expression: ");
        TextField expression = new TextField();

        Button calculate = new Button("Calculate");

        // Define an action event handler for the "Calculate" button
        calculate.setOnAction(actionEvent -> this.plotGraph(expression.getText()));

        // Create a horizontal container for input elements
        HBox container = new HBox(5, prompt, expression, calculate);

        container.setPadding(new Insets(7.0));
        container.setAlignment(Pos.CENTER);

        // Add the container with input elements to the bottom of the parent layout
        this.parent.setBottom(container);

    }

    private void plotGraph(String expressionText) {

        Argument xargument = new Argument("x");
        Expression expression = new Expression(expressionText, xargument);

        // Clear previous data on the chart
        lineChart.getData().clear();

        // Create a new series for the graph
        XYChart.Series<Number, Number> series = new XYChart.Series<>();
        series.setName(expressionText);

        // Populate the series with data points
        for (double x = -10; x <= 10; x += 0.1) {

            xargument.setArgumentValue(x);

            double y = expression.calculate();

            series.getData().add(new XYChart.Data<>(x, y));
        }

        // Add the series to the chart
        lineChart.getData().add(series);
    }

    @Override
    public void start(Stage stage) throws Exception {

        // Create a scene with the BorderPane as the root
        Scene scene = new Scene(parent, 640, 480);

        // Set the stage title
        stage.setTitle("Graphical Calculator");

        // Set the scene for the stage
        stage.setScene(scene);

        // Center the stage on the screen
        stage.centerOnScreen();

        // Display the stage
        stage.show();
    }
}
In this extended code, we’ve added a LineChart to the UI, which will display the graph of the entered mathematical expression. The plotGraph method calculates and plots the graph for a given expression. We use a LineChart with an XYChart.Series to display the data points.
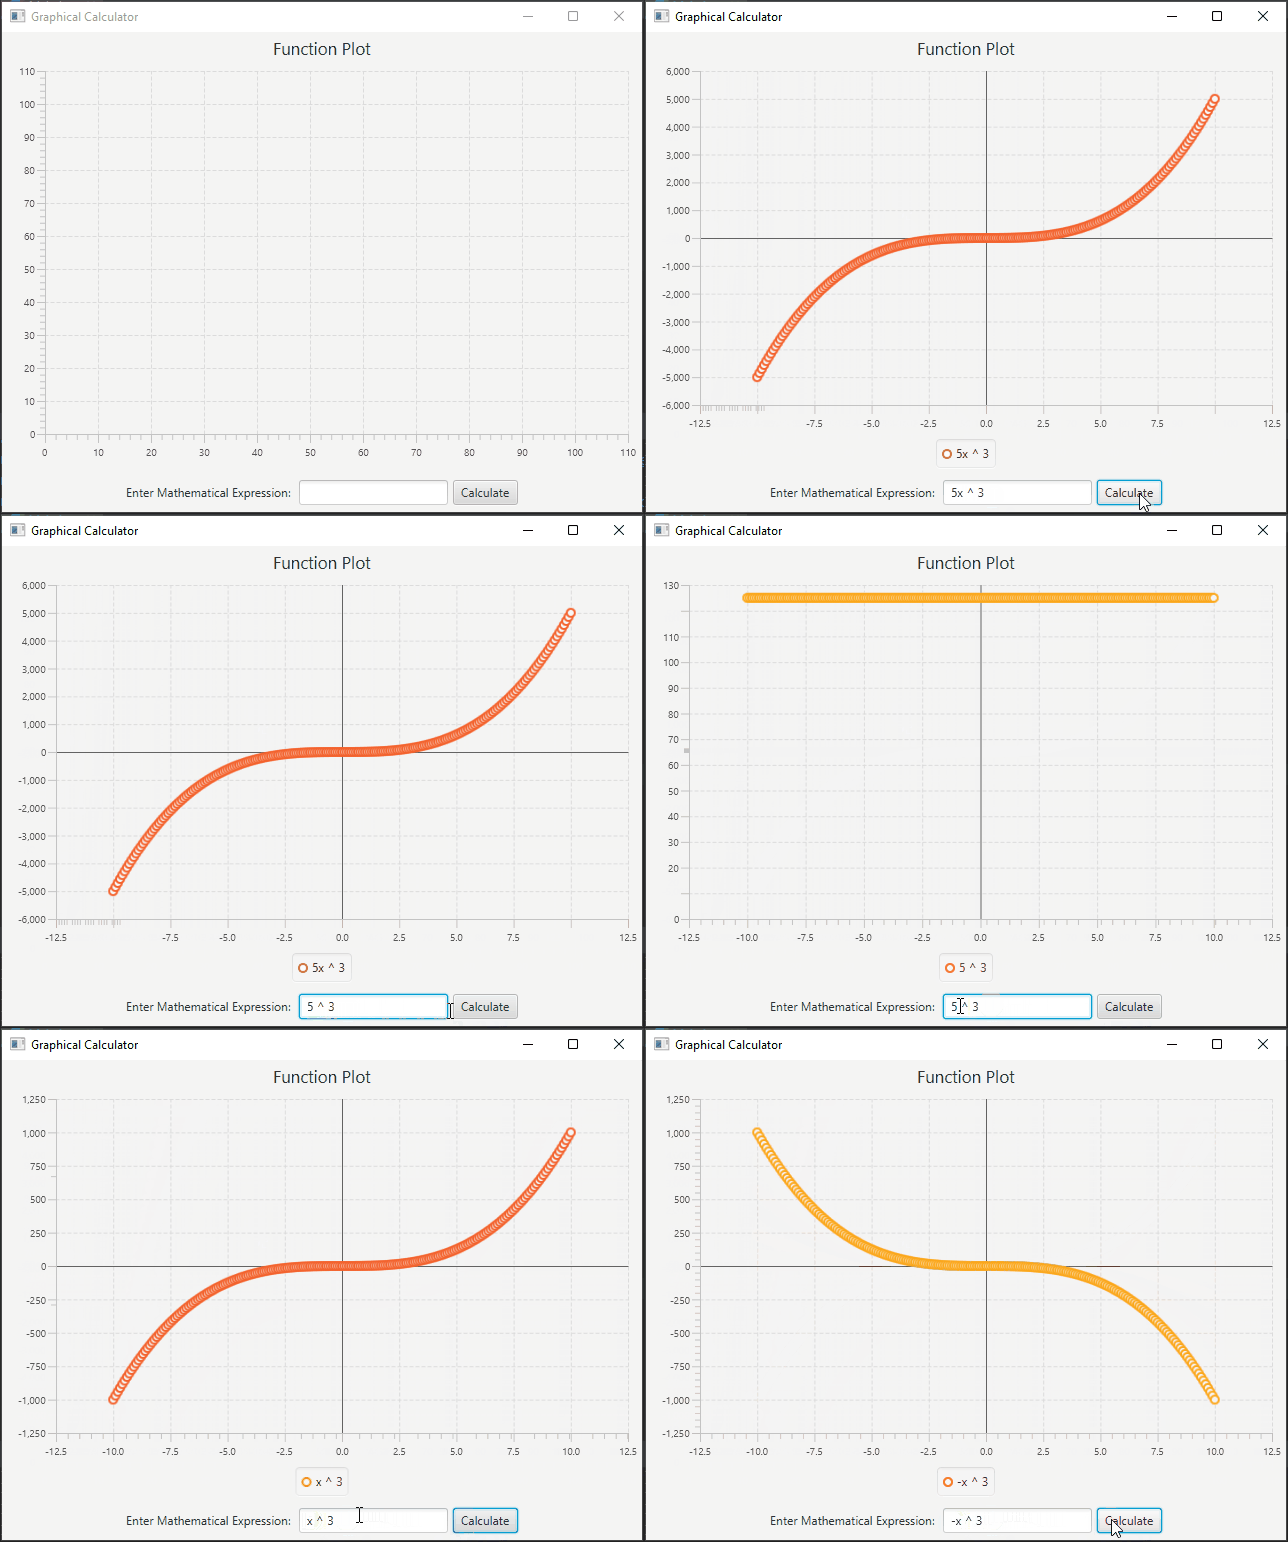
Now, when you enter a mathematical expression in the input field and click the “Calculate” button, the calculator will not only compute the result but also plot the graph of the function.
Conclusion
In this article, we explored the world of mathematical visualization with JavaFX by building a graphical calculator. We utilized the org.mariuszgromada.math.mxparser library to handle mathematical expressions and added the capability to plot mathematical functions. With this versatile tool, you can not only perform complex calculations but also visualize mathematical concepts with ease.
As you continue your journey into the world of mathematics and programming, remember that the possibilities for exploration and creativity are limitless. Whether you’re a student, a teacher, or simply a math enthusiast, a graphical calculator like the one we’ve created can be a valuable asset in your mathematical toolkit.
I hope you found this article informative and useful. If you would like to receive more content, please consider subscribing to our newsletter.
