JavaFX, a popular framework for creating graphical user interfaces in Java, provides a wide range of visual effects to enhance the user experience of your applications. One such effect is the BoxBlur effect, which can add a captivating touch to your images or UI elements. In this article, we will explore the JavaFX BoxBlur effect, its applications, and create an example application to demonstrate its functionality.

with hands-on learning.
get the skills and confidence to land your next move.
What is the BoxBlur Effect?
The BoxBlur Effect, as the name suggests, is a blurring effect that is applied to JavaFX nodes, such as images and shapes. It simulates the appearance of an image being viewed through a frosted or semi-transparent glass. This effect can be customized to achieve varying levels of blur, making it a powerful tool for enhancing the visual appeal of your JavaFX applications.
Understanding the BoxBlur Parameters
Before we dive into the practical application of the BoxBlur Effect, let’s familiarize ourselves with its essential parameters:
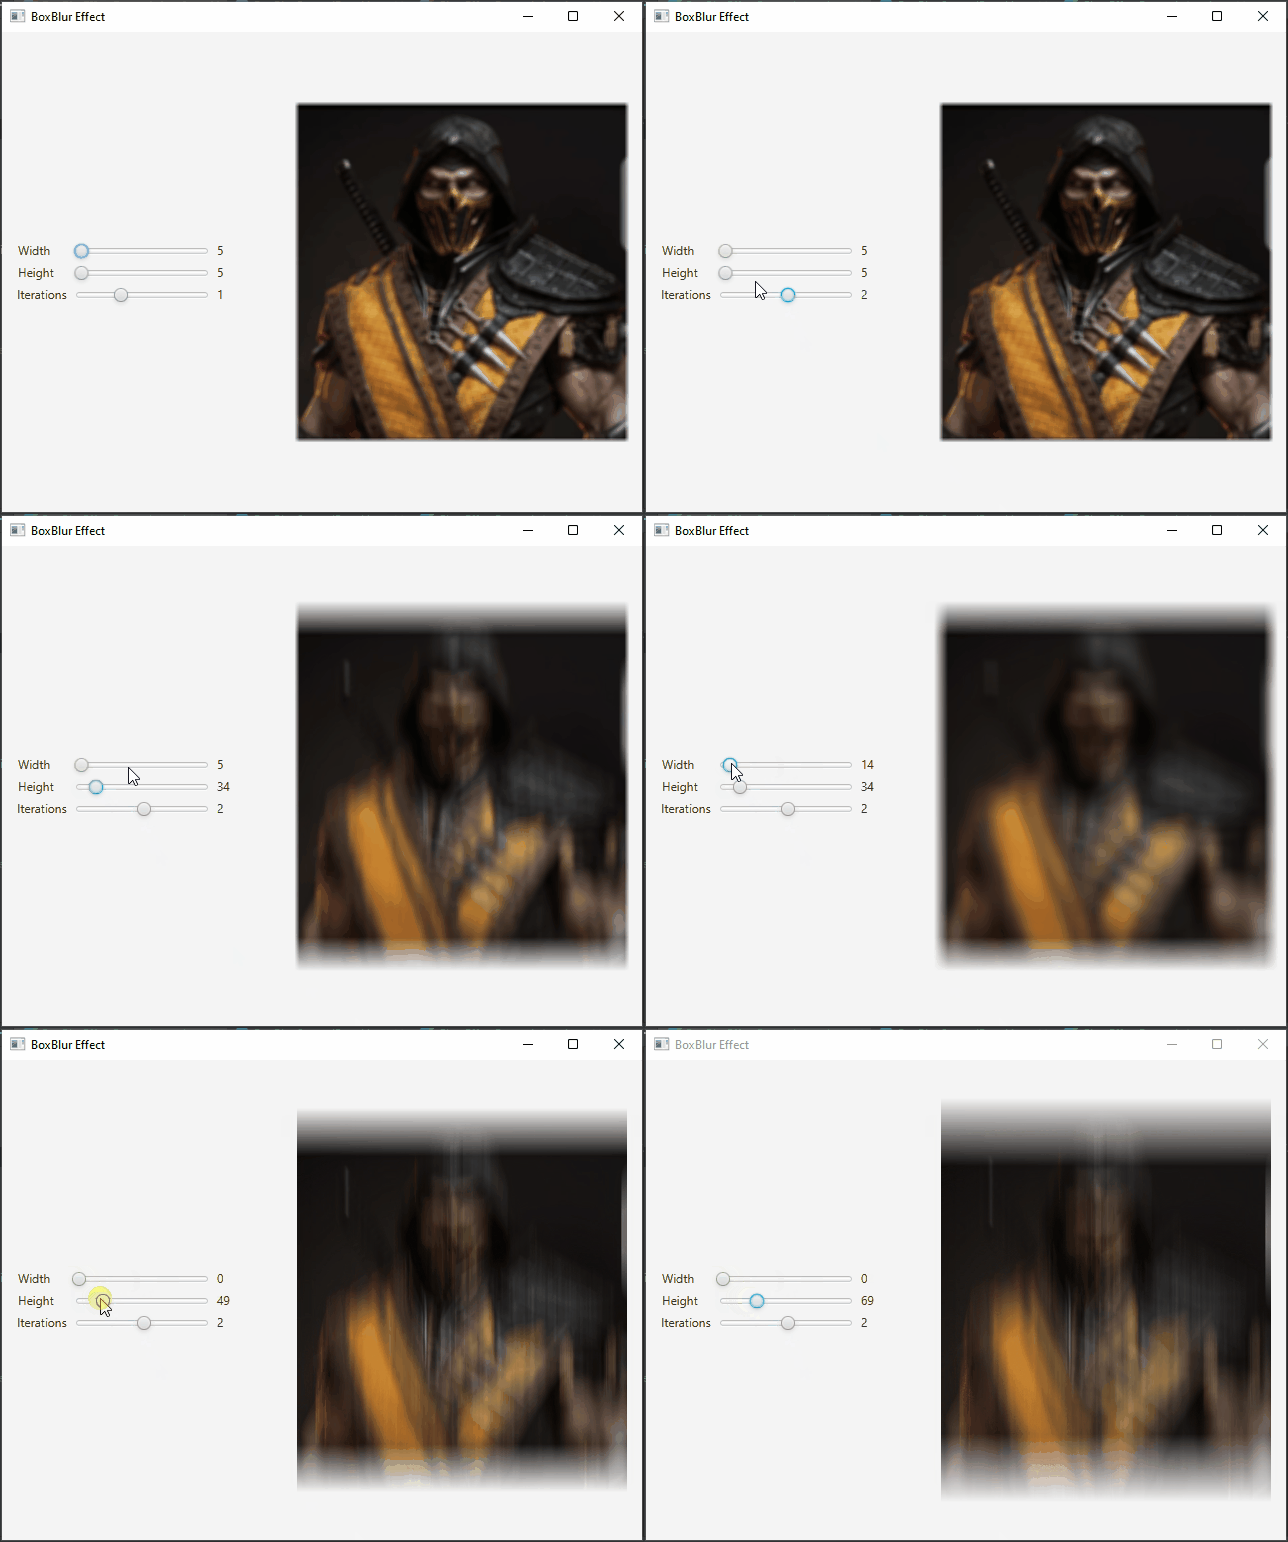
- width and height: These parameters specify the width and height ((0.0 – 255.0)) of the blur kernel. The larger the values, the more pronounced the blur will be.
- iterations: This parameter determines the number of times (1 – 3) the blur operation is applied to the node. A higher number of iterations results in a more intense blur.
Creating a BoxBlurEffect Application
To demonstrate the BoxBlur effect, we’ve created a simple JavaFX application. In this example, we load an image and apply the BoxBlur effect to it. Users can interact with sliders to adjust the properties of the blur effect in real-time. Here’s the code for the application:
import javafx.application.Application;
import javafx.geometry.Insets;
import javafx.geometry.Pos;
import javafx.scene.Scene;
import javafx.scene.effect.BoxBlur;
import javafx.scene.image.Image;
import javafx.scene.image.ImageView;
import javafx.scene.layout.BorderPane;
import javafx.stage.Stage;

public class BoxBlurEffectExampleApp extends Application {

    private static final double WIDTH = 640;
    private static final double HEIGHT = 480;

    /* The parent layout manager */
    private final BorderPane parent = new BorderPane();

    @Override
    public void start(Stage stage) throws Exception {

        Scene scene = new Scene(this.parent, WIDTH, HEIGHT);

        // Sets the stage title
        stage.setTitle("BoxBlur Effect");

        // Set the stage scene
        stage.setScene(scene);

        // Center stage on screen
        stage.centerOnScreen();

        // Show stage on screen
        stage.show();

    }

    @Override
    public void init() throws Exception {
        super.init();

        Image image = new Image("scorpion.jpg");

        ImageView imageView = new ImageView(image);
        imageView.setPreserveRatio(true);
        imageView.setFitWidth(330);

        // Create the BoxBlur Effect
        BoxBlur boxBlur = new BoxBlur();

        BoxBlurControlPanel colorAdjustControlPanel = new BoxBlurControlPanel(boxBlur);

        // Set the BoxBlur effect on the ImageView
        imageView.setEffect(boxBlur);

        /* Add the ImageView to the BorderPane right region */
        this.parent.setRight(imageView);
        BorderPane.setAlignment(imageView,Pos.CENTER);
        BorderPane.setMargin(imageView, new Insets(15));

        this.parent.setLeft(colorAdjustControlPanel);

    }

}
In this example, we load an image (“scorpion.jpg”) and display it on the right side of the application window. On the left side, we have a control panel containing sliders that allow users to adjust the BoxBlur effect parameters.
The BoxBlurControlPanel Class
The BoxBlurControlPanel class is responsible for creating the sliders and binding them to the BoxBlur effect properties. Here’s the code for the control panel class:
import javafx.geometry.Insets;
import javafx.geometry.Pos;
import javafx.scene.control.Label;
import javafx.scene.control.Slider;
import javafx.scene.effect.BoxBlur;
import javafx.scene.layout.HBox;
import javafx.scene.layout.VBox;

public class BoxBlurControlPanel extends VBox {

    public BoxBlurControlPanel(BoxBlur boxBlur) {
        super(5);

        // Create sliders for adjusting BoxBlur properties
        Slider width = new Slider(0, 255, 5);
        Slider height = new Slider(0, 255, 5);
        Slider iterations = new Slider(0, 3, 1);

        // Bind the sliders to BoxBlur properties
        boxBlur.widthProperty().bind(width.valueProperty());
        boxBlur.heightProperty().bind(height.valueProperty());
        boxBlur.iterationsProperty().bind(iterations.valueProperty());

        // Create a VBox to arrange Sliders
        this.getChildren().addAll(
                this.createLabeledSlider(width, "Width"),
                this.createLabeledSlider(height, "Height"),
                this.createLabeledSlider(iterations, "Iterations")
        );

        this.setAlignment(Pos.CENTER_LEFT);
        this.setPadding(new Insets(15));

    }

    private HBox createLabeledSlider(Slider slider, String label) {

        Label value = new Label();
        value.setMinWidth(30);

        // Format the slider value with two decimal places
        value.textProperty().bind(slider.valueProperty().asString("%.0f"));

        Label lblLabel = new Label(String.format("%-10s", label));

        // Create the HBox to arrange UI components
        HBox container = new HBox(5, lblLabel, slider, value);
        container.setAlignment(Pos.CENTER);

        return container;

    }

}
The control panel consists of sliders for adjusting the width, height, and number of iterations of the BoxBlur effect. These sliders are bound to the corresponding properties of the BoxBlur effect, allowing real-time updates as users interact with the sliders.
Conclusion
The BoxBlur effect in JavaFX is a versatile tool for adding a blur effect to your user interface elements. In this article, we’ve demonstrated its usage in a sample application and provided the code to create your own BoxBlur effects. You can explore further by applying the BoxBlur effect to different UI elements and experimenting with various parameter values to achieve the desired visual effects in your JavaFX applications.
I hope you found this article informative and useful. If you would like to receive more content, please consider subscribing to our newsletter.
