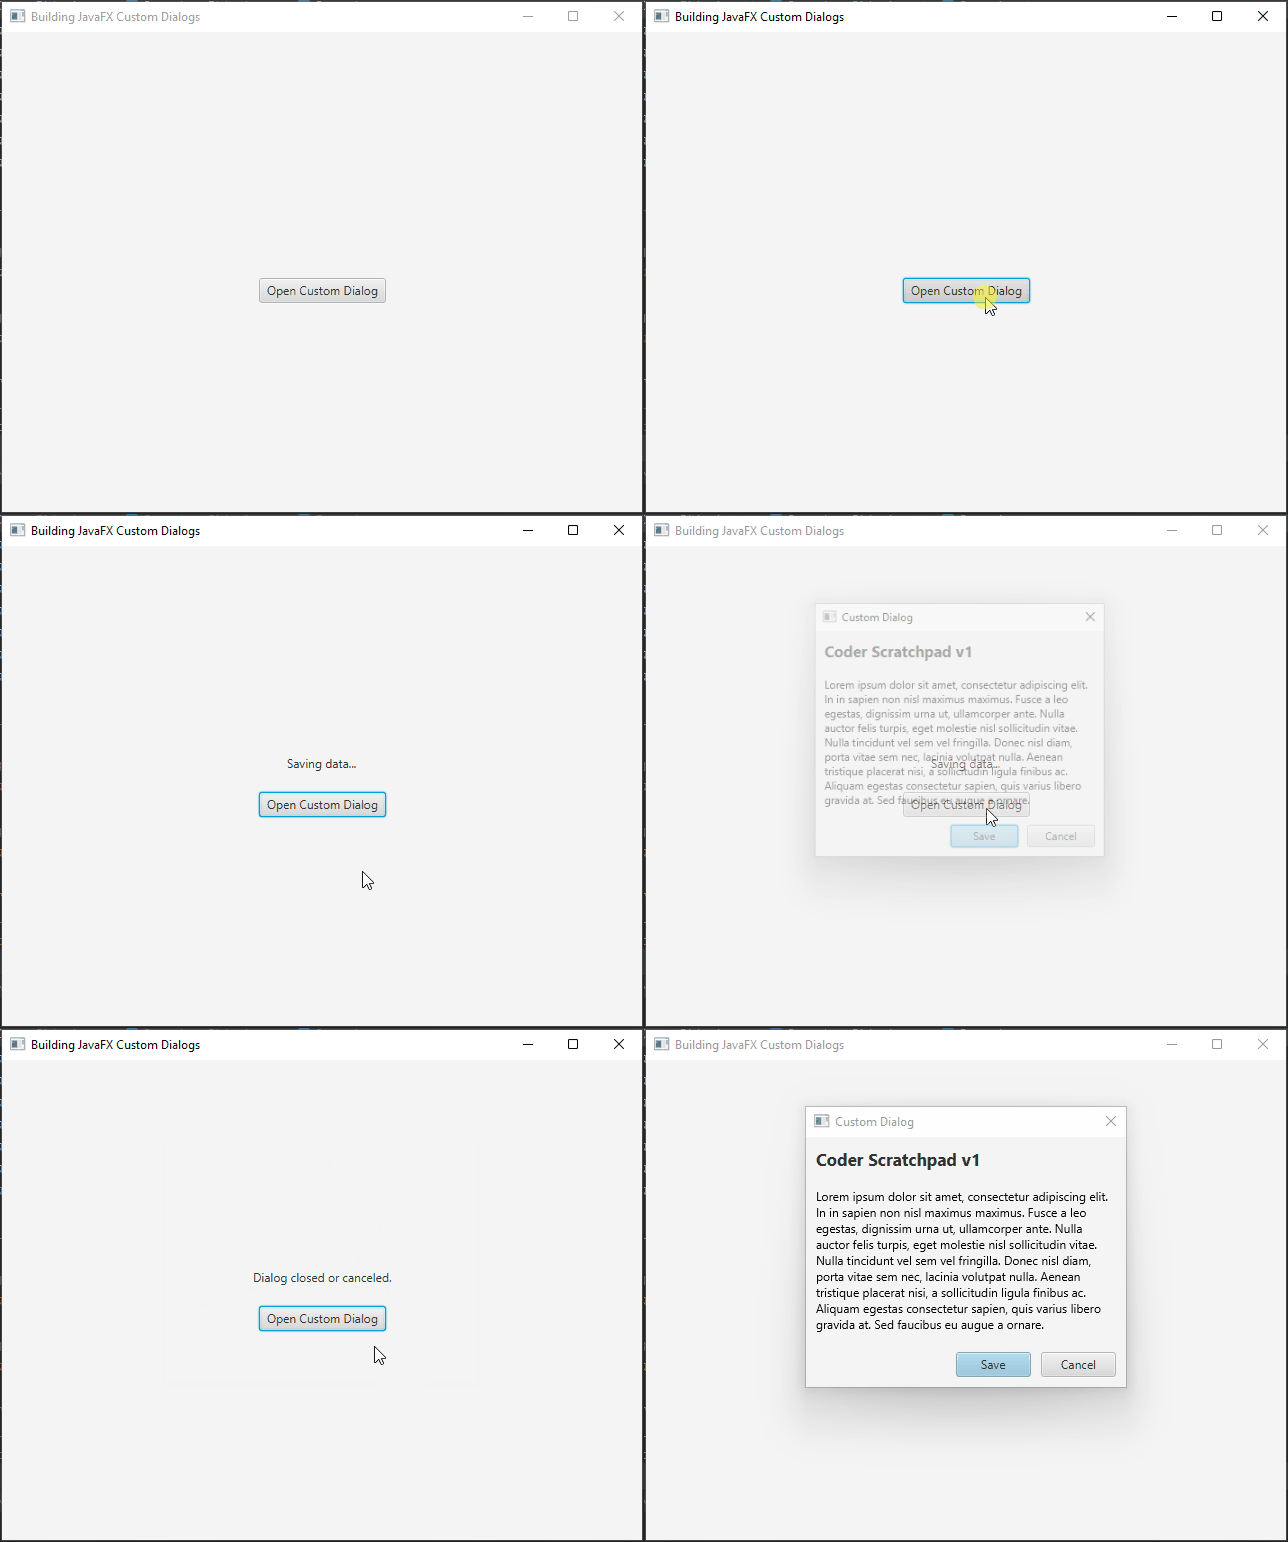
Dialogs are an essential part of any interactive JavaFX application. They allow developers to present important information or prompt users for input in a clean and user-friendly manner. While JavaFX provides standard dialogs like Alert, there are situations where you might need to create custom dialogs to better suit your application’s needs and design.

with hands-on learning.
get the skills and confidence to land your next move.
In this article, we will explore how to build custom dialogs in JavaFX with full code examples to help you create tailored dialog boxes for your JavaFX applications.
Creating the Custom Dialog Class
Let’s start by creating a Java class that will serve as our custom dialog. This class will extend javafx.scene.control.Dialog, and we’ll define the layout, content, and functionality for the custom dialog.
import javafx.scene.control.ButtonBar;
import javafx.scene.control.ButtonType;
import javafx.scene.control.Dialog;
import javafx.scene.control.Label;
import javafx.scene.layout.StackPane;
import javafx.scene.layout.VBox;
import javafx.scene.text.Text;

public class CustomDialog extends Dialog<String> {

    private final ButtonType saveButtonType = new ButtonType("Save", ButtonBar.ButtonData.OK_DONE);

    private final ButtonType cancelButtonType = new ButtonType("Cancel", ButtonBar.ButtonData.CANCEL_CLOSE);

    public CustomDialog() {

        setTitle("Custom Dialog");

        // Set the content of the dialog
        StackPane contentPane = new StackPane();

        contentPane.setPrefSize(300, 200);

        Label label = new Label("Coder Scratchpad v1");
        label.setStyle("-fx-font-weight: bold; -fx-font-size: 17px;");

        Text text = new Text("Lorem ipsum dolor sit amet, consectetur adipiscing elit. " +
                "In in sapien non nisl maximus maximus. " +
                "Fusce a leo egestas, dignissim urna ut, ullamcorper ante. " +
                "Nulla auctor felis turpis, eget molestie nisl sollicitudin vitae. " +
                "Nulla tincidunt vel sem vel fringilla. " +
                "Donec nisl diam, porta vitae sem nec, lacinia volutpat nulla. " +
                "Aenean tristique placerat nisi, a sollicitudin ligula finibus ac. " +
                "Aliquam egestas consectetur sapien, quis varius libero gravida at. " +
                "Sed faucibus eu augue a ornare.");

        text.wrappingWidthProperty().set(300);

        VBox vBox = new VBox(15, label,text);

        contentPane.getChildren().addAll(vBox);

        getDialogPane().setContent(contentPane);

        // Add buttons to the dialog
        getDialogPane().getButtonTypes().addAll(saveButtonType, cancelButtonType);

        // Set the result converter
        setResultConverter(buttonType -> {

            if (buttonType == saveButtonType) {

                // Perform actions when the "Save" button is clicked
                return "Save";

            } else {

                // Perform actions when the "Cancel" button is clicked or the dialog is closed
                return null;

            }

        });

    }

}
Using the Custom Dialog
Now that we have our CustomDialog class, let’s see how we can use it in our JavaFX application.
import javafx.application.Application;
import javafx.event.ActionEvent;
import javafx.geometry.Pos;
import javafx.scene.Scene;
import javafx.scene.control.*;
import javafx.scene.layout.*;
import javafx.stage.Stage;

public class Main extends Application {

    private final BorderPane parent = new BorderPane();

    private Label label;

    @Override
    public void start(Stage stage) throws Exception {
        this.setupStage(stage);
    }

    @Override
    public void init() throws Exception {
        super.init();
        this.buildUI();
    }

    private void buildUI() {

        this.label = new Label();

        Button button = new Button("Open Custom Dialog");

        button.setOnAction(this::openDialog);

        VBox vBox= new VBox(20, this.label, button);
        vBox.setAlignment(Pos.CENTER);

        this.parent.setCenter(vBox);

    }

    private void openDialog(ActionEvent actionEvent) {

        // Create a custom dialog instance
        CustomDialog customDialog = new CustomDialog();

        // Show the custom dialog and wait for the user response
        String result = customDialog.showAndWait().orElse("");

        // Handle the result
        if ("Save".equals(result)) {

            // Perform actions when "Save" is clicked
            this.label.setText("Saving data...");

        } else {

            // Perform actions when "Cancel" is clicked or the dialog is closed
            this.label.setText("Dialog closed or canceled.");

        }

    }

    private void setupStage(Stage stage) {

        Scene scene = new Scene(this.parent, 640.0, 480.0);

        // Set the stage title
        stage.setTitle("Building JavaFX Custom Dialogs");

        // Set the stage scene
        stage.setScene(scene);

        // Center the stage on the screen
        stage.centerOnScreen();

        // Show the stage on the screen
        stage.show();

    }

}
In the Main, we’ve created a simple JavaFX application with a button labeled “Open Custom Dialog.” When this button is clicked, we create an instance of CustomDialog and display it using the showAndWait() method, which will block the UI until the dialog is closed. We then handle the result of the dialog, which is either “Save” if the user clicked the “Save” button or null if the user clicked “Cancel” or closed the dialog.

Conclusion
In this article, we have learned how to build custom dialogs in JavaFX. By creating a custom dialog class that extends javafx.scene.control.Dialog, we can easily define the layout, content, and functionality of our dialogs. This allows us to create customized and user-friendly dialog boxes for our JavaFX applications, enhancing the user experience and improving the overall design of our software.
You can take this concept further by adding more components, validation, and customization to suit your specific application requirements. JavaFX provides a rich set of controls and features that can be integrated into your custom dialogs to make them even more powerful and versatile.
Related Links:
I hope you found this code informative and useful. If you would like to receive more content, please consider subscribing to our newsletter!


