PyQt is a set of Python bindings for the Qt application framework. It allows developers to create powerful cross-platform graphical user interfaces (GUIs) for their Python applications. One of the essential widgets provided by PyQt is QComboBox. QComboBox is a versatile GUI data selection element that provides a dropdown menu with a list of items. In this article, we will explore everything you need to know about PyQt QComboBox.

with hands-on learning.
get the skills and confidence to land your next move.
What is QComboBox?
The QComboBox widget is a combination of a line edit and a drop-down list. It allows users to choose a single item from a list of options by clicking on the drop-down arrow and selecting an item from the list. It is widely used in various GUI applications, especially when dealing with settings, preferences, or selecting from predefined choices.
Installing PyQt
Before getting started, you need to have PyQt installed on your system. You can install it using pip:
pip install pyqt6Creating a Basic QComboBox
Let’s start by creating a simple PyQt application with a QComboBox and a QLabel to display the selected item.
import sys
from PyQt6.QtCore import Qt
from PyQt6.QtWidgets import QApplication, QMainWindow, QWidget, QVBoxLayout, QComboBox, QLabel


# Create a QMainWindow subclass
class AppWindow(QMainWindow):

    def __init__(self, title, width, height, left=100, top=100):
        super().__init__()

        # Set the window title
        self.setWindowTitle(title)

        # Set the window location and size
        self.setGeometry(left, top, width, height)

        # Create a central widget to hold the layout
        self.central_widget = QWidget()
        self.setCentralWidget(self.central_widget)

        # Initialize the user interface
        self.initUI()

    def initUI(self):

        # Create a QVBoxLayout for the central widget
        layout = QVBoxLayout(self.central_widget)

        # Set spacing between widgets
        layout.setSpacing(10)

        # Set the alignment of the layout (optional)
        layout.setAlignment(Qt.AlignmentFlag.AlignCenter)

        # Create a QComboBox
        combo_box = QComboBox()
        combo_box.setFixedWidth(200)

        # Add items to the combo box
        items = ['C', 'C#', 'C++', 'Dart', 'F#', 'Golang', 'Java', 'JavaScript', 'Kotlin']
        combo_box.addItems(items)

        # Set the initial selection
        combo_box.setCurrentIndex(0)

        # Connect the activated signal to the on_activated slot
        combo_box.activated.connect(self.on_activated)

        # Create a QLabel with the initial text
        self.label = QLabel(f'Selected Item: {combo_box.currentText()}')

        # Add the QComboBox and QLabel to the QVBoxLayout
        layout.addWidget(combo_box)
        layout.addWidget(self.label)

    def on_activated(self, index):

        # Get the text of the currently selected item and update the QLabel
        text = self.sender().currentText()
        self.label.setText(f'Selected Item: {text}')

    def center(self):

        # Get the geometry of the screen
        screen = QApplication.primaryScreen().size()

        # Calculate the center point of the screen
        x = (screen.width() - self.width()) // 2
        y = (screen.height() - self.height()) // 2

        # Move the window to the center
        self.move(x, y)


if __name__ == "__main__":

    app = QApplication(sys.argv)

    # Create a new app window with title and dimensions
    window = AppWindow("Data Selection with PyQt QComboBox", 640, 480)

    # Center the app window on the screen
    window.center()

    # Show the app window on the screen
    window.show()

    # Run the application event loop
    sys.exit(app.exec())
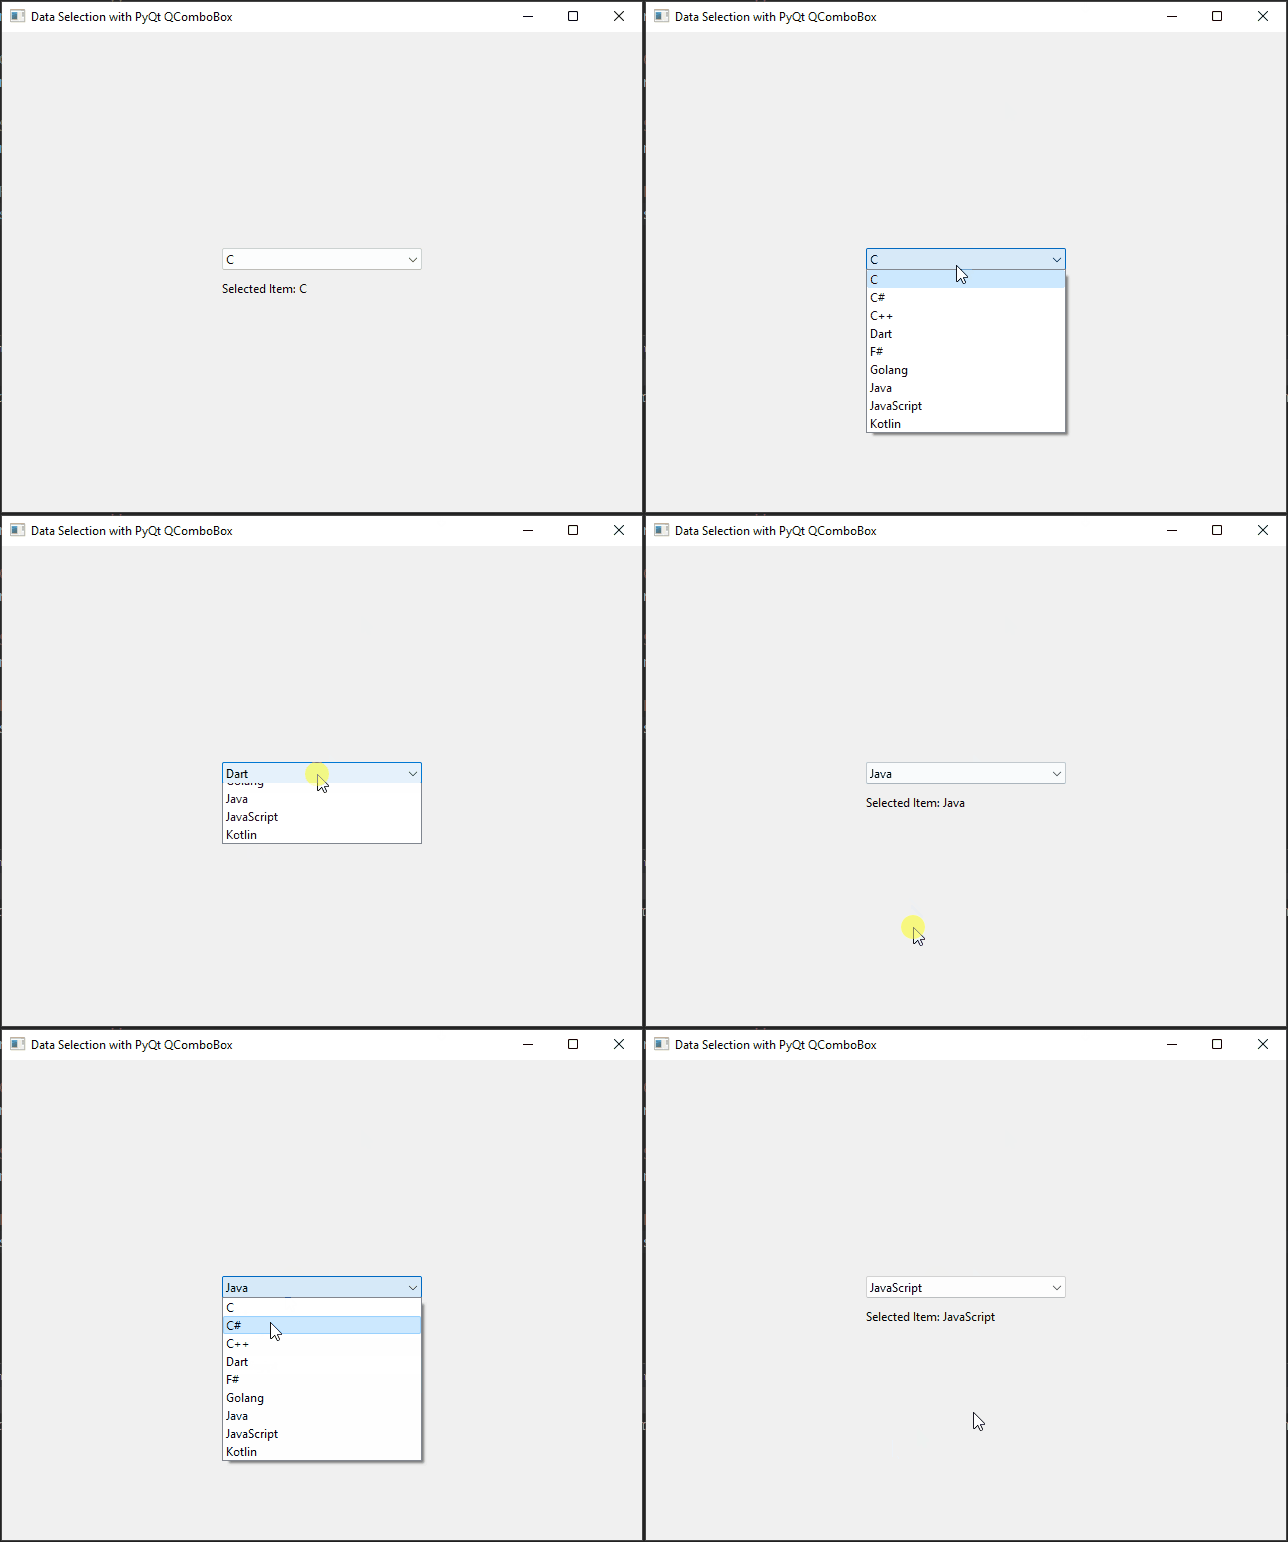
In this basic example, we create an AppWindow and add a QComboBox and QLabel to it. We add nine (9) items to the QComboBox and connect the activated signal to the on_activated slot. When the user selects an item from the QComboBox, the corresponding text is displayed on the QLabel.
Handling Signals from QComboBox
One of the key features of QComboBox is its ability to emit signals when its state changes. We can connect these signals to custom slots to perform actions based on user interactions.
Let’s create an example where we use a QComboBox to change the background color of a QLabel:
import sys
from PyQt6.QtCore import Qt
from PyQt6.QtWidgets import QApplication, QMainWindow, QWidget, QVBoxLayout, QComboBox, QLabel


# Create a QMainWindow subclass
class AppWindow(QMainWindow):

    def __init__(self, title, width, height, left=100, top=100):
        super().__init__()

        # Set the window title
        self.setWindowTitle(title)

        # Set the window location and size
        self.setGeometry(left, top, width, height)

        # Create a central widget to hold the layout
        self.central_widget = QWidget()
        self.setCentralWidget(self.central_widget)

        # Initialize the user interface
        self.initUI()

    def initUI(self):

        # Create a QVBoxLayout for the central widget
        layout = QVBoxLayout(self.central_widget)

        # Set spacing between widgets
        layout.setSpacing(10)

        # Set the alignment of the layout (optional)
        layout.setAlignment(Qt.AlignmentFlag.AlignCenter)

        # Create a QComboBox
        combo_box = QComboBox()
        combo_box.setFixedWidth(200)

        # Add items to the combo box
        combo_box.addItem('Red')
        combo_box.addItem('Green')
        combo_box.addItem('Blue')

        # Set the initial selection
        combo_box.setCurrentIndex(0)

        # Connect the currentIndexChanged signal to the change_color slot
        combo_box.currentIndexChanged.connect(self.change_color)

        # Create a QLabel with the initial text
        self.label = QLabel(f'Selected Item: {combo_box.currentText()}')
        self.label.setStyleSheet(f'background-color: {combo_box.currentText().lower()}; color: white')

        # Add the QComboBox and QLabel to the QVBoxLayout
        layout.addWidget(combo_box)
        layout.addWidget(self.label)

    def change_color(self, index):

        # Get the text of the currently selected item and update the QLabel
        color = self.sender().currentText()
        self.label.setText(f'Selected Item: {color}')
        self.label.setStyleSheet(f'background-color: {color.lower()}; color: white')

    def center(self):

        # Get the geometry of the screen
        screen = QApplication.primaryScreen().size()

        # Calculate the center point of the screen
        x = (screen.width() - self.width()) // 2
        y = (screen.height() - self.height()) // 2

        # Move the window to the center
        self.move(x, y)


if __name__ == "__main__":

    app = QApplication(sys.argv)

    # Create a new app window with title and dimensions
    window = AppWindow("Data Selection with PyQt QComboBox", 640, 480)

    # Center the app window on the screen
    window.center()

    # Show the app window on the screen
    window.show()

    # Run the application event loop
    sys.exit(app.exec())
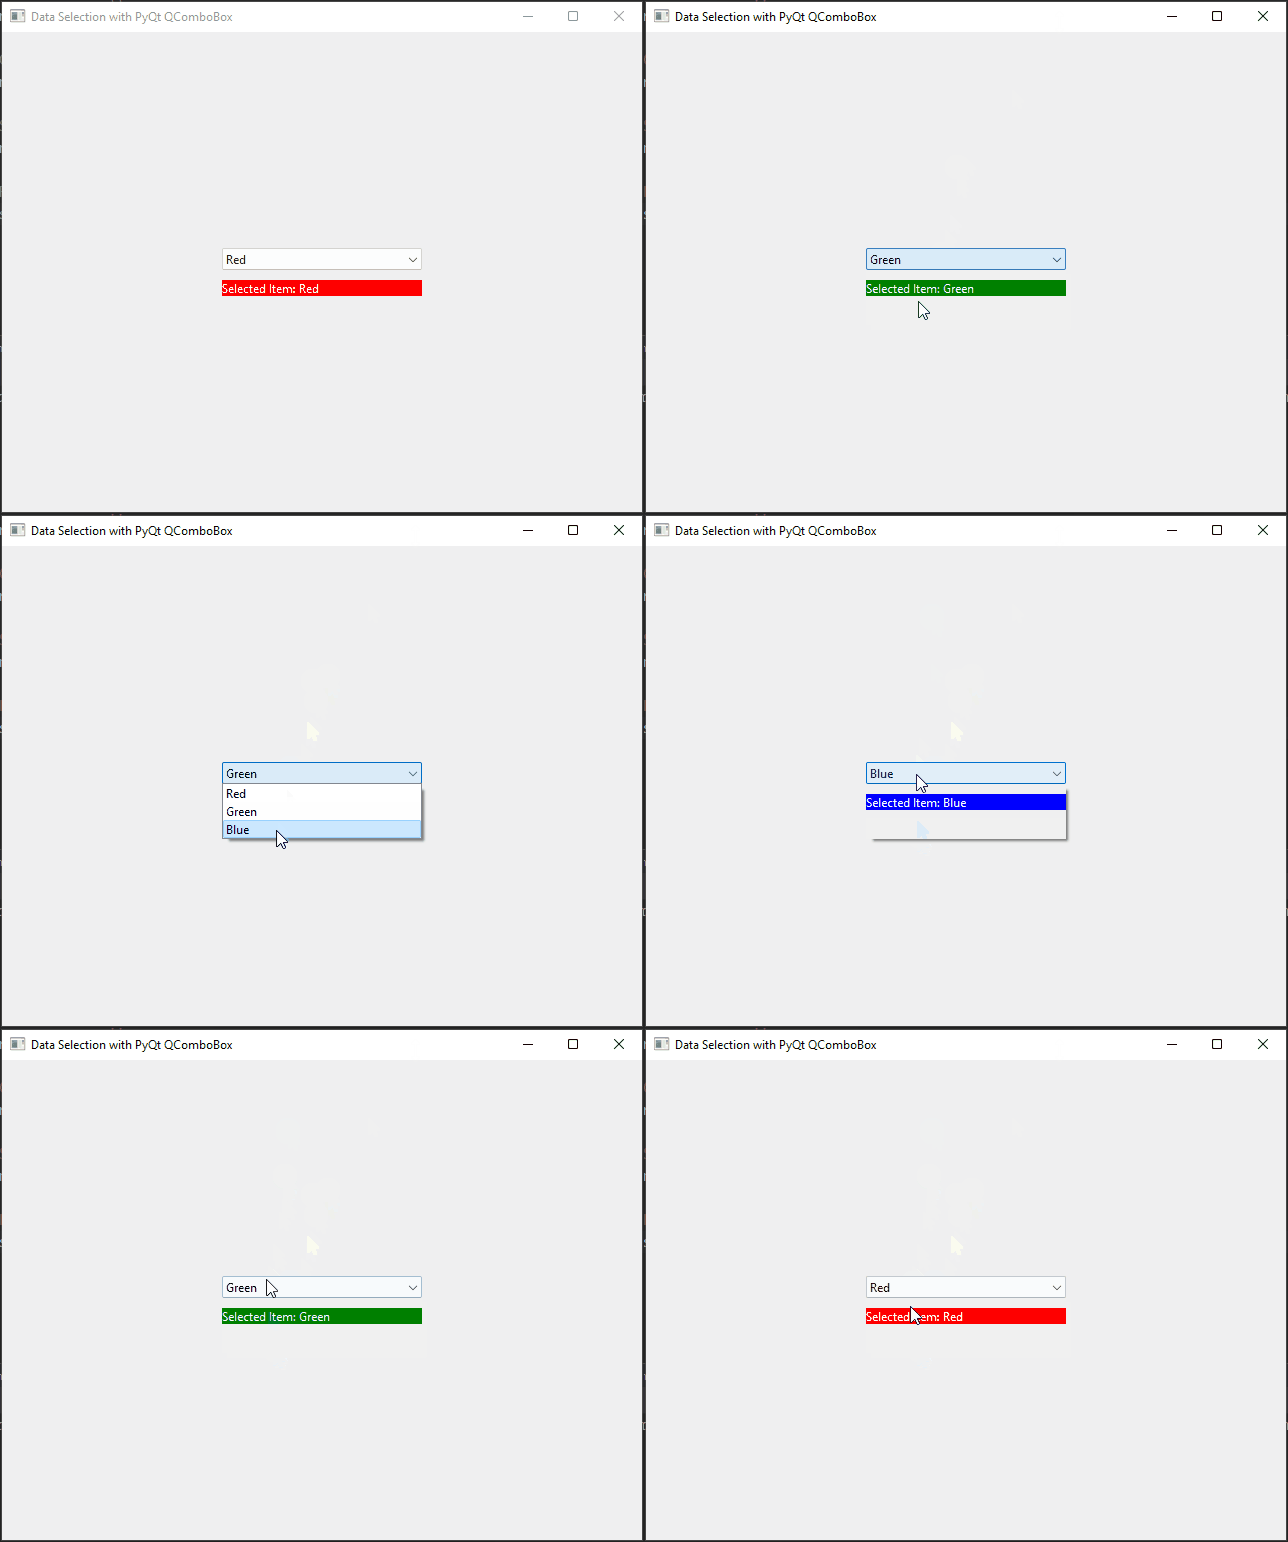
In this example, we create an AppWindow class that changes the background color of a QLabel based on the selected item in the QComboBox. We connect the currentIndexChanged signal of the QComboBox to the change_color() method. When the user selects an item from the dropdown list, the change_color() method gets called, and the background color of the label is updated accordingly.
Using QComboBox with Item Data
In many cases, you may need to associate additional data with each item in the QComboBox. Let’s create an example where we use item data to store the RGB values of colors:
import sys
from PyQt6.QtCore import Qt
from PyQt6.QtWidgets import QApplication, QMainWindow, QWidget, QVBoxLayout, QComboBox, QLabel


# Create a QMainWindow subclass
class AppWindow(QMainWindow):

    def __init__(self, title, width, height, left=100, top=100):
        super().__init__()

        # Set the window title
        self.setWindowTitle(title)

        # Set the window location and size
        self.setGeometry(left, top, width, height)

        # Create a central widget to hold the layout
        self.central_widget = QWidget()
        self.setCentralWidget(self.central_widget)

        # Initialize the user interface
        self.initUI()

    def initUI(self):

        # Create a QVBoxLayout for the central widget
        layout = QVBoxLayout(self.central_widget)

        # Set spacing between widgets
        layout.setSpacing(10)

        # Set the alignment of the layout (optional)
        layout.setAlignment(Qt.AlignmentFlag.AlignCenter)

        # Create a QComboBox
        combo_box = QComboBox()
        combo_box.setFixedWidth(200)

        # Add items to the combo box with associated data (RGB color)
        combo_box.addItem('Red', (255, 0, 0))
        combo_box.addItem('Green', (0, 255, 0))
        combo_box.addItem('Blue', (0, 0, 255))

        # Set the initial selection
        combo_box.setCurrentIndex(0)

        # Connect the currentIndexChanged signal to the change_color slot
        combo_box.currentIndexChanged.connect(self.change_color)

        # Create a QLabel with the initial text and background color
        self.label = QLabel(f'Selected Item: {combo_box.currentText()}')
        r, g, b = combo_box.currentData()
        self.label.setStyleSheet(f'background-color: rgb({r}, {g}, {b}); color: white')

        # Add the QComboBox and QLabel to the QVBoxLayout
        layout.addWidget(combo_box)
        layout.addWidget(self.label)

    def change_color(self, index):

        # Get the text and associated RGB color data of the currently selected item
        color_name = self.sender().currentText()
        color_data = self.sender().currentData()
        r, g, b = color_data

        # Update the QLabel text and background color
        self.label.setText(f'Selected Item: {color_name}')
        self.label.setStyleSheet(f'background-color: rgb({r}, {g}, {b}); color: white')

    def center(self):

        # Get the geometry of the screen
        screen = QApplication.primaryScreen().size()

        # Calculate the center point of the screen
        x = (screen.width() - self.width()) // 2
        y = (screen.height() - self.height()) // 2

        # Move the window to the center
        self.move(x, y)


if __name__ == "__main__":

    app = QApplication(sys.argv)

    # Create a new app window with title and dimensions
    window = AppWindow("Data Selection with PyQt QComboBox", 640, 480)

    # Center the app window on the screen
    window.center()

    # Show the app window on the screen
    window.show()

    # Run the application event loop
    sys.exit(app.exec())
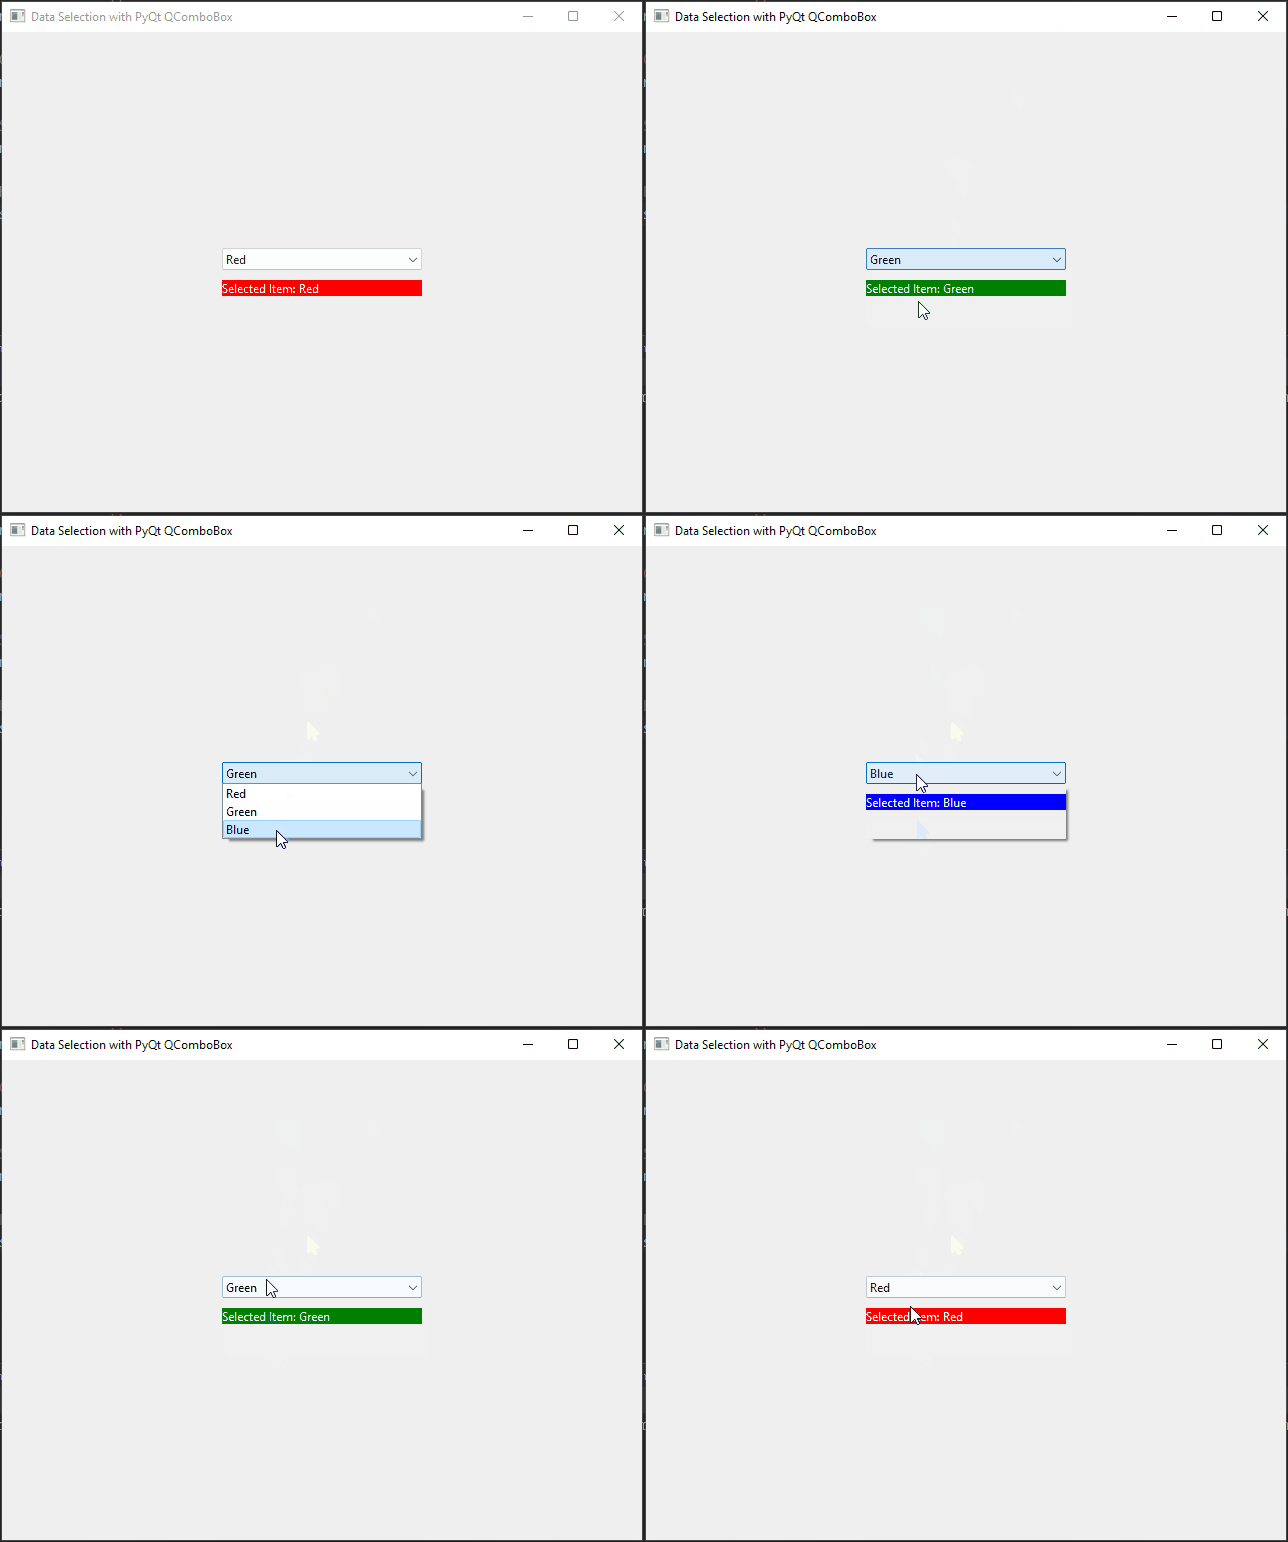
In this example, we create an AppWindow class that associates RGB values with each color in the QComboBox using the addItem() method. We then retrieve the associated data using the currentData() method when an item is selected, and the label’s background color is updated accordingly.
Adding Icons to Items
You can enhance the QComboBox by adding icons to the items. To do this, you’ll need to use the setIconSize method and set the icon for each item using the addItem method, providing the QIcon object and the text.
import sys
from PyQt6 import QtCore
from PyQt6.QtCore import Qt
from PyQt6.QtGui import QIcon
from PyQt6.QtWidgets import QApplication, QMainWindow, QWidget, QVBoxLayout, QComboBox, QLabel

# Create a QMainWindow subclass
class AppWindow(QMainWindow):

    def __init__(self, title, width, height, left=100, top=100):
        super().__init__()

        # Set the window title
        self.setWindowTitle(title)

        # Set the window location and size
        self.setGeometry(left, top, width, height)

        # Create a central widget to hold the layout
        self.central_widget = QWidget()
        self.setCentralWidget(self.central_widget)

        # Initialize the user interface
        self.initUI()

    def initUI(self):

        # Create a QVBoxLayout for the central widget
        layout = QVBoxLayout(self.central_widget)

        # Set spacing between widgets
        layout.setSpacing(10)

        # Set the alignment of the layout (optional)
        layout.setAlignment(Qt.AlignmentFlag.AlignCenter)

        # Create a QComboBox
        combo_box = QComboBox()
        combo_box.setFixedWidth(200)

        combo_box.setIconSize(QtCore.QSize(22, 22))

        # Add items to the combo box with icons
        countries = [
            (QIcon('ke.png'), 'Kenya'),
            (QIcon('mw.png'), 'Malawi'),
            (QIcon('ng.png'), 'Nigeria'),
            (QIcon('za.png'), 'South Africa'),
            (QIcon('ug.png'), 'Uganda'),
            (QIcon('zm.png'), 'Zambia'),
            (QIcon('zw.png'), 'Zimbabwe'),
        ]

        for icon, country in countries:
            combo_box.addItem(icon, country)

        # Set the initial selection
        combo_box.setCurrentText('Zambia')

        # Connect the currentIndexChanged signal to the index_changed slot
        combo_box.currentIndexChanged.connect(self.index_changed)

        # Create a QLabel with the initial text
        self.label = QLabel(f'Selected Country: {combo_box.currentText()}')

        # Add the QComboBox and QLabel to the QVBoxLayout
        layout.addWidget(combo_box)
        layout.addWidget(self.label)

    def index_changed(self):

        # Get the text of the currently selected item and update the QLabel
        country = self.sender().currentText()
        self.label.setText(f'Selected Country: {country}')

    def center(self):

        # Get the geometry of the screen
        screen = QApplication.primaryScreen().size()

        # Calculate the center point of the screen
        x = (screen.width() - self.width()) // 2
        y = (screen.height() - self.height()) // 2

        # Move the window to the center
        self.move(x, y)


if __name__ == "__main__":

    app = QApplication(sys.argv)

    # Create a new app window with title and dimensions
    window = AppWindow("Data Selection with PyQt QComboBox", 640, 480)

    # Center the app window on the screen
    window.center()

    # Show the app window on the screen
    window.show()

    # Run the application event loop
    sys.exit(app.exec())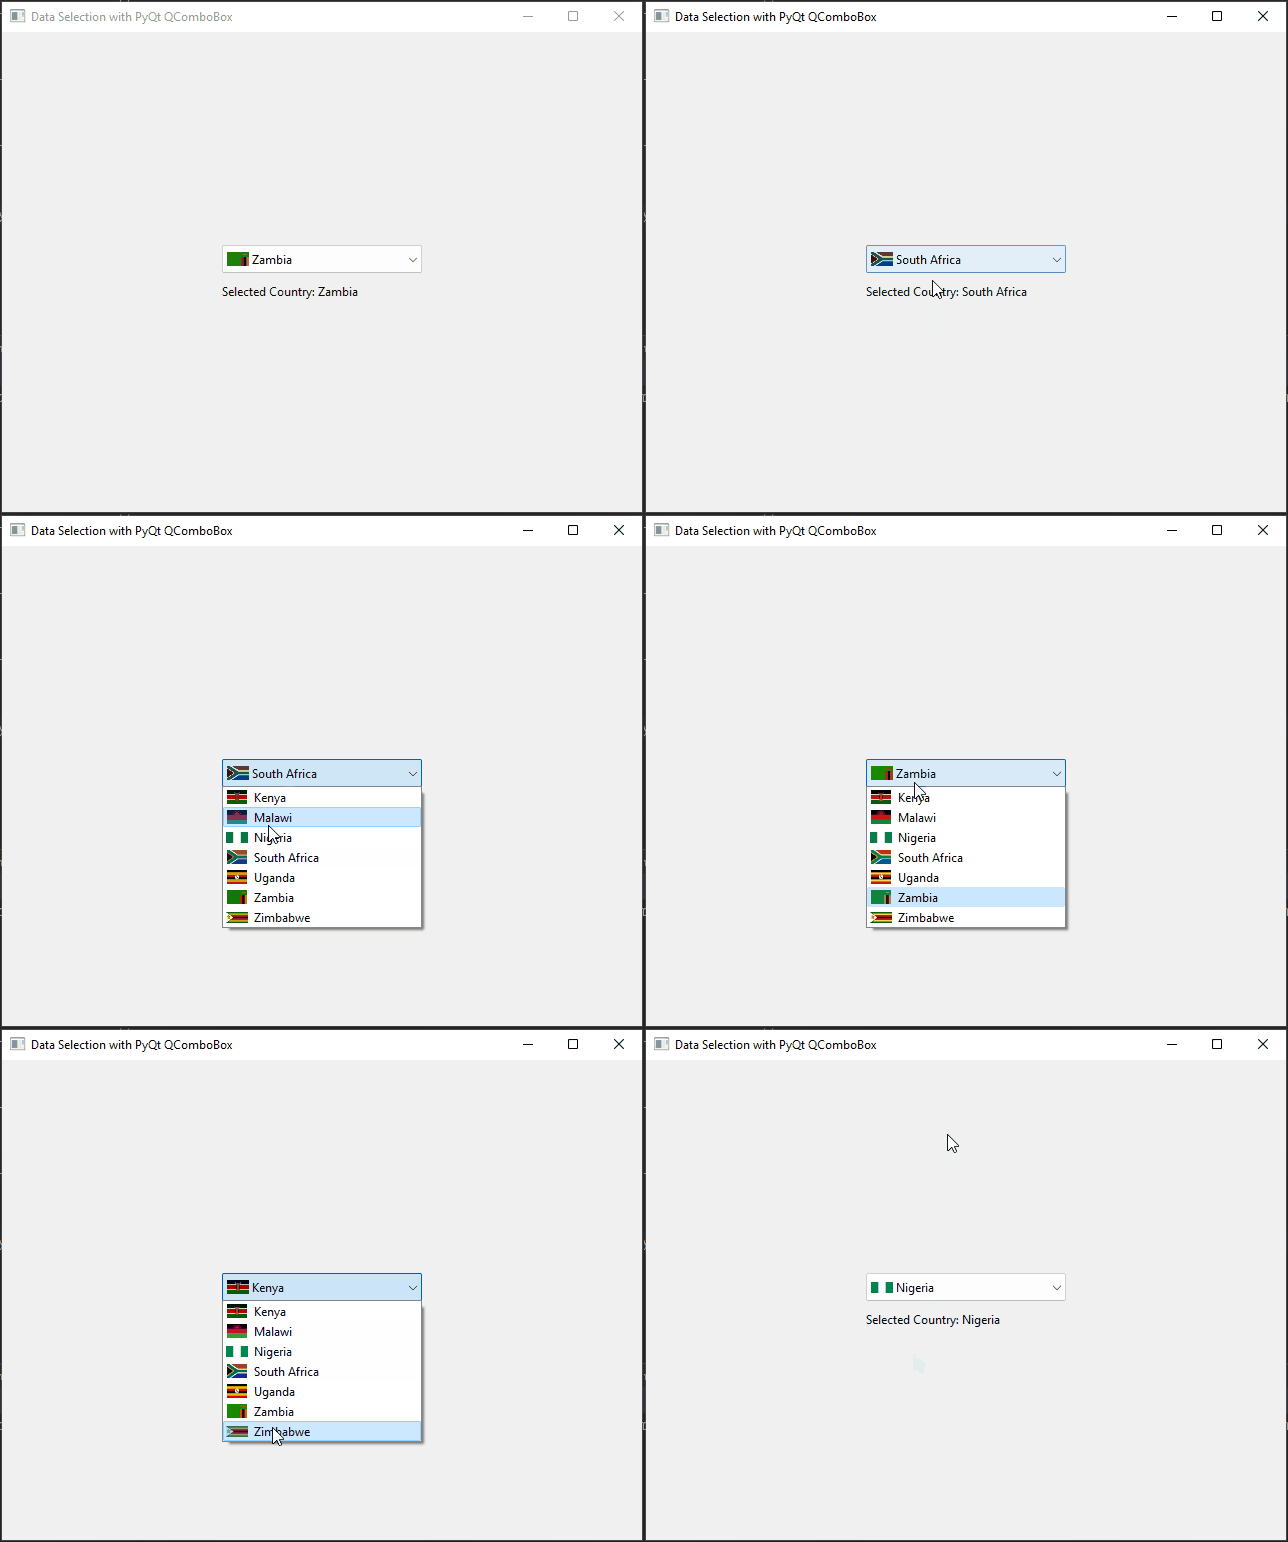
Conclusion
PyQt QComboBox is a powerful and flexible widget that simplifies the process of creating dropdowns and allowing users to select from predefined options. In this article, we covered the essential features of QComboBox, demonstrated how to create a simple QComboBox, and use data models with QComboBox. This knowledge will empower you to build interactive and user-friendly GUI applications with PyQt. Experiment with the examples provided and explore more functionalities to enhance your PyQt projects.
I hope you found this article informative and useful. If you would like to receive more content, please consider subscribing to our newsletter.

