When creating a JavaFX application, choosing the right font for your user interface is an essential aspect of design. Fonts can convey information, set the mood, and enhance the overall user experience. However, implementing a font selection dialog in your JavaFX application can be a challenging task. Thankfully, the ControlsFX library provides a convenient FontSelectorDialog that simplifies font selection for your JavaFX projects. In this article, we will explore how to use the ControlsFX FontSelectorDialog to empower your users to choose the perfect font for your application.

with hands-on learning.
get the skills and confidence to land your next move.
What is ControlsFX?
ControlsFX is an open-source library that complements JavaFX by providing additional controls, enhancements, and utilities. It simplifies the development of JavaFX applications by offering a wide range of custom controls and dialogs, including the FontSelectorDialog we will discuss in this article.
Setting Up ControlsFX
Before we begin, make sure you have added the ControlsFX library to your JavaFX project. You can download the ControlsFX library from the official GitHub repository or include it as a dependency using a build tool like Maven or Gradle.
Using the FontSelectorDialog
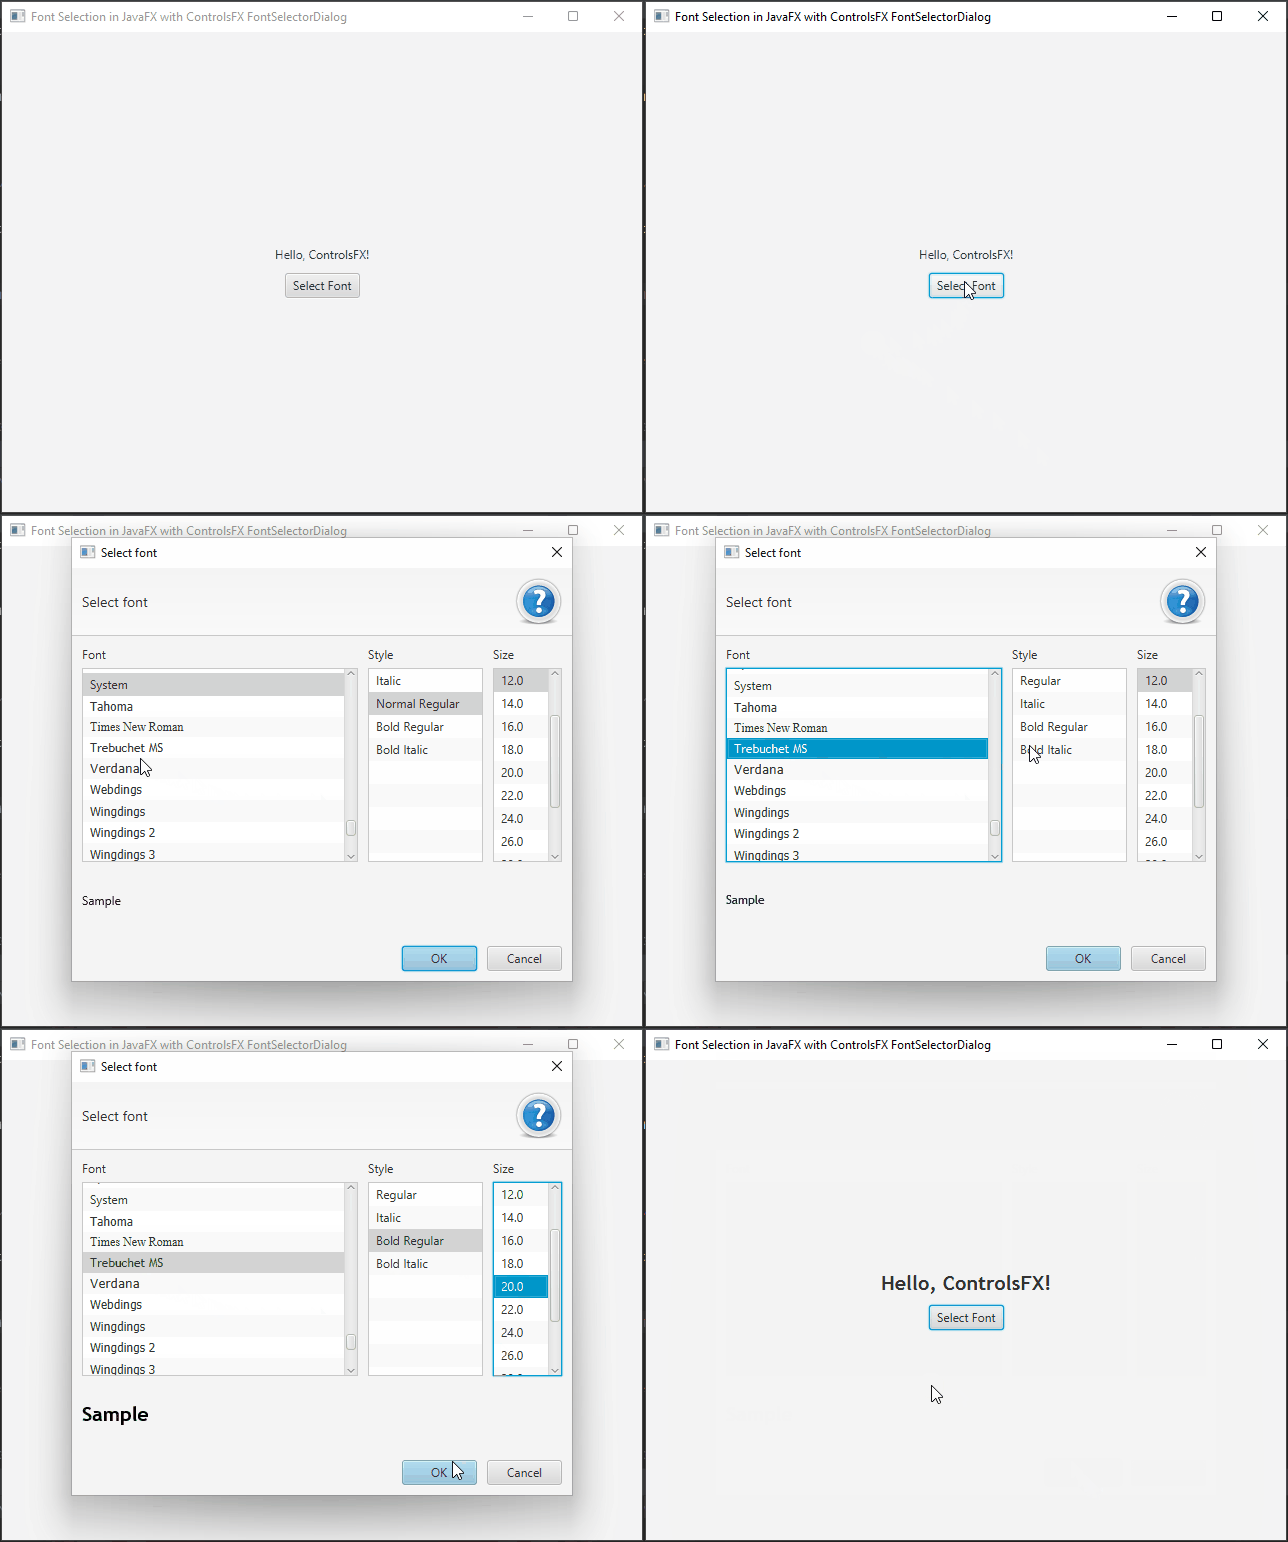
To demonstrate how to use the FontSelectorDialog, let’s create a simple JavaFX application that allows users to change the font of a text label using the ControlsFX dialog.
import javafx.application.Application;
import javafx.geometry.Pos;
import javafx.scene.Scene;
import javafx.scene.control.Button;
import javafx.scene.control.Label;
import javafx.scene.layout.*;
import javafx.stage.Stage;
import org.controlsfx.dialog.FontSelectorDialog;

public class Main extends Application {

    private final BorderPane parent = new BorderPane();

    @Override
    public void init() throws Exception {
        super.init();

        // Build the user interface
        this.buildUI();

    }

    private void buildUI() {

        // Create the Label
        Label label = new Label("Hello, ControlsFX!");

        // Create the Button
        Button fontButton = new Button("Select Font");

        // Create the VBox container with 10px spacing between Nodes
        // Add the Label and Button to the VBox container
        VBox container = new VBox(10, label, fontButton);
        container.setAlignment(Pos.CENTER);

        fontButton.setOnAction(e -> {

            // Create a FontSelectorDialog, set the Label Font as the default
            FontSelectorDialog fontDialog = new FontSelectorDialog(label.getFont());

            // Update the Label Font
            fontDialog.showAndWait().ifPresent(label::setFont);

        });

        // Add the VBox container to the center of the BorderPane
        this.parent.setCenter(container);

    }

    @Override
    public void start(Stage stage) throws Exception {

        // Setup and display the stage
        this.setupStage(stage);

    }

    private void setupStage(Stage stage) {

        // Create a scene with the BorderPane as the root
        Scene scene = new Scene(this.parent, 640, 480);

        // Set the stage title
        stage.setTitle("Font Selection in JavaFX with ControlsFX FontSelectorDialog");

        // Set the scene for the stage
        stage.setScene(scene);

        // Center the stage on the screen
        stage.centerOnScreen();

        // Display the stage
        stage.show();

    }

}
In this example, we created a Button labeled “Select Font” and add an event handler to open the FontSelectorDialog when the button is clicked. When a font is selected in the dialog, we update the font of the Label with the selected font.

Conclusion
In this article, we’ve explored how to use the ControlsFX FontSelectorDialog to enable font selection in your JavaFX applications. ControlsFX simplifies the process of adding a font selection feature, enhancing the usability and design of your JavaFX user interfaces. By integrating the FontSelectorDialog into your projects, you can provide users with a more personalized and engaging experience while maintaining a sleek and professional appearance for your JavaFX applications. Remember to check the ControlsFX FontSelectorDialog documentation for more.
I hope you found this code informative and useful. If you would like to receive more content, please consider subscribing to our newsletter!


