When it comes to designing graphical user interfaces (GUIs) in Java applications, JavaFX provides a powerful and flexible framework. One of the fundamental components for creating well-organized layouts is the VBox, short for “Vertical Box.” The VBox allows you to arrange your UI components vertically, stacking them one on top of the other. In this article, we will explore the features and usage of the JavaFX VBox layout container, accompanied by code examples.

with hands-on learning.
get the skills and confidence to land your next move.
Understanding the VBox Layout
The VBox layout is part of the javafx.scene.layout package and is used to arrange UI elements vertically. This is particularly useful when you want to display a sequence of components stacked on top of each other. The VBox layout automatically adjusts the size of its children based on their preferred sizes, making it ideal for creating dynamic and responsive user interfaces.
Here are some key characteristics of the VBox layout:
- Vertical Arrangement: The VBox arranges its children in a vertical manner, where each child is placed below the previous one.
- Resizable: As the VBox is resized, its children are automatically resized as well to fit within the available space.
- Alignment: You can specify how the children are aligned within the VBox using alignment properties such as Pos.TOP_LEFT, Pos.CENTER, etc.
- Spacing: You can control the spacing between the children using the spacing property.
Creating a Simple VBox Layout
Let’s start by creating a simple JavaFX application that demonstrates the usage of the VBox layout. We will create a VBox containing labels with some text.
import javafx.application.Application;
import javafx.geometry.Insets;
import javafx.geometry.Pos;
import javafx.scene.Scene;
import javafx.scene.control.Button;
import javafx.scene.layout.*;
import javafx.stage.Stage;

public class Main extends Application {

    private final BorderPane parent = new BorderPane();

    @Override
    public void start(Stage stage) throws Exception {
        this.setupStage(stage);
    }

    @Override
    public void init() throws Exception {
        super.init();
        this.buildUI();
    }

    private void buildUI() {

        // Create the VBox container
        VBox content = new VBox();

        // Set alignment to center
        content.setAlignment(Pos.CENTER);

        // Set 10px spacing between nodes
        content.setSpacing(10);

        // Add 10 pixels of padding around the VBox
        content.setPadding(new Insets(10));

        // Create UI elements
        Button button1 = new Button("Button 1");
        Button button2 = new Button("Button 2");
        Button button3 = new Button("Button 3");

        // Add buttons to VBox
        content.getChildren().addAll(button1, button2, button3);

        this.parent.setCenter(content);

    }

    private void setupStage(Stage stage) {

        Scene scene = new Scene(this.parent, 640, 480);

        // Set the stage title
        stage.setTitle("JavaFX VBox: Building Vertical Layouts");

        // Set the stage scene
        stage.setScene(scene);

        // Center the stage on the screen
        stage.centerOnScreen();

        // Show the stage on the screen
        stage.show();

    }

}
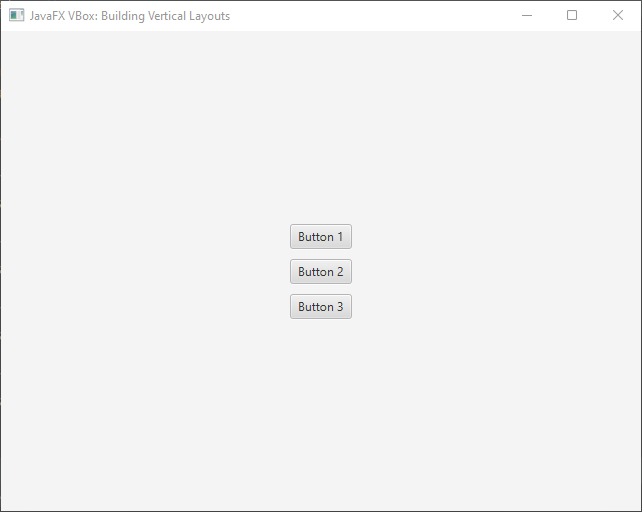
In this example, we create a VBox named content and set its alignment to Pos.CENTER. We also set the spacing between the children to 10 pixels, and the padding to 10px. Then, we create three buttons and add them to the VBox using the getChildren().addAll() method.
Grow Priority
Grow priority, also known as “vgrow” or “priority,” is a property that defines how a child node within a VBox layout should grow or allocate additional vertical space when the layout’s height expands. The primary purpose of grow priority is to ensure that specific UI elements receive more space during resizing while others remain fixed in size.
In a VBox layout, child nodes are allocated vertical space based on their preferred heights and the available space within the VBox. Grow priority comes into play when there is extra space available that can be distributed among child nodes.
Understanding Grow Priority Levels
JavaFX offers three levels of grow priority for VBox child nodes:
- Priority.ALWAYS: Child nodes with this priority level will expand vertically as much as possible when extra space is available. These nodes will grow proportionally to the remaining space after accommodating nodes with lower priority or fixed heights.
- Priority.SOMETIMES: Nodes with this priority level will grow vertically if there’s extra space left after accommodating nodes with “ALWAYS” priority. However, they won’t expand as aggressively as “ALWAYS” nodes.
- Priority.NEVER: Nodes with this priority level will maintain their preferred height and won’t grow vertically even if there’s extra space in the VBox.
Implementing Grow Priority
Let’s explore a practical example to understand how grow priority works in a VBox layout:
import javafx.application.Application;
import javafx.geometry.Insets;
import javafx.geometry.Pos;
import javafx.scene.Scene;
import javafx.scene.control.Button;
import javafx.scene.layout.*;
import javafx.scene.layout.Priority;
import javafx.stage.Stage;

public class Main extends Application {

    private final BorderPane parent = new BorderPane();

    @Override
    public void start(Stage stage) throws Exception {
        this.setupStage(stage);
    }

    @Override
    public void init() throws Exception {
        super.init();
        this.buildUI();
    }

    private void buildUI() {

        // Create the VBox container
        VBox content = new VBox();

        // Set alignment to center
        content.setAlignment(Pos.CENTER);

        // Set 10px spacing between nodes
        content.setSpacing(10);

        // Add 10 pixels of padding around the VBox
        content.setPadding(new Insets(10));

        // Create UI elements
        Button button1 = new Button("Button 1");
        Button button2 = new Button("Button 2");
        Button button3 = new Button("Button 3");

        // Set grow priorities
        VBox.setVgrow(button1, Priority.ALWAYS);
        button1.setMaxHeight(Double.MAX_VALUE);

        VBox.setVgrow(button2, Priority.SOMETIMES);
        button2.setMaxHeight(Double.MAX_VALUE);

        // Add buttons to VBox
        content.getChildren().addAll(button1, button2, button3);

        this.parent.setCenter(content);

    }

    private void setupStage(Stage stage) {

        Scene scene = new Scene(this.parent, 640, 480);

        // Set the stage title
        stage.setTitle("JavaFX VBox: Building Vertical Layouts");

        // Set the stage scene
        stage.setScene(scene);

        // Center the stage on the screen
        stage.centerOnScreen();

        // Show the stage on the screen
        stage.show();

    }

}
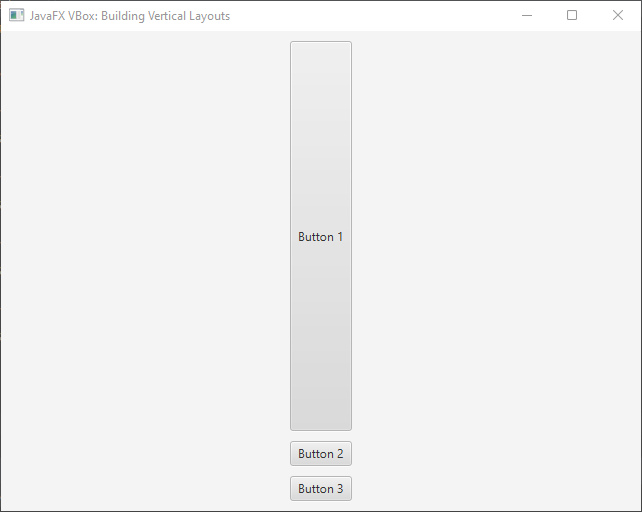
In this example, we have three buttons inside a VBox. We set grow priorities using the VBox.setVgrow() method. “Button 1” has a priority of “ALWAYS,” which means it will expand to fill available space. “Button 2” has a priority of “SOMETIMES,” so it will grow if there’s additional space, but not as aggressively as “ALWAYS” nodes. “Button 3” has the default priority of “NEVER,” and it won’t grow vertically.
Margins
Margins refer to the space between the edges of a layout container and its child nodes. Margins play a vital role in creating visually pleasing designs by offering separation between UI elements, improving readability, and ensuring a balanced layout composition.
In JavaFX, you can use the VBox.setMargin() method to set margins for individual child nodes within a VBox layout. This method accepts the child node and an instance of the Insets class, which allows you to define the margin values for the top, right, bottom, and left edges.
Let’s explore a practical example that demonstrates how to use margins effectively within a VBox layout:
import javafx.application.Application;
import javafx.geometry.Insets;
import javafx.geometry.Pos;
import javafx.scene.Scene;
import javafx.scene.control.Button;
import javafx.scene.layout.*;
import javafx.stage.Stage;

public class Main extends Application {

    private final BorderPane parent = new BorderPane();

    @Override
    public void start(Stage stage) throws Exception {
        this.setupStage(stage);
    }

    @Override
    public void init() throws Exception {
        super.init();
        this.buildUI();
    }

    private void buildUI() {

        // Create the VBox container
        VBox content = new VBox();

        // Set alignment to center
        content.setAlignment(Pos.CENTER);

        // Set 10px spacing between nodes
        content.setSpacing(10);

        // Add 10 pixels of padding around the VBox
        content.setPadding(new Insets(10));

        // Create UI elements
        Button button1 = new Button("Button 1");
        Button button2 = new Button("Button 2");
        Button button3 = new Button("Button 3");

        // Set margins for individual nodes
        // top, right, bottom, left
        VBox.setMargin(button1, new Insets(10, 20, 10, 20));
        VBox.setMargin(button2, new Insets(5, 15, 5, 15));
        VBox.setMargin(button3, new Insets(15, 25, 15, 25));

        // Add buttons to VBox
        content.getChildren().addAll(button1, button2, button3);

        this.parent.setCenter(content);

    }

    private void setupStage(Stage stage) {

        Scene scene = new Scene(this.parent, 640, 480);

        // Set the stage title
        stage.setTitle("JavaFX VBox: Building Vertical Layouts");

        // Set the stage scene
        stage.setScene(scene);

        // Center the stage on the screen
        stage.centerOnScreen();

        // Show the stage on the screen
        stage.show();

    }

}
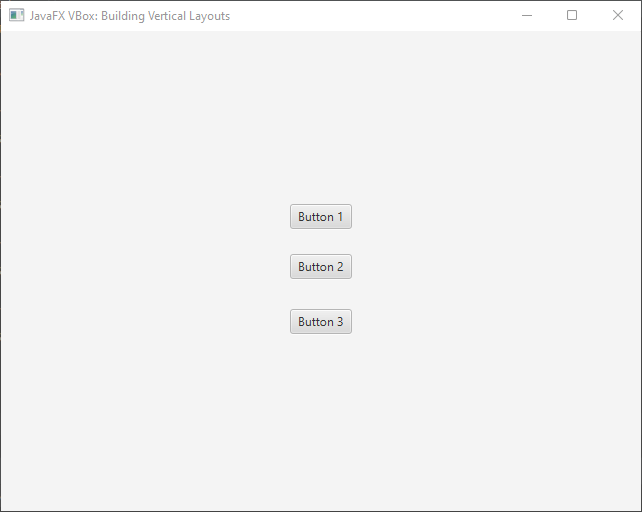
In this example, we create a VBox layout containing three buttons. We use the VBox.setMargin() method to set different margin values for each button. The Insets class allows us to specify the margin values for the top, right, bottom, and left edges.
Customizing Margins for Visual Appeal
By using margins strategically, you can achieve various design effects, such as creating a centered or spaced-out appearance for your UI elements. Margins enable you to control the padding around individual components and maintain a consistent visual rhythm within your layout.
Consider experimenting with different margin values and combinations to achieve your desired design outcome. Keep in mind that a well-considered use of margins can significantly improve the overall aesthetics and user experience of your JavaFX applications.
Conclusion
The VBox layout container in JavaFX is a versatile tool for building vertical layouts in GUI applications. Its ability to stack UI elements vertically makes it a powerful choice for creating clean and organized user interfaces. By understanding the basic usage and properties of the VBox, you can create sophisticated layouts that cater to various design requirements. Whether you’re building a simple form or a complex UI structure, the VBox is a valuable tool in your JavaFX toolkit.
Sources:
I hope you found this code informative and useful. If you would like to receive more content, please consider subscribing to our newsletter!
