PyQt is a set of Python bindings for the Qt application framework. It allows developers to create powerful desktop applications with a native look and feel across different platforms. One of the essential GUI components provided by PyQt is the QCheckBox, which is used to represent a toggleable option or setting in a graphical interface. In this article, we will explore everything you need to know about PyQt QCheckBox.

with hands-on learning.
get the skills and confidence to land your next move.
What is QCheckBox?
QCheckBox is a class in the PyQt library that represents a checkbox control. A checkbox is a small square box that allows the user to select or deselect an option. When the checkbox is checked, it displays a tick mark inside the box, indicating that the option is selected. When it is unchecked, the box remains empty, indicating that the option is not selected.
Creating a QCheckBox
To use QCheckBox, you need to have PyQt installed. If you don’t have it already, you can install it using pip:
pip install pyqt6
Now, let’s create a simple PyQt application with a QCheckBox that displays a label indicating its state.
import sys
from PyQt6.QtCore import Qt
from PyQt6.QtWidgets import *


# Create a QMainWindow subclass
class AppWindow(QMainWindow):

    def __init__(self, title, width, height, left=100, top=100):
        super().__init__()

        # Set the window title
        self.setWindowTitle(title)

        # Set the window location and size
        self.setGeometry(left, top, width, height)

        # Create a central widget to hold the layout
        self.central_widget = QWidget()
        self.setCentralWidget(self.central_widget)

        # Initialize the user interface
        self.initUI()

    def initUI(self):

        # Create a QVBoxLayout for the central widget
        layout = QVBoxLayout(self.central_widget)

        # Set spacing between widgets
        layout.setSpacing(10)

        # Set the alignment of the layout (optional)
        layout.setAlignment(Qt.AlignmentFlag.AlignTop)

        # Create a QCheckBox
        self.checkbox = QCheckBox("Enable Feature")

        # Set the initial state to checked
        self.checkbox.setChecked(True)

        # Create a QLabel to display the state of the QCheckBox
        self.label = QLabel("Feature is enabled")

        # Connect the QCheckBox stateChanged signal to the updateLabel slot
        self.checkbox.stateChanged.connect(self.updateLabel)

        layout.addWidget(self.checkbox)
        layout.addWidget(self.label)

    def updateLabel(self, state):

        if state == 2:  # 2 represents the CheckedState
            self.label.setText("Feature is enabled")
        else:
            self.label.setText("Feature is disabled")

    def center(self):
        # Get the geometry of the screen
        screen = QApplication.primaryScreen().size()

        # Calculate the center point of the screen
        x = (screen.width() - self.width()) // 2
        y = (screen.height() - self.height()) // 2

        # Move the window to the center
        self.move(x, y)


if __name__ == "__main__":
    app = QApplication(sys.argv)

    # Create a new app window with title and dimensions
    window = AppWindow("PyQt QCheckBox", 640, 480)

    # Center the app window on the screen
    window.center()

    # Show the app window on the screen
    window.show()

    # Run the application event loop
    sys.exit(app.exec())
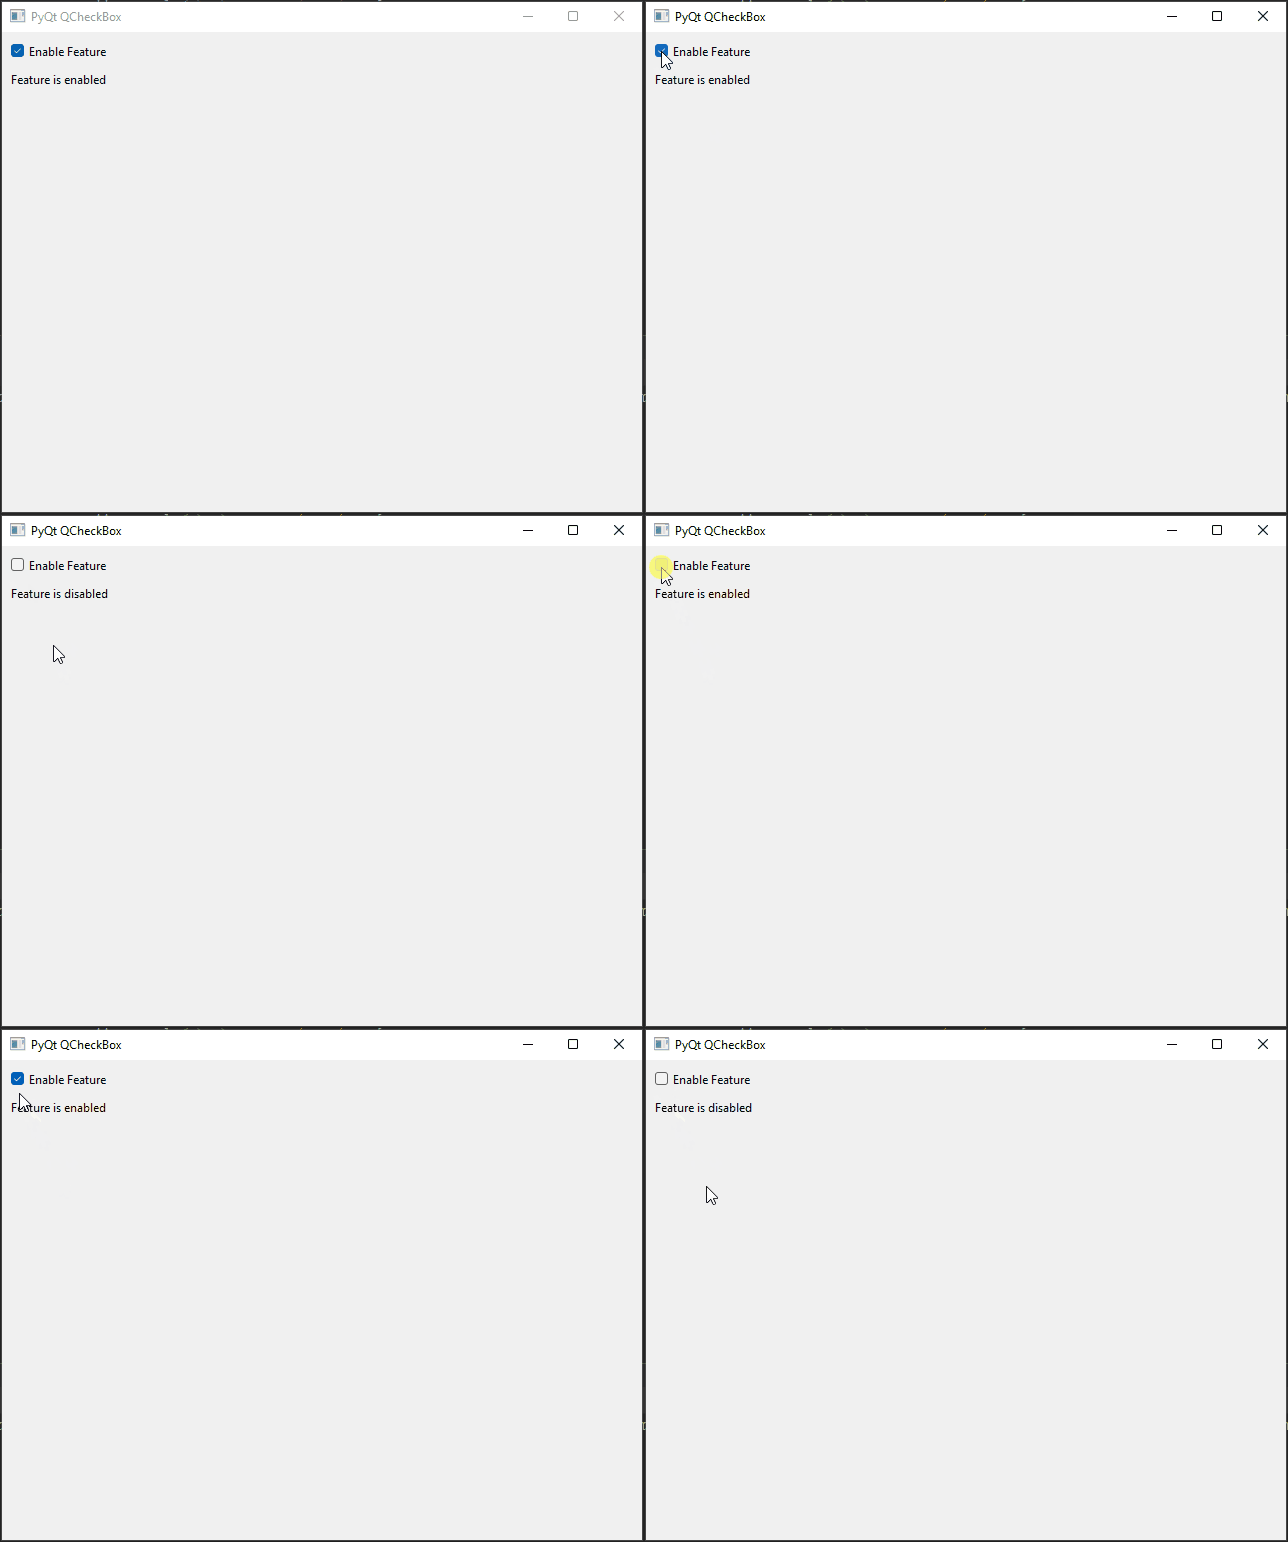
In this example, we create a main window (AppWindow) containing a QCheckBox and a QLabel. We connect the stateChanged signal of the QCheckBox to the updateLabel slot, which updates the QLabel text based on the state of the QCheckBox.
Handling QCheckBox State Changes
The stateChanged signal is emitted whenever the state of the QCheckBox changes. This signal carries an integer value representing the new state. The integer values and their meanings are as follows:
- Qt.Unchecked (0): The QCheckBox is unchecked.
- Qt.PartiallyChecked (1): The QCheckBox is in a partially checked state (used in tri-state mode).
- Qt.Checked (2): The QCheckBox is checked.
In the previous example, we used the stateChanged signal and checked the state value to determine if the QCheckBox is checked or unchecked.
Customizing the CheckBox
Changing the Text
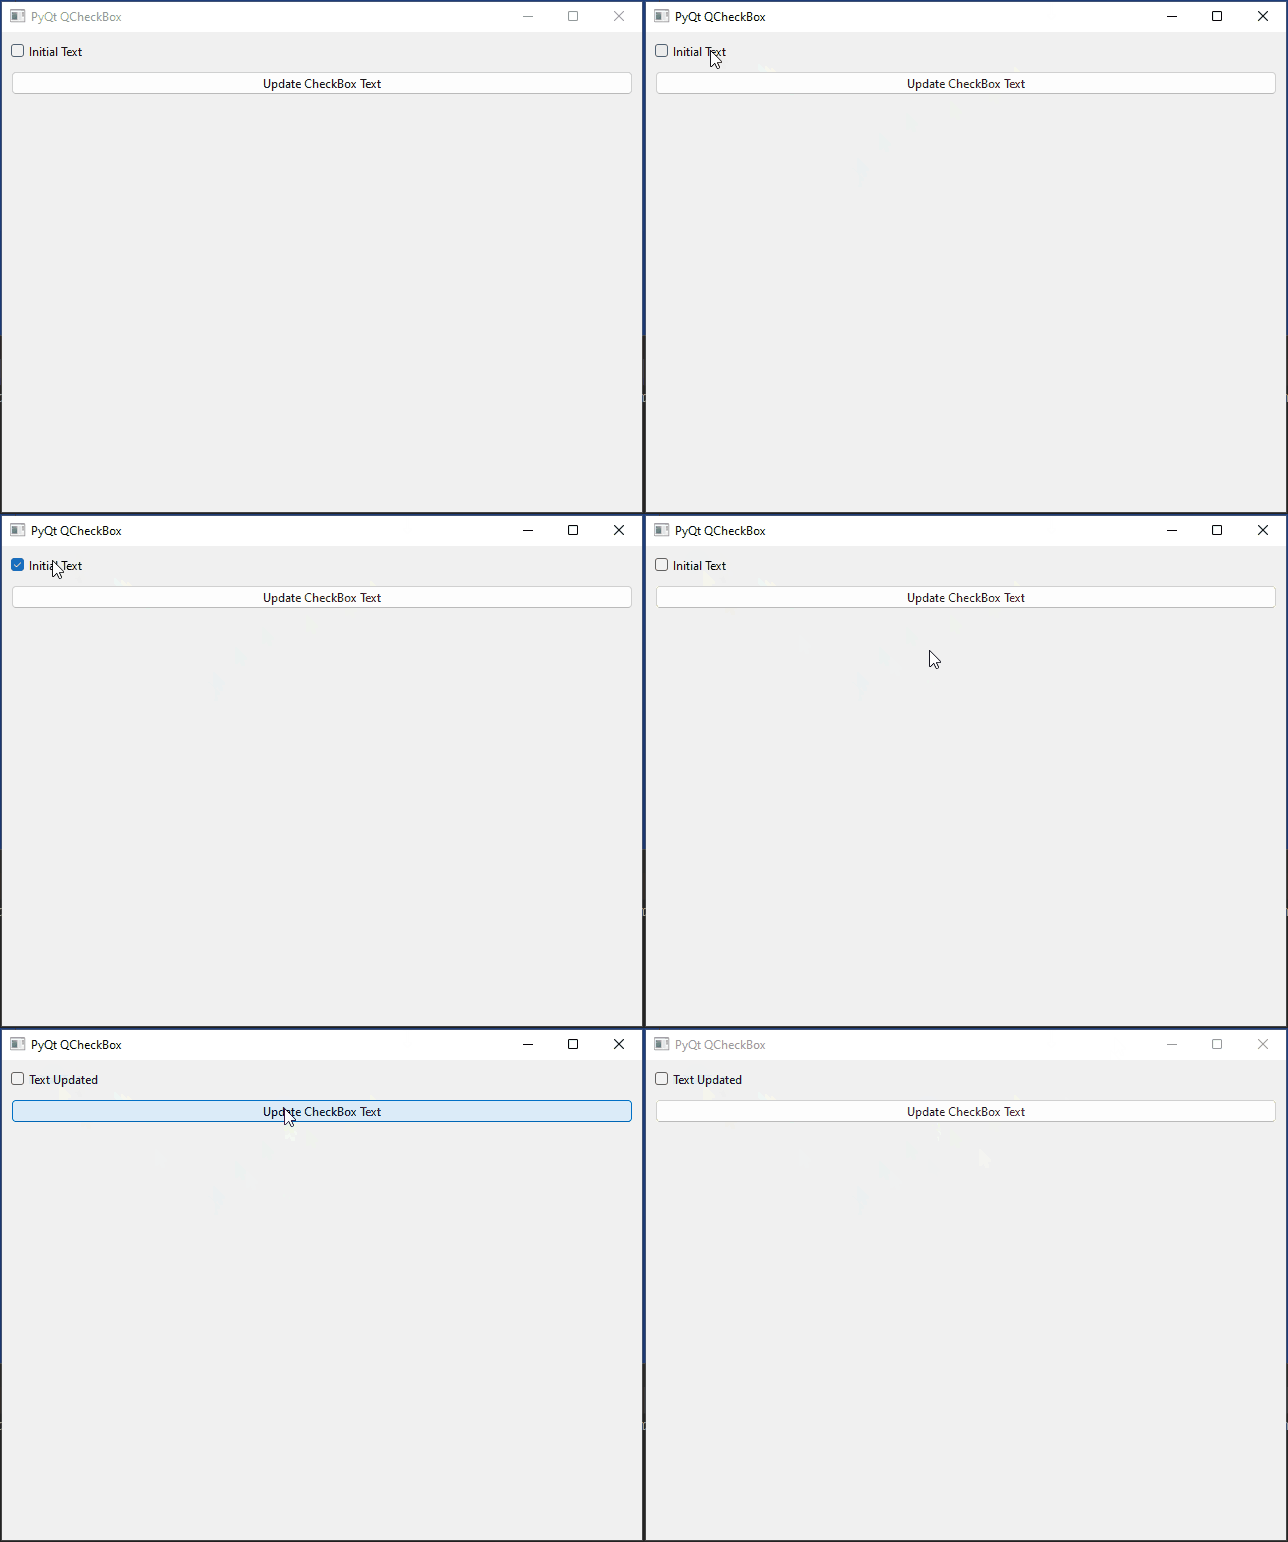
By default, the text displayed next to the checkbox is set when creating the QCheckBox. However, you can change it dynamically using the setText method.
import sys
from PyQt6.QtCore import Qt
from PyQt6.QtWidgets import *


# Create a QMainWindow subclass
class AppWindow(QMainWindow):

    def __init__(self, title, width, height, left=100, top=100):
        super().__init__()

        # Set the window title
        self.setWindowTitle(title)

        # Set the window location and size
        self.setGeometry(left, top, width, height)

        # Create a central widget to hold the layout
        self.central_widget = QWidget()
        self.setCentralWidget(self.central_widget)

        # Initialize the user interface
        self.initUI()

    def initUI(self):

        # Create a QVBoxLayout for the central widget
        layout = QVBoxLayout(self.central_widget)

        # Set spacing between widgets
        layout.setSpacing(10)

        # Set the alignment of the layout (optional)
        layout.setAlignment(Qt.AlignmentFlag.AlignTop)

        # Create a QCheckBox
        self.checkbox = QCheckBox("Initial Text")

        # Create a QPushButton
        self.button = QPushButton("Update CheckBox Text")

        # Connect the QPushButton clicked signal to the updateText slot
        self.button.clicked.connect(self.updateText)

        layout.addWidget(self.checkbox)
        layout.addWidget(self.button)

    def updateText(self):

        # Update CheckBox text
        self.checkbox.setText("Text Updated")

    def center(self):
        # Get the geometry of the screen
        screen = QApplication.primaryScreen().size()

        # Calculate the center point of the screen
        x = (screen.width() - self.width()) // 2
        y = (screen.height() - self.height()) // 2

        # Move the window to the center
        self.move(x, y)


if __name__ == "__main__":
    app = QApplication(sys.argv)

    # Create a new app window with title and dimensions
    window = AppWindow("PyQt QCheckBox", 640, 480)

    # Center the app window on the screen
    window.center()

    # Show the app window on the screen
    window.show()

    # Run the application event loop
    sys.exit(app.exec())
Setting Icons
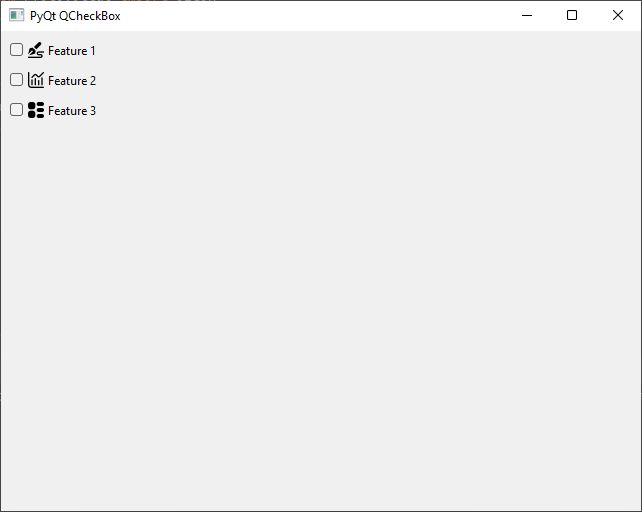
You can easily set an icon for a QCheckBox in PyQt using the setIcon method. Here is an example demonstrating how to do so:
import sys
from PyQt6.QtCore import Qt
from PyQt6.QtGui import QIcon
from PyQt6.QtWidgets import *


# Create a QMainWindow subclass
class AppWindow(QMainWindow):

    def __init__(self, title, width, height, left=100, top=100):
        super().__init__()

        # Set the window title
        self.setWindowTitle(title)

        # Set the window location and size
        self.setGeometry(left, top, width, height)

        # Create a central widget to hold the layout
        self.central_widget = QWidget()
        self.setCentralWidget(self.central_widget)

        # Initialize the user interface
        self.initUI()

    def initUI(self):

        # Create a QVBoxLayout for the central widget
        layout = QVBoxLayout(self.central_widget)

        # Set spacing between widgets
        layout.setSpacing(10)

        # Set the alignment of the layout (optional)
        layout.setAlignment(Qt.AlignmentFlag.AlignTop)

        # Create QCheckBoxes and set icons
        self.checkbox1 = QCheckBox("Feature 1")
        self.checkbox1.setIcon(QIcon("icon1.png"))

        self.checkbox2 = QCheckBox("Feature 2")
        self.checkbox2.setIcon(QIcon("icon2.png"))

        self.checkbox3 = QCheckBox("Feature 3")
        self.checkbox3.setIcon(QIcon("icon3.png"))

        layout.addWidget(self.checkbox1)
        layout.addWidget(self.checkbox2)
        layout.addWidget(self.checkbox3)

    def center(self):
        # Get the geometry of the screen
        screen = QApplication.primaryScreen().size()

        # Calculate the center point of the screen
        x = (screen.width() - self.width()) // 2
        y = (screen.height() - self.height()) // 2

        # Move the window to the center
        self.move(x, y)


if __name__ == "__main__":
    app = QApplication(sys.argv)

    # Create a new app window with title and dimensions
    window = AppWindow("PyQt QCheckBox", 640, 480)

    # Center the app window on the screen
    window.center()

    # Show the app window on the screen
    window.show()

    # Run the application event loop
    sys.exit(app.exec())
Enabling and Disabling the Checkbox
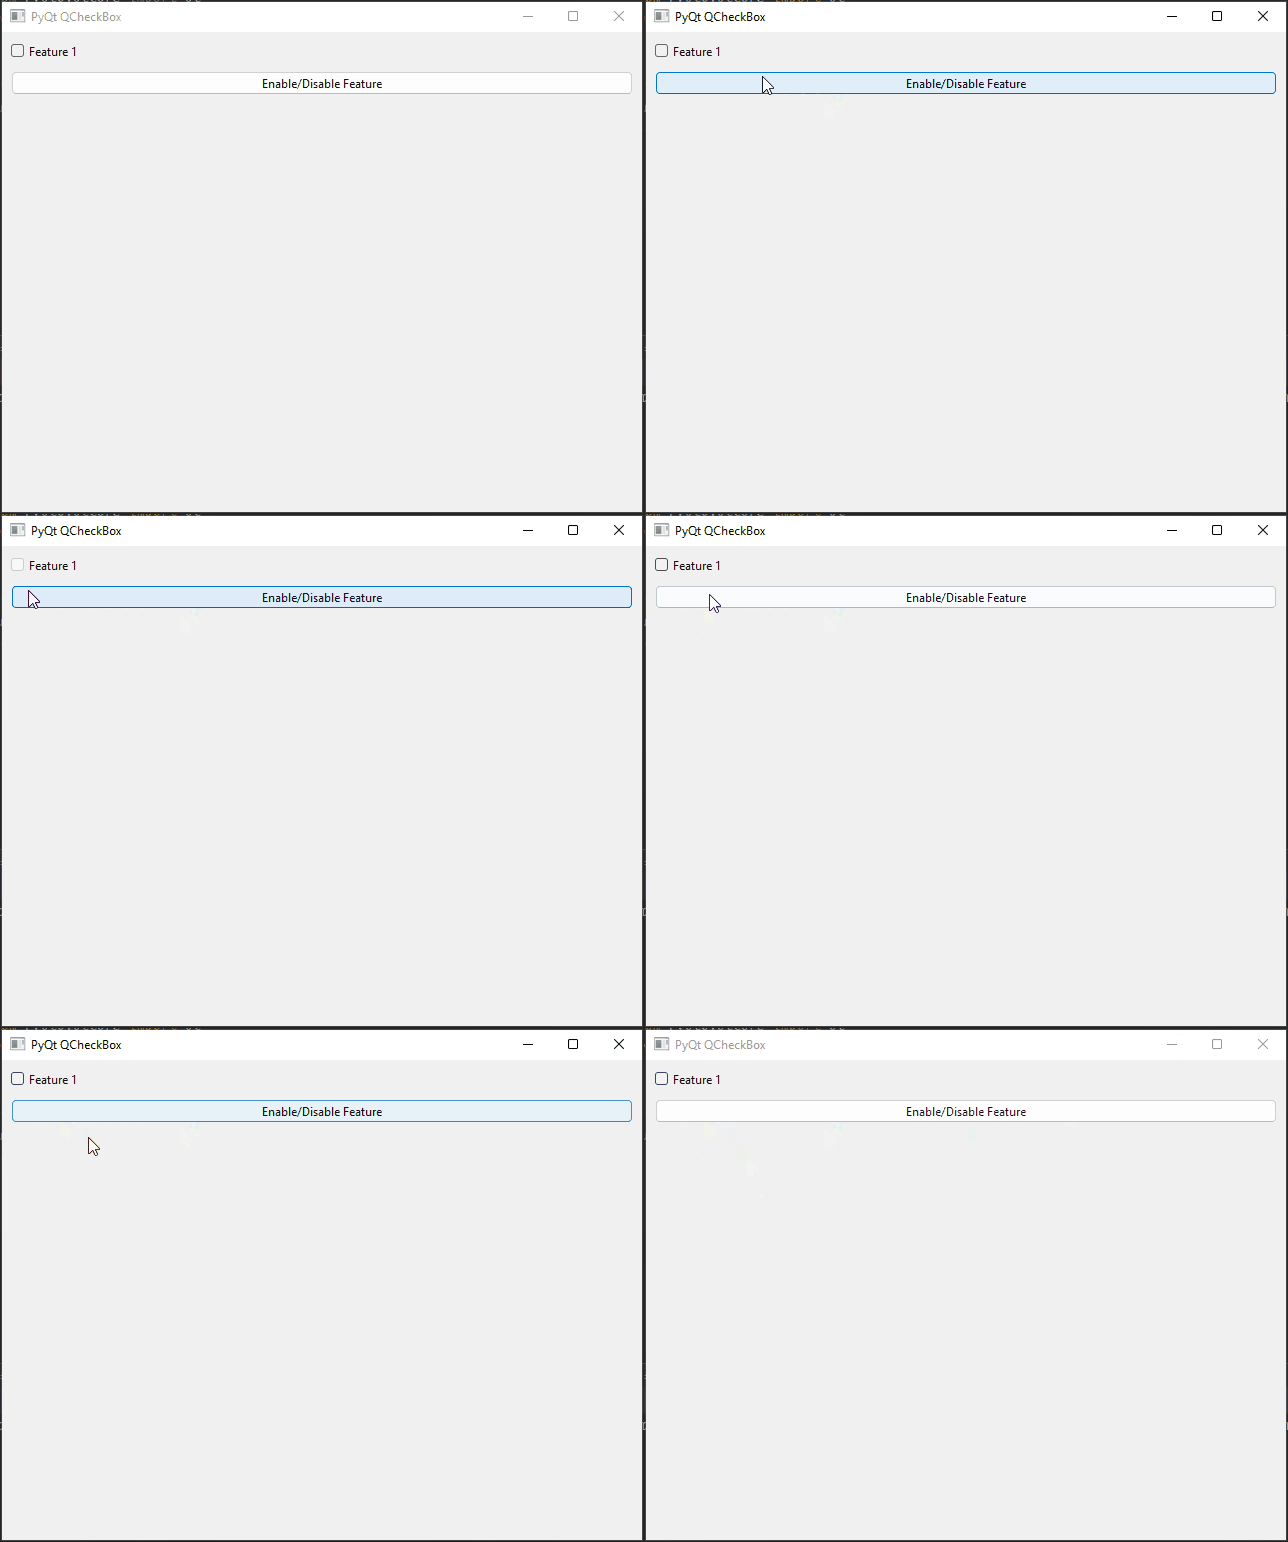
To disable the checkbox and make it non-editable, use the setEnabled method:
import sys

from PyQt6.QtCore import Qt
from PyQt6.QtWidgets import *


# Create a QMainWindow subclass
class AppWindow(QMainWindow):

    def __init__(self, title, width, height, left=100, top=100):
        super().__init__()

        # Set the window title
        self.setWindowTitle(title)

        # Set the window location and size
        self.setGeometry(left, top, width, height)

        # Create a central widget to hold the layout
        self.central_widget = QWidget()
        self.setCentralWidget(self.central_widget)

        # Initialize the user interface
        self.initUI()

    def initUI(self):

        # Create a QVBoxLayout for the central widget
        layout = QVBoxLayout(self.central_widget)

        # Set spacing between widgets
        layout.setSpacing(10)

        # Set the alignment of the layout (optional)
        layout.setAlignment(Qt.AlignmentFlag.AlignTop)

        # Create a CheckBox
        self.checkbox = QCheckBox("Feature 1")

        # Create a QPushButton
        self.button = QPushButton("Enable/Disable Feature")

        self.button.clicked.connect(self.enableDisable)

        layout.addWidget(self.checkbox)
        layout.addWidget(self.button)

    def enableDisable(self):
        self.checkbox.setEnabled(not self.checkbox.isEnabled())

    def center(self):
        # Get the geometry of the screen
        screen = QApplication.primaryScreen().size()

        # Calculate the center point of the screen
        x = (screen.width() - self.width()) // 2
        y = (screen.height() - self.height()) // 2

        # Move the window to the center
        self.move(x, y)


if __name__ == "__main__":
    app = QApplication(sys.argv)

    # Create a new app window with title and dimensions
    window = AppWindow("PyQt QCheckBox", 640, 480)

    # Center the app window on the screen
    window.center()

    # Show the app window on the screen
    window.show()

    # Run the application event loop
    sys.exit(app.exec())
Toggling the CheckBox
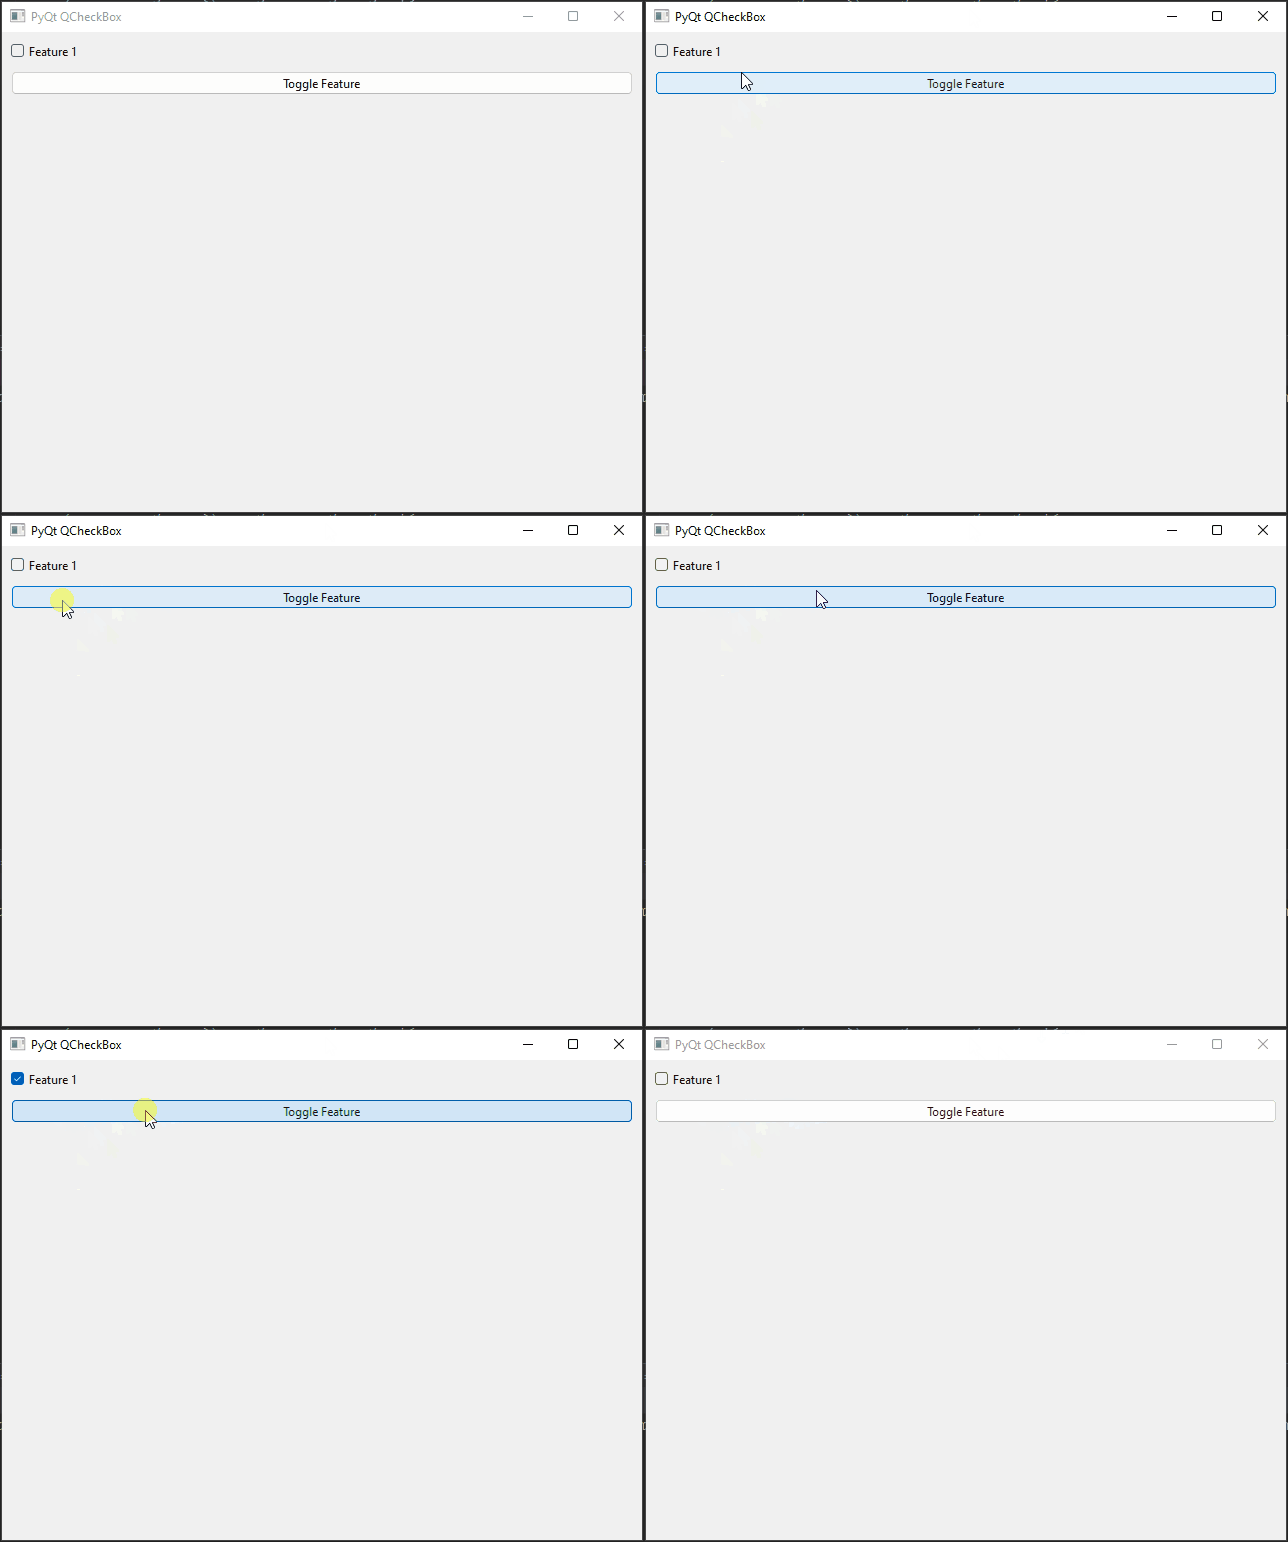
You can programmatically toggle the checkbox state using the toggle method:
import sys

from PyQt6.QtCore import Qt
from PyQt6.QtWidgets import *


# Create a QMainWindow subclass
class AppWindow(QMainWindow):

    def __init__(self, title, width, height, left=100, top=100):
        super().__init__()

        # Set the window title
        self.setWindowTitle(title)

        # Set the window location and size
        self.setGeometry(left, top, width, height)

        # Create a central widget to hold the layout
        self.central_widget = QWidget()
        self.setCentralWidget(self.central_widget)

        # Initialize the user interface
        self.initUI()

    def initUI(self):

        # Create a QVBoxLayout for the central widget
        layout = QVBoxLayout(self.central_widget)

        # Set spacing between widgets
        layout.setSpacing(10)

        # Set the alignment of the layout (optional)
        layout.setAlignment(Qt.AlignmentFlag.AlignTop)

        # Create a CheckBox
        self.checkbox = QCheckBox("Feature 1")

        # Create a QPushButton
        self.button = QPushButton("Toggle Feature")

        self.button.clicked.connect(self.toggle)

        layout.addWidget(self.checkbox)
        layout.addWidget(self.button)

    def toggle(self):
        self.checkbox.toggle()

    def center(self):
        # Get the geometry of the screen
        screen = QApplication.primaryScreen().size()

        # Calculate the center point of the screen
        x = (screen.width() - self.width()) // 2
        y = (screen.height() - self.height()) // 2

        # Move the window to the center
        self.move(x, y)


if __name__ == "__main__":
    app = QApplication(sys.argv)

    # Create a new app window with title and dimensions
    window = AppWindow("PyQt QCheckBox", 640, 480)

    # Center the app window on the screen
    window.center()

    # Show the app window on the screen
    window.show()

    # Run the application event loop
    sys.exit(app.exec())
Working with Tri-State QCheckBox
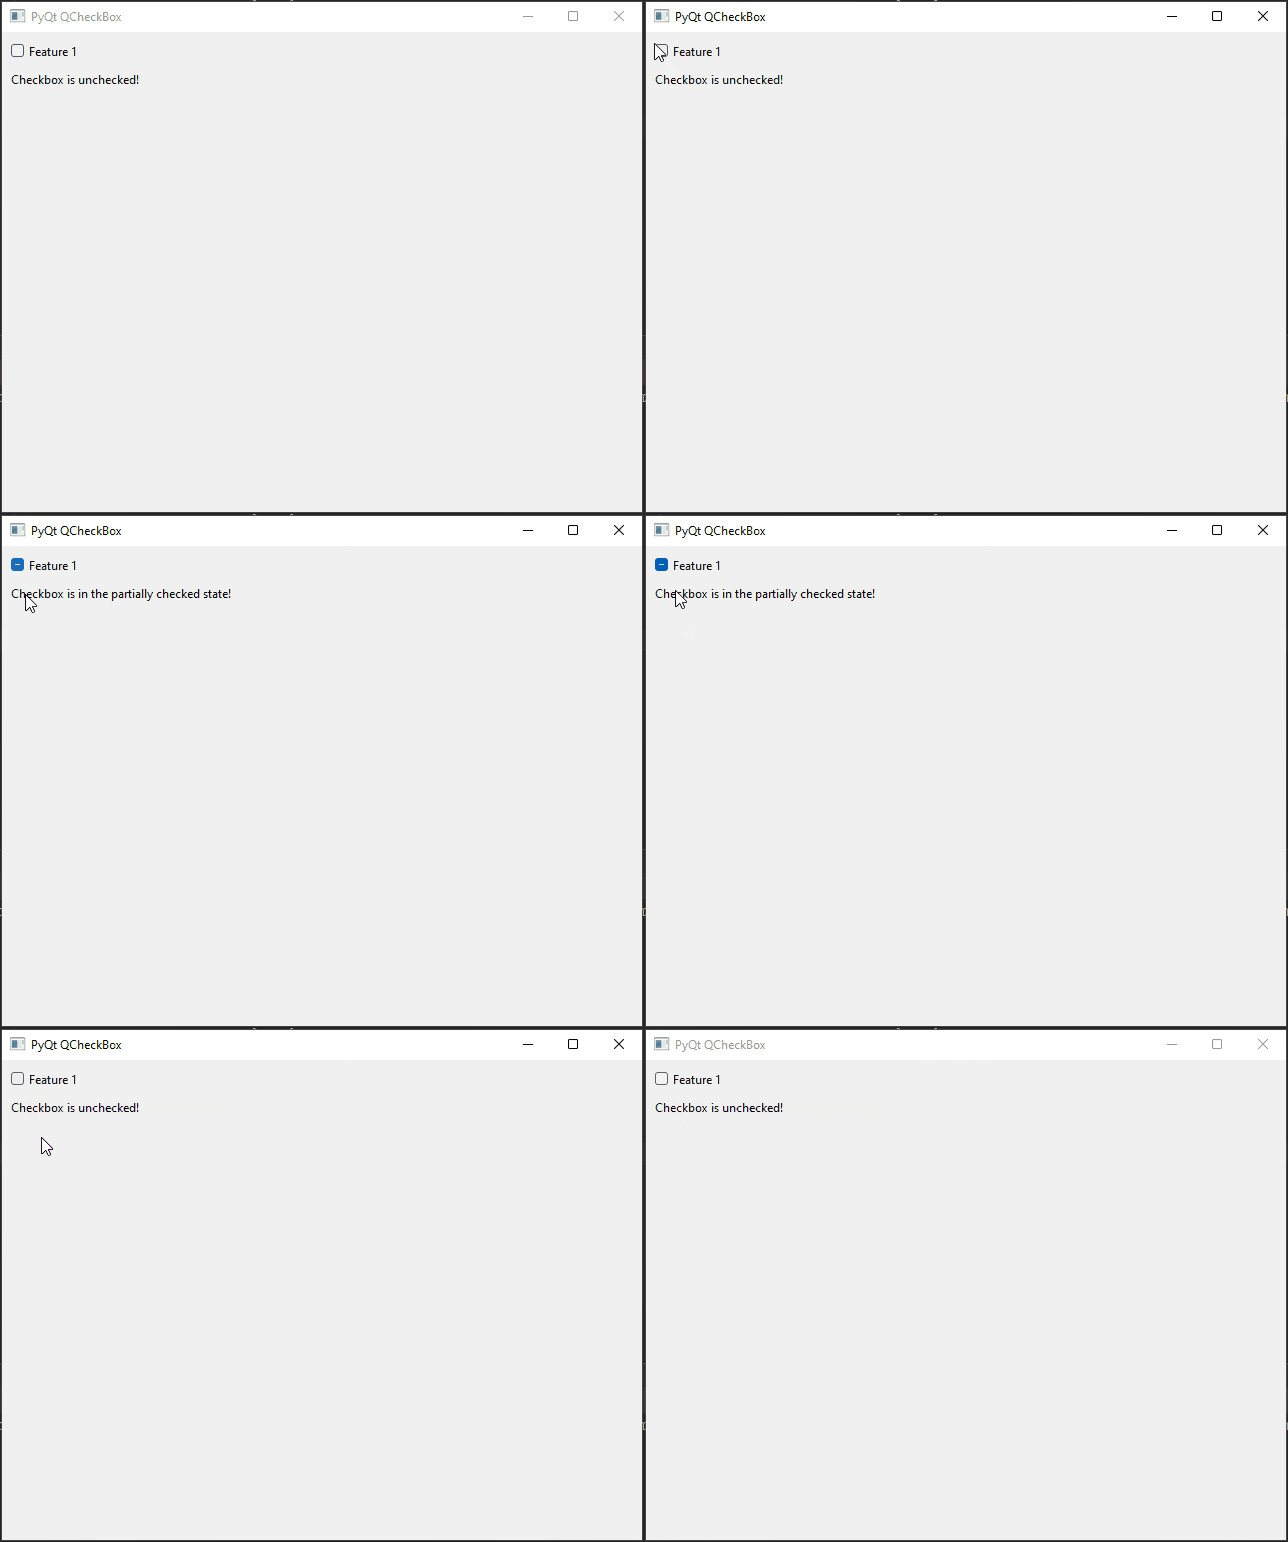
By default, QCheckBox has two states: checked and unchecked. However, you can enable the tri-state mode by calling the setTristate(True) method. In tri-state mode, the checkbox can have three states: checked, unchecked, and partially checked.
Here’s an example of a tri-state QCheckBox:
import sys

from PyQt6.QtCore import Qt
from PyQt6.QtWidgets import *


# Create a QMainWindow subclass
class AppWindow(QMainWindow):

    def __init__(self, title, width, height, left=100, top=100):
        super().__init__()

        # Set the window title
        self.setWindowTitle(title)

        # Set the window location and size
        self.setGeometry(left, top, width, height)

        # Create a central widget to hold the layout
        self.central_widget = QWidget()
        self.setCentralWidget(self.central_widget)

        # Initialize the user interface
        self.initUI()

    def initUI(self):

        # Create a QVBoxLayout for the central widget
        layout = QVBoxLayout(self.central_widget)

        # Set spacing between widgets
        layout.setSpacing(10)

        # Set the alignment of the layout (optional)
        layout.setAlignment(Qt.AlignmentFlag.AlignTop)

        self.checkbox = QCheckBox("Feature 1")

        self.checkbox.setTristate(True)

        self.checkbox.stateChanged.connect(self.on_checkbox_state_changed)

        # Create a QLabel
        self.label = QLabel('Checkbox is unchecked!')

        layout.addWidget(self.checkbox)
        layout.addWidget(self.label)

    def on_checkbox_state_changed(self, state):
        if state == 2:
            self.label.setText('Checkbox is checked!')
        elif state == 1:
            self.label.setText('Checkbox is in the partially checked state!')
        else:
            self.label.setText('Checkbox is unchecked!')

    def center(self):
        # Get the geometry of the screen
        screen = QApplication.primaryScreen().size()

        # Calculate the center point of the screen
        x = (screen.width() - self.width()) // 2
        y = (screen.height() - self.height()) // 2

        # Move the window to the center
        self.move(x, y)


if __name__ == "__main__":
    app = QApplication(sys.argv)

    # Create a new app window with title and dimensions
    window = AppWindow("PyQt QCheckBox", 640, 480)

    # Center the app window on the screen
    window.center()

    # Show the app window on the screen
    window.show()

    # Run the application event loop
    sys.exit(app.exec())
In this example, we enable the tri-state mode by calling setTristate(True) on the QCheckBox instance. When you run the script, you will see that the checkbox can be in three different states.
Other Signals
Apart from stateChanged, QCheckBox also emits other signals such as clicked and toggled. The clicked signal is triggered when the user clicks on the checkbox, while the toggled signal is emitted whenever the checkbox state changes, regardless of whether it was triggered by user interaction or through code.
import sys

from PyQt6.QtCore import Qt
from PyQt6.QtWidgets import *


# Create a QMainWindow subclass
class AppWindow(QMainWindow):

    def __init__(self, title, width, height, left=100, top=100):
        super().__init__()

        # Set the window title
        self.setWindowTitle(title)

        # Set the window location and size
        self.setGeometry(left, top, width, height)

        # Create a central widget to hold the layout
        self.central_widget = QWidget()
        self.setCentralWidget(self.central_widget)

        # Initialize the user interface
        self.initUI()

    def initUI(self):

        # Create a QVBoxLayout for the central widget
        layout = QVBoxLayout(self.central_widget)

        # Set spacing between widgets
        layout.setSpacing(10)

        # Set the alignment of the layout (optional)
        layout.setAlignment(Qt.AlignmentFlag.AlignTop)

        self.checkbox = QCheckBox("Feature 1")

        # Clicked signal
        self.checkbox.clicked.connect(self.checkbox_clicked)

        # Toggled signal
        self.checkbox.toggled.connect(self.checkbox_toggled)

        layout.addWidget(self.checkbox)

    def checkbox_clicked(self):
        print('Checkbox clicked!')

    def checkbox_toggled(self, checked):
        if checked:
            print('Checkbox is now checked!')
        else:
            print('Checkbox is now unchecked!')

    def center(self):
        # Get the geometry of the screen
        screen = QApplication.primaryScreen().size()

        # Calculate the center point of the screen
        x = (screen.width() - self.width()) // 2
        y = (screen.height() - self.height()) // 2

        # Move the window to the center
        self.move(x, y)


if __name__ == "__main__":
    app = QApplication(sys.argv)

    # Create a new app window with title and dimensions
    window = AppWindow("PyQt QCheckBox", 640, 480)

    # Center the app window on the screen
    window.center()

    # Show the app window on the screen
    window.show()

    # Run the application event loop
    sys.exit(app.exec())
You can connect these signals to appropriate functions to handle different scenarios in your application.
Multi-Checkbox Selection
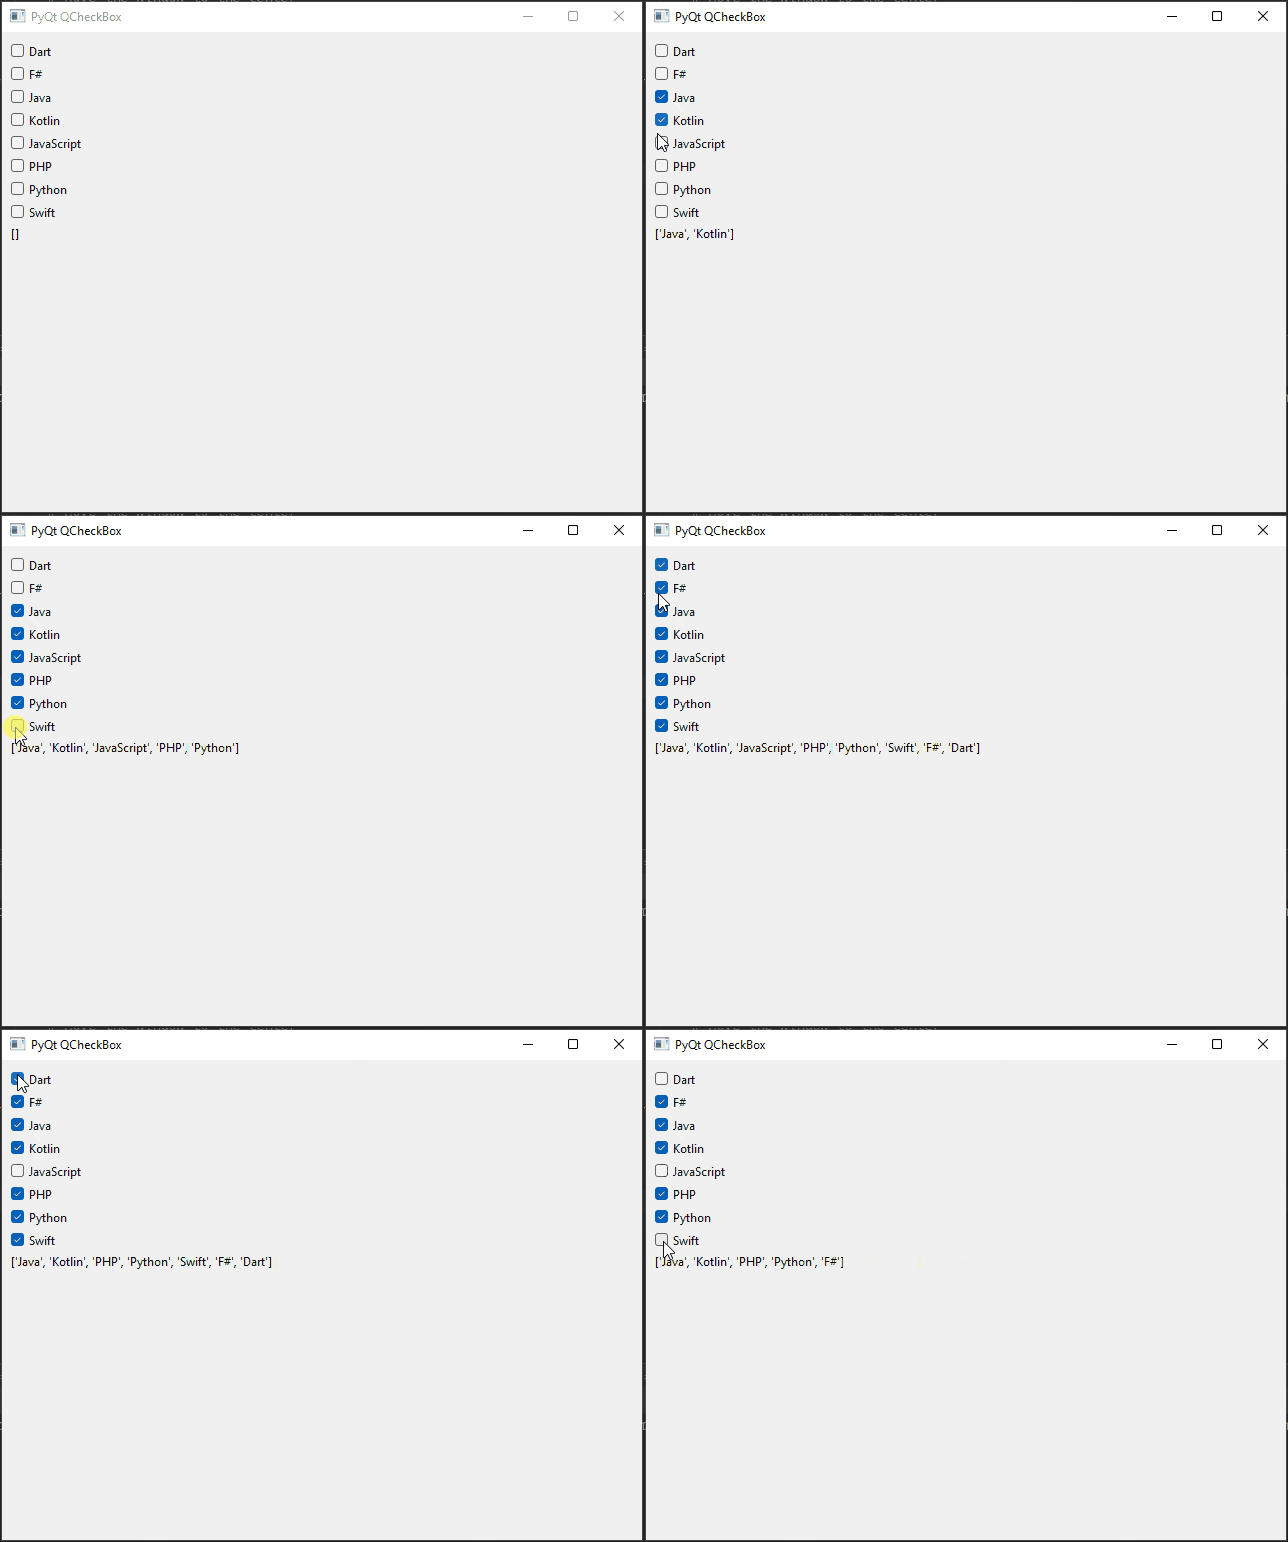
This code example demonstrates how to create a graphical user interface (GUI) application with multiple checkboxes to allow users to select programming languages of their choice. The selected languages are displayed in a list below the checkboxes.
import sys
from PyQt6.QtCore import Qt
from PyQt6.QtWidgets import *


# Create a QMainWindow subclass
class AppWindow(QMainWindow):

    def __init__(self, title, width, height, left=100, top=100):
        super().__init__()

        # Set the window title
        self.setWindowTitle(title)

        # Set the window location and size
        self.setGeometry(left, top, width, height)

        # Create a central widget to hold the layout
        self.central_widget = QWidget()
        self.setCentralWidget(self.central_widget)

        # Initialize the user interface
        self.initUI()

    def initUI(self):
        # Create a QVBoxLayout for the central widget
        layout = QVBoxLayout(self.central_widget)

        # Set spacing between widgets
        layout.setSpacing(3)

        # Set the alignment of the layout (optional)
        layout.setAlignment(Qt.AlignmentFlag.AlignTop)

        # Create QCheckBoxes for various programming languages
        for language in ["Dart", "F#", "Java", "Kotlin", "JavaScript", "PHP", "Python", "Swift"]:
            chk_language = QCheckBox(language)

            # Connect the toggled signal of the QCheckBox to the on_language_select method
            chk_language.toggled.connect(lambda checked, lang=language: self.on_language_select(checked, lang))

            # Add QCheckBox to the QVBoxLayout
            layout.addWidget(chk_language)

        # Create a list to store the selected languages
        self.languages = []

        # Create a QLabel to display selected languages
        self.label = QLabel(str(self.languages))

        # Add the QLabel to the QVBoxLayout
        layout.addWidget(self.label)

    def on_language_select(self, checked, language):
        # Update the list of selected languages and display them in the QLabel
        if checked:
            self.languages.append(language)
        else:
            self.languages.remove(language)

        self.label.setText(str(self.languages))

    def center(self):
        # Get the geometry of the screen
        screen = QApplication.primaryScreen().size()

        # Calculate the center point of the screen
        x = (screen.width() - self.width()) // 2
        y = (screen.height() - self.height()) // 2

        # Move the window to the center
        self.move(x, y)


if __name__ == "__main__":
    app = QApplication(sys.argv)

    # Create a new app window with title and dimensions
    window = AppWindow("PyQt QCheckBox", 640, 480)

    # Center the app window on the screen
    window.center()

    # Show the app window on the screen
    window.show()

    # Run the application event loop
    sys.exit(app.exec())
QCheckBox in Real-World Examples
The QCheckBox widget is widely used in many real-world PyQt applications. Some common use cases include:
- Creating preference panels with various options that the user can enable or disable.
- Enabling and disabling specific features or functionality based on user preferences.
- Implementing filters in data visualization applications to allow users to show or hide specific data items.
In these scenarios, you can use QCheckBox along with other PyQt widgets and functionalities to build intuitive and user-friendly applications.
Conclusion
In this article, we explored the fundamentals of PyQt QCheckBox, a widget used to provide binary choices in graphical user interfaces. We learned how to create a basic PyQt application with a QCheckBox, enable tristate mode, handle signals, and perform various operations programmatically. Armed with this knowledge, you can now incorporate QCheckBox into your PyQt applications, making them more interactive and user-friendly.
The QCheckBox is a fundamental and versatile widget that enhances the interactivity and usability of your PyQt applications. By combining it with other PyQt components, you can build powerful desktop applications with a clean and modern user interface.
I hope you found this article informative and useful. If you would like to receive more content, please consider subscribing to our newsletter.
