In every app, we need to show some words—maybe a title, a message, or a button label. Flutter gives us a simple and powerful tool for this: the Text widget.
In this article, you’ll learn how to use the Text widget to show text, style it, align it, and even handle long sentences. Let’s get started!
What Is the Text Widget?
The Text widget in Flutter is used to display text on the screen. This can be short text like a button title, or long text like a paragraph.
Here’s a quick example:
Text('Hello, World!');This line shows “Hello, World!” but it must be placed inside a widget tree (like inside a Scaffold) to appear on the screen.
Creating a Simple Text Widget
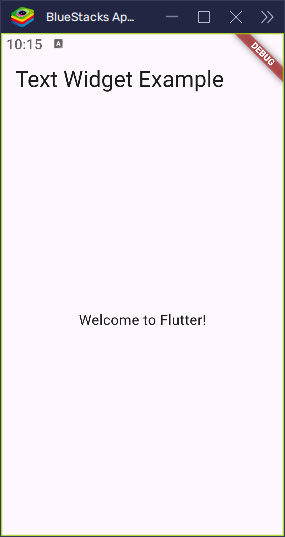
Let’s build a full Flutter app that shows a simple text message in the center:
import 'package:flutter/material.dart';

void main() {
  runApp(const MyApp());
}

class MyApp extends StatelessWidget {
  const MyApp({super.key});

  @override
  Widget build(BuildContext context) {
    return MaterialApp(
      home: Scaffold(
        appBar: AppBar(title: Text('Text Widget Example')),
        body: Center(child: Text('Welcome to Flutter!')),
      ),
    );
  }
}
This example uses a Scaffold to build the screen, and a Center widget to place the text in the middle.
Customizing Text Appearance
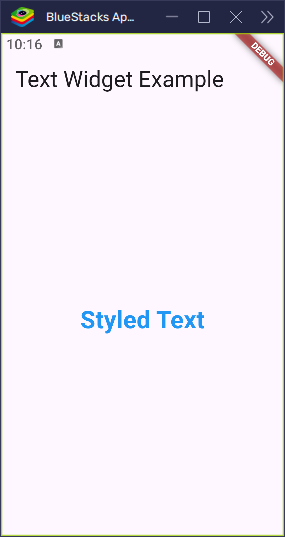
We can make text bigger, colorful, bold, or italic using the style property. The TextStyle class lets us customize how the text looks.
import 'package:flutter/material.dart';

void main() {
  runApp(const MyApp());
}

class MyApp extends StatelessWidget {
  const MyApp({super.key});

  @override
  Widget build(BuildContext context) {
    return MaterialApp(
      home: Scaffold(
        appBar: AppBar(title: Text('Text Widget Example')),
        body: Center(
          child: Text(
            'Styled Text',
            style: TextStyle(
              fontSize: 24,
              color: Colors.blue,
              fontWeight: FontWeight.bold,
            ),
          ),
        ),
      ),
    );
  }
}
This makes the text bigger, turns it blue, and makes it bold. You can also make it italic by adding fontStyle: FontStyle.italic.
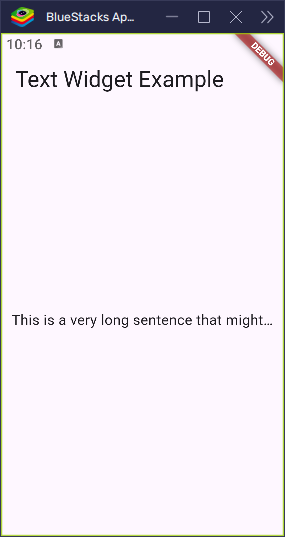
Handling Long Text
Sometimes your text may be too long to fit in the space. You can fix this using maxLines and overflow.
import 'package:flutter/material.dart';

void main() {
  runApp(const MyApp());
}

class MyApp extends StatelessWidget {
  const MyApp({super.key});

  @override
  Widget build(BuildContext context) {
    return MaterialApp(
      home: Scaffold(
        appBar: AppBar(title: Text('Text Widget Example')),
        body: Center(
          child: Padding(
            padding: const EdgeInsets.all(12.0),
            child: Text(
              'This is a very long sentence that might not fit in one line.',
              maxLines: 1,
              overflow: TextOverflow.ellipsis,
            ),
          ),
        ),
      ),
    );
  }
}
This tells Flutter to show only 1 line of text. If the sentence is too long, it will be cut off and end with three dots (...).
Other overflow options include fade, clip, and visible.
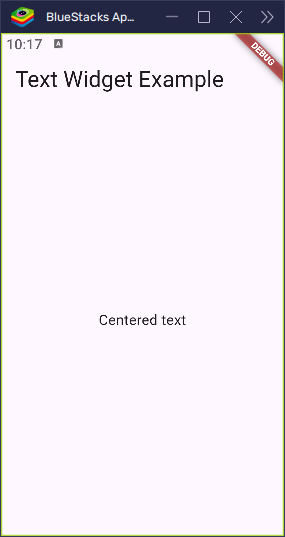
Text Alignment and Direction
By default, text is aligned to the start (usually the left side). But you can change it using textAlign.
import 'package:flutter/material.dart';

void main() {
  runApp(const MyApp());
}

class MyApp extends StatelessWidget {
  const MyApp({super.key});

  @override
  Widget build(BuildContext context) {
    return MaterialApp(
      home: Scaffold(
        appBar: AppBar(title: Text('Text Widget Example')),
        body: Center(child: Text('Centered text', textAlign: TextAlign.center)),
      ),
    );
  }
}
To support languages like Arabic or Hebrew, you can change the text direction using textDirection.
import 'package:flutter/material.dart';

void main() {
  runApp(const MyApp());
}

class MyApp extends StatelessWidget {
  const MyApp({super.key});

  @override
  Widget build(BuildContext context) {
    return MaterialApp(
      home: Scaffold(
        appBar: AppBar(title: Text('Text Widget Example')),
        body: Center(
          child: Text(
            'أُحِبُّ البرمَجَة!',
            textDirection: TextDirection.rtl,
            textAlign: TextAlign.start,
          ),
        ),
      ),
    );
  }
}
This displays the Arabic text from right to left.

Real-World Examples
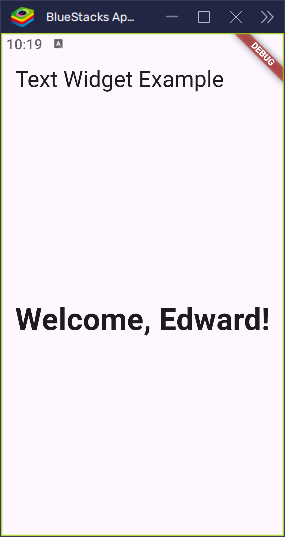
1. Welcome Message
import 'package:flutter/material.dart';

void main() {
  runApp(const MyApp());
}

class MyApp extends StatelessWidget {
  const MyApp({super.key});

  @override
  Widget build(BuildContext context) {
    return MaterialApp(
      home: Scaffold(
        appBar: AppBar(title: Text('Text Widget Example')),
        body: Center(
          child: Text(
            'Welcome, Edward!',
            style: TextStyle(fontSize: 30, fontWeight: FontWeight.w600),
          ),
        ),
      ),
    );
  }
}
This is great for greeting users when they open your app.
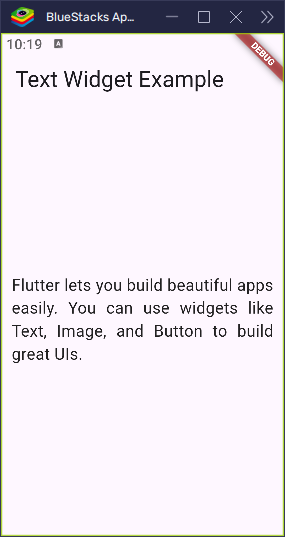
2. Paragraph with Justify
import 'package:flutter/material.dart';

void main() {
  runApp(const MyApp());
}

class MyApp extends StatelessWidget {
  const MyApp({super.key});

  @override
  Widget build(BuildContext context) {
    return MaterialApp(
      home: Scaffold(
        appBar: AppBar(title: Text('Text Widget Example')),
        body: Center(
          child: Padding(
            padding: const EdgeInsets.all(12.0),
            child: Text(
              'Flutter lets you build beautiful apps easily. You can use widgets like Text, Image, and Button to build great UIs.',
              style: TextStyle(fontSize: 16, color: Colors.black87),
              textAlign: TextAlign.justify,
            ),
          ),
        ),
      ),
    );
  }
}
This styles the paragraph and aligns it evenly from left to right.
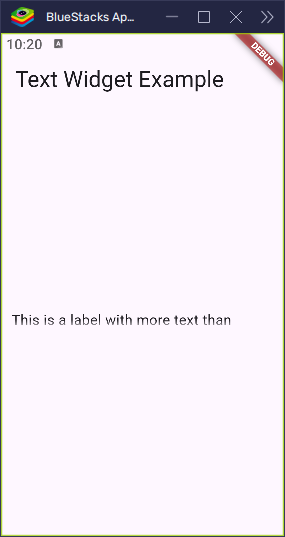
3. Label with Overflow Fade
import 'package:flutter/material.dart';

void main() {
  runApp(const MyApp());
}

class MyApp extends StatelessWidget {
  const MyApp({super.key});

  @override
  Widget build(BuildContext context) {
    return MaterialApp(
      home: Scaffold(
        appBar: AppBar(title: Text('Text Widget Example')),
        body: Center(
          child: Padding(
            padding: const EdgeInsets.all(12.0),
            child: Text(
              'This is a label with more text than expected',
              maxLines: 1,
              overflow: TextOverflow.fade,
            ),
          ),
        ),
      ),
    );
  }
}
Useful when you want a clean design and the full text won’t fit.
Conclusion
The Text widget is one of the most useful tools in Flutter. In this article, you learned how to:
- Display text in your app
- Change how the text looks using
TextStyle - Control long text using
maxLinesandoverflow - Align text and support other languages