When it comes to building user interfaces in Java applications, JavaFX has proven to be a versatile and powerful framework. One of the key layout managers in JavaFX is the HBox, which stands for Horizontal Box. The HBox allows developers to arrange nodes horizontally, making it perfect for creating flexible and responsive user interfaces. In this article, we’ll explore the JavaFX HBox layout manager and provide code examples to demonstrate its usage.

with hands-on learning.
get the skills and confidence to land your next move.
Understanding the HBox Layout
The HBox layout manager is a container that arranges its child nodes in a single horizontal row. It ensures that each child node is placed adjacent to the previous one, maintaining their order and alignment. This makes it ideal for arranging items such as buttons, labels, and text fields in a row-like fashion.
Creating a Basic HBox
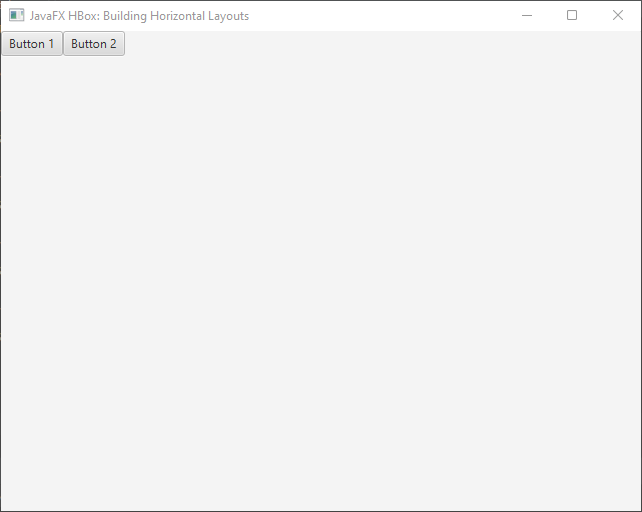
Let’s start by creating a simple JavaFX application that uses HBox to arrange a couple of buttons horizontally.
import javafx.application.Application;
import javafx.scene.Scene;
import javafx.scene.control.Button;
import javafx.scene.layout.*;
import javafx.stage.Stage;

public class Main extends Application {

    private final BorderPane parent = new BorderPane();

    @Override
    public void start(Stage stage) throws Exception {
        this.setupStage(stage);
    }

    @Override
    public void init() throws Exception {
        super.init();
        this.buildUI();
    }

    private void buildUI() {

        // Create an HBox container
        HBox content = new HBox();

        Button button1 = new Button("Button 1");
        Button button2 = new Button("Button 2");

        // Add buttons to HBox
        content.getChildren().addAll(button1, button2);

        this.parent.setCenter(content);

    }

    private void setupStage(Stage stage) {

        Scene scene = new Scene(this.parent, 640, 480);

        // Set the stage title
        stage.setTitle("JavaFX HBox: Building Horizontal Layouts");

        // Set the stage scene
        stage.setScene(scene);

        // Center the stage on the screen
        stage.centerOnScreen();

        // Show the stage on the screen
        stage.show();

    }

}
In this example, we create an HBox named content, then create two Button instances named button1 and button2. We add these buttons to the HBox using the getChildren().addAll(…) method.

Customizing HBox Layout
HBox provides various properties that allow you to customize the appearance and behavior of the layout. Let’s explore some of these properties with examples:
Alignment and Spacing
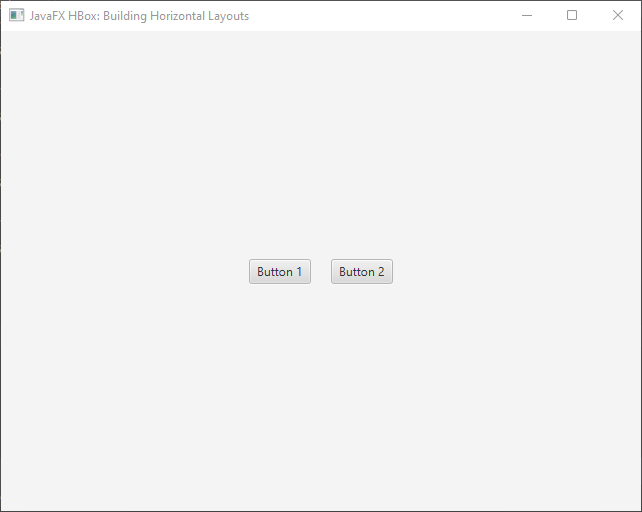
HBox offers properties to control the alignment of its child nodes and the spacing between them.
import javafx.application.Application;
import javafx.geometry.Pos;
import javafx.scene.Scene;
import javafx.scene.control.Button;
import javafx.scene.layout.*;
import javafx.stage.Stage;

public class Main extends Application {

    private final BorderPane parent = new BorderPane();

    @Override
    public void start(Stage stage) throws Exception {
        this.setupStage(stage);
    }

    @Override
    public void init() throws Exception {
        super.init();
        this.buildUI();
    }

    private void buildUI() {

        // Create an HBox container
        HBox content = new HBox();

        // Set alignment to center
        content.setAlignment(Pos.CENTER);

        // Set spacing between nodes
        content.setSpacing(20);

        Button button1 = new Button("Button 1");
        Button button2 = new Button("Button 2");

        // Add buttons to HBox
        content.getChildren().addAll(button1, button2);

        this.parent.setCenter(content);

    }

    private void setupStage(Stage stage) {

        Scene scene = new Scene(this.parent, 640, 480);

        // Set the stage title
        stage.setTitle("JavaFX HBox: Building Horizontal Layouts");

        // Set the stage scene
        stage.setScene(scene);

        // Center the stage on the screen
        stage.centerOnScreen();

        // Show the stage on the screen
        stage.show();

    }

}
In this example, we set the alignment of the HBox to center using the setAlignment(Pos.CENTER) method and specify a spacing of 20 pixels between the child nodes using the setSpacing(20) method.

Padding
You can also add padding around the entire HBox using the setPadding(Insets) method:
import javafx.application.Application;
import javafx.geometry.Insets;
import javafx.geometry.Pos;
import javafx.scene.Scene;
import javafx.scene.control.Button;
import javafx.scene.layout.*;
import javafx.stage.Stage;

public class Main extends Application {

    private final BorderPane parent = new BorderPane();

    @Override
    public void start(Stage stage) throws Exception {
        this.setupStage(stage);
    }

    @Override
    public void init() throws Exception {
        super.init();
        this.buildUI();
    }

    private void buildUI() {

        // Create an HBox container
        HBox content = new HBox();

        // Set alignment to center
        content.setAlignment(Pos.CENTER);

        // Set spacing between nodes
        content.setSpacing(20);

        // Add 10 pixels of padding around the HBox
        content.setPadding(new Insets(10));

        Button button1 = new Button("Button 1");
        Button button2 = new Button("Button 2");

        // Add buttons to HBox
        content.getChildren().addAll(button1, button2);

        this.parent.setCenter(content);

    }

    private void setupStage(Stage stage) {

        Scene scene = new Scene(this.parent, 640, 480);

        // Set the stage title
        stage.setTitle("JavaFX HBox: Building Horizontal Layouts");

        // Set the stage scene
        stage.setScene(scene);

        // Center the stage on the screen
        stage.centerOnScreen();

        // Show the stage on the screen
        stage.show();

    }

}
Grow Priority
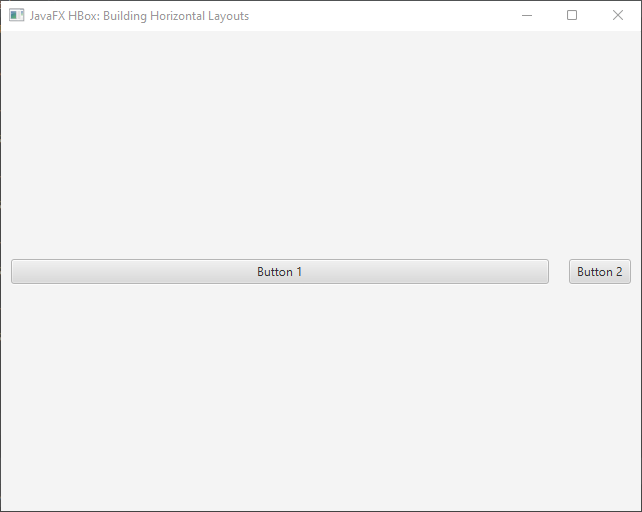
HBox allows you to set the “grow priority” for its child nodes, which determines how they should expand within the available space.
import javafx.application.Application;
import javafx.geometry.Insets;
import javafx.geometry.Pos;
import javafx.scene.Scene;
import javafx.scene.control.Button;
import javafx.scene.layout.*;
import javafx.scene.layout.Priority;
import javafx.stage.Stage;

public class Main extends Application {

    private final BorderPane parent = new BorderPane();

    @Override
    public void start(Stage stage) throws Exception {
        this.setupStage(stage);
    }

    @Override
    public void init() throws Exception {
        super.init();
        this.buildUI();
    }

    private void buildUI() {

        // Create an HBox container
        HBox content = new HBox();

        // Set alignment to center
        content.setAlignment(Pos.CENTER);

        // Set spacing between nodes
        content.setSpacing(20);

        // Add 10 pixels of padding around the HBox
        content.setPadding(new Insets(10));

        Button button1 = new Button("Button 1");
        Button button2 = new Button("Button 2");

        // Make button1 expand to fill available space
        HBox.setHgrow(button1, Priority.ALWAYS);

        button1.setMaxWidth(Double.MAX_VALUE);

        // Add buttons to HBox
        content.getChildren().addAll(button1, button2);

        this.parent.setCenter(content);

    }

    private void setupStage(Stage stage) {

        Scene scene = new Scene(this.parent, 640, 480);

        // Set the stage title
        stage.setTitle("JavaFX HBox: Building Horizontal Layouts");

        // Set the stage scene
        stage.setScene(scene);

        // Center the stage on the screen
        stage.centerOnScreen();

        // Show the stage on the screen
        stage.show();

    }

}
In this example, we use the HBox.setHgrow(Node, Priority) method to specify that button1 should have a higher priority for expansion than other nodes.

Conclusion
The HBox layout in JavaFX provides a powerful and flexible way to create horizontal UI layouts. By understanding its properties and methods, you can arrange your GUI components efficiently and achieve the desired visual design. Whether you’re building a simple user interface or a complex application, the HBox layout can help you create organized and user-friendly designs.
In this article, we’ve covered the basics of using the HBox layout, creating a basic horizontal layout with buttons, and customizing its properties. Armed with this knowledge, you’re now ready to start building engaging and well-structured user interfaces using JavaFX’s HBox layout.
Sources:
I hope you found this code informative and useful. If you would like to receive more content, please consider subscribing to our newsletter!


