User interface controls play a crucial role in creating intuitive and efficient user experiences. In the realm of JavaFX development, the ControlsFX library offers a gem known as the PlusMinusSlider. This versatile control allows users to smoothly traverse a range of values between -1 and +1 by manipulating a thumb, providing an elegant solution for scenarios such as scrolling through lists of items at varying speeds. In this article, we’ll explore how to implement and harness the power of the PlusMinusSlider for precisely this purpose.

with hands-on learning.
get the skills and confidence to land your next move.
What’s a PlusMinusSlider?
The PlusMinusSlider is more than just a slider. It combines slider functionality with plus and minus buttons, enabling users to generate a continuous stream of events with values ranging from -1 to +1. The control’s thumb can be moved from its central position to the left or right edge, or top and bottom, based on the orientation you choose. When the user releases the mouse button, the thumb resets to the zero position.
A Use Case: Navigating Vast Lists
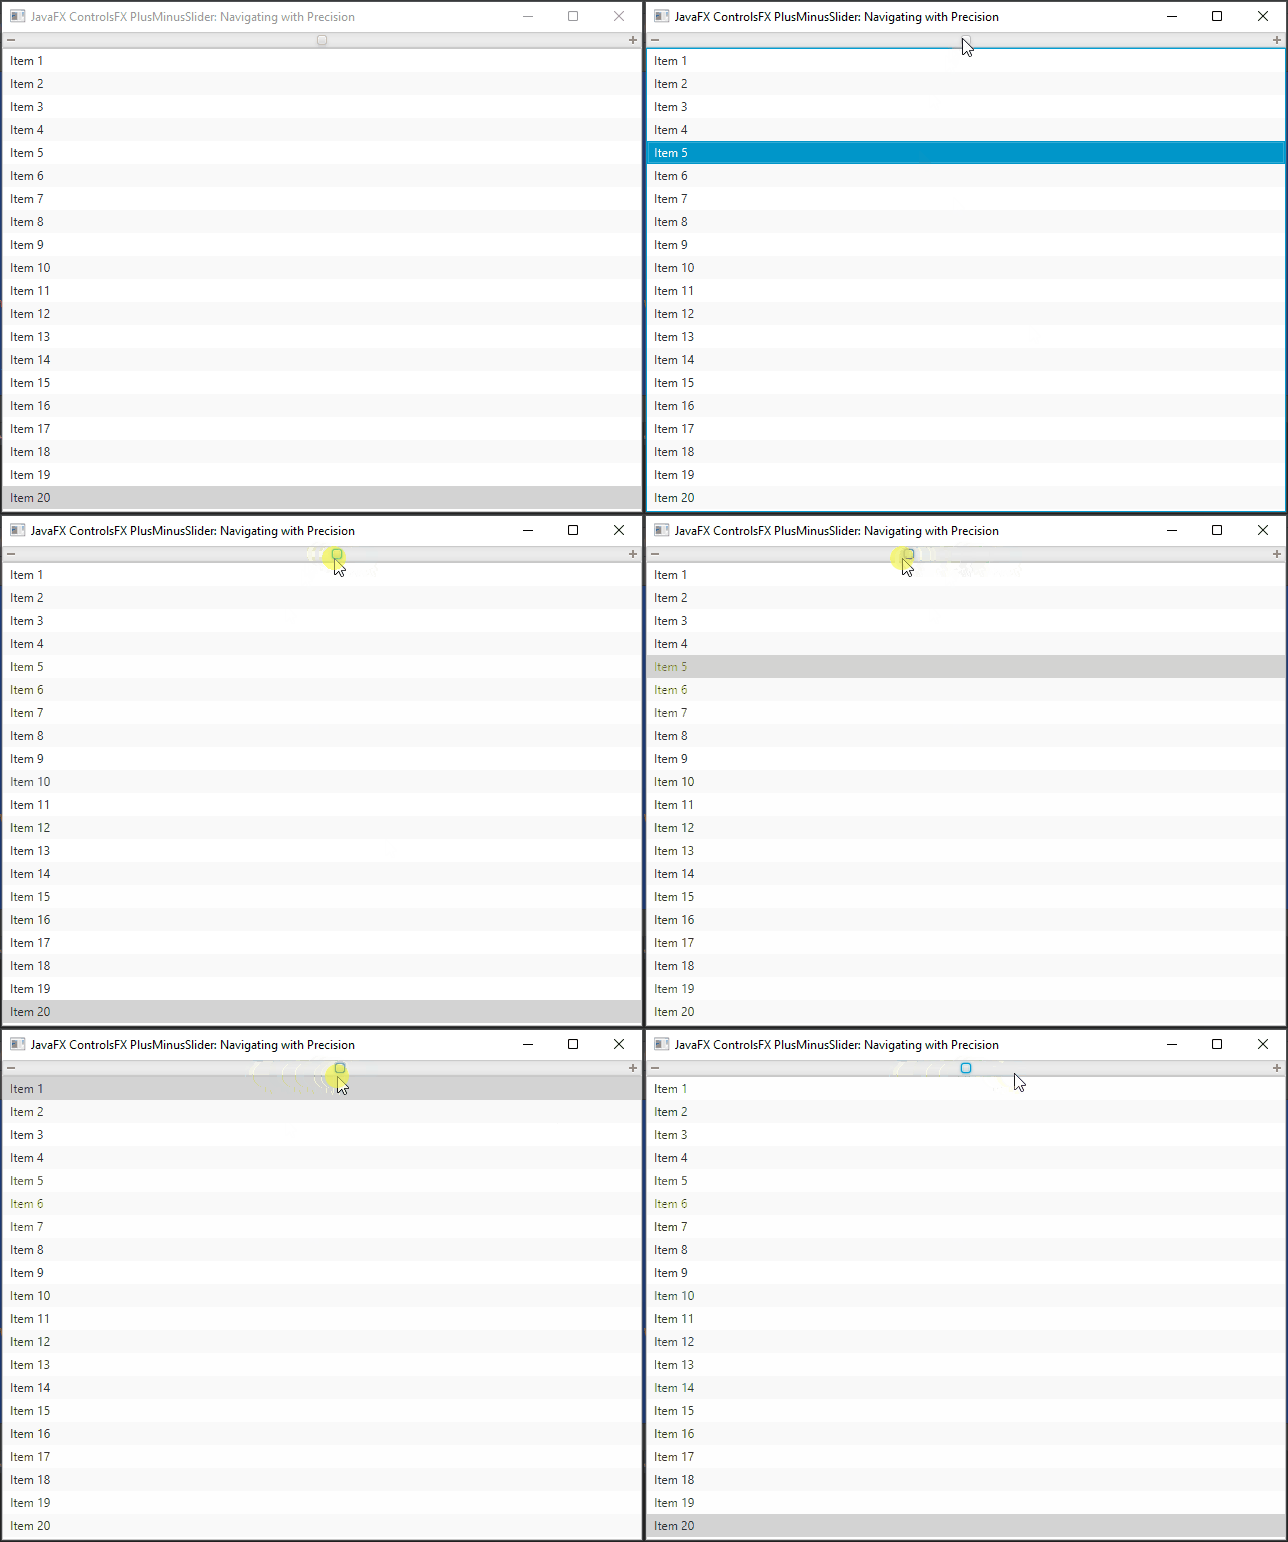
One compelling use case for the PlusMinusSlider is navigating through extensive lists. Imagine you have a lengthy list of items that you want users to explore quickly and at varying speeds. The PlusMinusSlider can serve as an efficient navigation tool for such scenarios. By adjusting the thumb’s position, users can scroll through the list faster or slower, enhancing the overall user experience.
Setting Up ControlsFX
To use the ControlsFX PlusMinusSlider in your JavaFX application, you need to add the ControlsFX library to your project. You can include it as a Maven or Gradle dependency, or manually download the JAR file from the ControlsFX GitHub repository and add it to your project’s classpath.
Implementing a PlusMinusSlider for List Navigation
Imagine a scenario where you have a long list of items, and you want users to be able to navigate through them using the ControlsFX PlusMinusSlider. Here’s how you can implement this:
import javafx.application.Application;
import javafx.scene.Scene;
import javafx.scene.control.ListView;
import javafx.scene.layout.*;
import javafx.stage.Stage;
import org.controlsfx.control.*;

public class Main extends Application {

    private final BorderPane parent = new BorderPane();

    @Override
    public void init() throws Exception {
        super.init();
        this.buildUI();
    }

    private void buildUI() {

        // Create the PlusMinusSlider
        PlusMinusSlider plusMinusSlider = new PlusMinusSlider();

        // Create the ListView
        ListView<String> listView = new ListView<>();

        // Populate the list with sample items
        for (int i = 1; i <= 20; i++) {
            listView.getItems().add("Item " + i);
        }

        // Attach a listener to the PlusMinusSlider value changes
        plusMinusSlider.valueProperty().addListener((observable, oldValue, newValue) -> {

            // Calculate the offset based on the PlusMinusSlider value
            // Adjust the multiplier as needed
            int offset = (int) (newValue.doubleValue() * 10);

            // Scroll the ListView by the calculated offset
            int currentIndex = listView.getSelectionModel().getSelectedIndex();
            int newIndex = currentIndex + offset;

            // Ensure the new index is within valid bounds
            if (newIndex >= 0 && newIndex < listView.getItems().size()) {
                listView.getSelectionModel().select(newIndex);
            }

        });

        // Add the PlusMinusSlider and ListView to the BorderPane
        this.parent.setTop(plusMinusSlider);
        this.parent.setCenter(listView);

    }

    @Override
    public void start(Stage stage) throws Exception {
        this.setupStage(stage);
    }

    private void setupStage(Stage stage) {

        Scene scene = new Scene(this.parent, 640, 480);

        // Set the stage title
        stage.setTitle("JavaFX ControlsFX PlusMinusSlider: Navigating with Precision");

        // Set the stage scene
        stage.setScene(scene);

        // Center the stage on the screen
        stage.centerOnScreen();

        // Show the stage on the screen
        stage.show();

    }

}
In this example, the PlusMinusSlider’s value changes are used to calculate an offset that determines how much the ListView’s selected index should be adjusted. The calculated offset is then added to the current index, and the ListView’s selection is updated accordingly. This approach provides a convenient way for users to navigate through the list with precision using the PlusMinusSlider.

Customizing the PlusMinusSlider Orientation
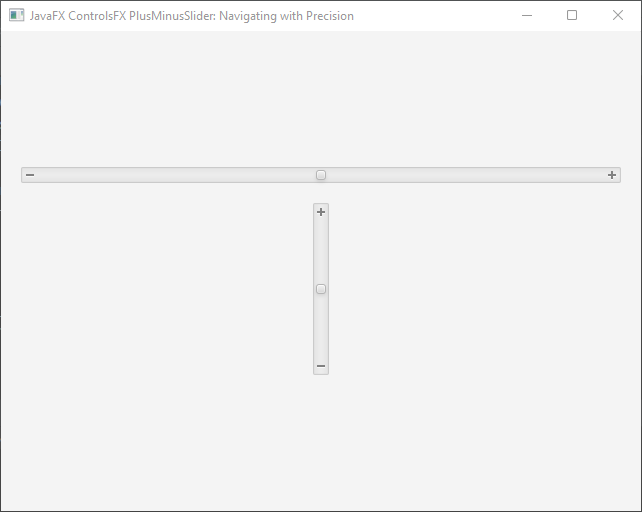
The setOrientation(Orientation value) method in the PlusMinusSlider class sets the orientation of the PlusMinusSlider control. The Orientation enum in JavaFX has two possible values: HORIZONTAL and VERTICAL. The orientation determines whether the slider and buttons are laid out horizontally or vertically within the control.
Here’s how you can use the setOrientation method to change the orientation of a PlusMinusSlider:
import javafx.application.Application;
import javafx.geometry.Insets;
import javafx.geometry.Orientation;
import javafx.geometry.Pos;
import javafx.scene.Scene;
import javafx.scene.layout.*;
import javafx.stage.Stage;
import org.controlsfx.control.*;

public class Main extends Application {

    private final BorderPane parent = new BorderPane();

    @Override
    public void init() throws Exception {
        super.init();
        this.buildUI();
    }

    private void buildUI() {

        // Create the PlusMinusSlider
        PlusMinusSlider horizontalSlider = new PlusMinusSlider();
        horizontalSlider.setOrientation(Orientation.HORIZONTAL);

        PlusMinusSlider verticalSlider = new PlusMinusSlider();
        verticalSlider.setOrientation(Orientation.VERTICAL);

        // Add the PlusMinusSlider to the VBox
        VBox container = new VBox(20, horizontalSlider, verticalSlider);
        container.setAlignment(Pos.CENTER);
        container.setPadding(new Insets(20.0));

        // Add the VBox to the BorderPane
        this.parent.setCenter(container);

    }

    @Override
    public void start(Stage stage) throws Exception {
        this.setupStage(stage);
    }

    private void setupStage(Stage stage) {

        Scene scene = new Scene(this.parent, 640, 480);

        // Set the stage title
        stage.setTitle("JavaFX ControlsFX PlusMinusSlider: Navigating with Precision");

        // Set the stage scene
        stage.setScene(scene);

        // Center the stage on the screen
        stage.centerOnScreen();

        // Show the stage on the screen
        stage.show();

    }

}
In this example, two PlusMinusSlider controls are created, and their orientations are set to HORIZONTAL and VERTICAL, respectively. The sliders are then added to a VBox layout container, which is displayed in a JavaFX window.
The setOrientation method provides flexibility in how you can arrange the PlusMinusSlider controls in your user interface, making it easier to fit them into various design layouts while maintaining the desired user experience.

Conclusion
The JavaFX ControlsFX PlusMinusSlider empowers developers to create seamless and dynamic user interactions within their applications. By allowing users to effortlessly navigate a range of values, the PlusMinusSlider finds utility in various contexts, from accelerating through lengthy lists to adjusting settings with variable speeds. By following the steps outlined in this article, you can seamlessly integrate the PlusMinusSlider into your JavaFX projects and provide users with an enhanced and intuitive experience. As you explore the control’s customization options, you’ll be well-equipped to cater to diverse user needs and create impactful applications. Remember to check the ControlsFX PlusMinusSlider documentation for more advanced customization options and features.
I hope you found this code informative and useful. If you would like to receive more content, please consider subscribing to our newsletter!


