Graphical User Interfaces (GUIs) play a vital role in modern software development, enabling developers to create user-friendly applications with interactive elements. PyQt, a set of Python bindings for the Qt application framework, provides developers with the tools to build powerful and feature-rich desktop applications. Among the various widgets PyQt offers, the QTextEdit stands out as a versatile text editing component that allows users to input, edit, and display text with ease. In this article, we will explore the PyQt QTextEdit and provide some code examples to demonstrate its capabilities.

with hands-on learning.
get the skills and confidence to land your next move.
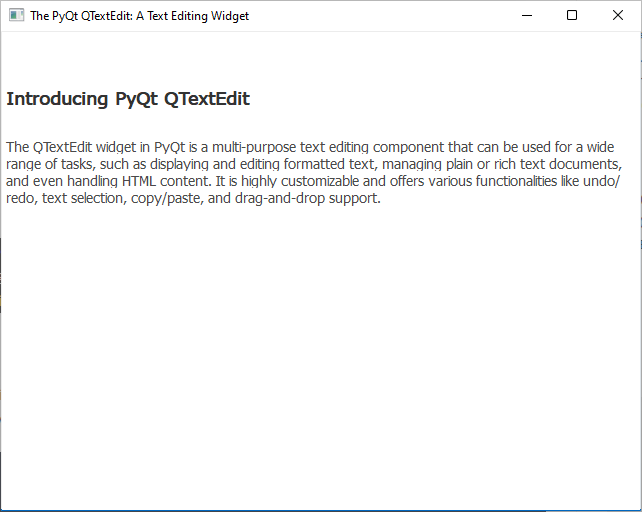
Introducing PyQt QTextEdit
The QTextEdit widget in PyQt is a multi-purpose text editing component that can be used for a wide range of tasks, such as displaying and editing formatted text, managing plain or rich text documents, and even handling HTML content. It is highly customizable and offers various functionalities like undo/redo, text selection, copy/paste, and drag-and-drop support.
Basic QTextEdit Usage
Let’s start by creating a simple PyQt application with a QTextEdit widget to get a feel for its basic usage. First, make sure you have PyQt installed. If not, you can install it via pip:
pip install PyQt6
Now, let’s create a basic PyQt QTextEdit application:
import sys

from PyQt6.QtWidgets import QApplication, QMainWindow, QTextEdit


class AppWindow(QMainWindow):

    def __init__(self, title, width, height, left=100, top=100):
        super().__init__()

        self.setWindowTitle(title)

        # Set the window location and size
        self.setGeometry(left, top, width, height)

        self.initUI()

    def initUI(self):

        # Create a QTextEdit
        text_edit = QTextEdit(self)

        # Add a QTextEdit to the app window
        self.setCentralWidget(text_edit)

    def center(self):
        # Get the geometry of the screen
        screen = QApplication.primaryScreen().size()

        # Calculate the center point of the screen
        x = (screen.width() - self.width()) // 2
        y = (screen.height() - self.height()) // 2

        # Move the window to the center
        self.move(x, y)


if __name__ == "__main__":
    app = QApplication(sys.argv)

    # Create new app window with title, and dimensions
    window = AppWindow("The PyQt QTextEdit: A Text Editing Widget", 640, 480)

    # Center app window on screen
    window.center()

    # show app window on screen
    window.show()

    sys.exit(app.exec())
In this example, we create a AppWindow class that inherits from QMainWindow. We create an instance of QTextEdit and set it as the central widget for the main window. When you run this code, a basic window with a QTextEdit widget will appear. You can type and edit text in the QTextEdit area.

Working with QTextEdit Functions
QTextEdit provides various functions to manipulate the text content programmatically. Let’s demonstrate some of these functions with code examples:
Setting and Getting Text
You can set the text content of the QTextEdit widget using the setText() method and retrieve the text using the toPlainText() method. Let’s modify our previous example to add a “Save” button that saves the entered text to a file:
import sys

from PyQt6.QtWidgets import QApplication, QMainWindow, QTextEdit, QVBoxLayout, QWidget, QPushButton


class AppWindow(QMainWindow):

    def __init__(self, title, width, height, left=100, top=100):
        super().__init__()

        self.setWindowTitle(title)

        # Set the window location and size
        self.setGeometry(left, top, width, height)

        self.initUI()

    def initUI(self):

        # Create a QTextEdit
        self.text_edit = QTextEdit(self)

        # Create a QPushButton
        save_button = QPushButton('Save', self)

        # Save Text to file when button is clicked
        save_button.clicked.connect(self.save_text)

        layout = QVBoxLayout()

        layout.addWidget(self.text_edit)
        layout.addWidget(save_button)

        central_widget = QWidget(self)

        # Set the QVBoxLayout as the
        # layout manager for the QWidget
        central_widget.setLayout(layout)

        self.setCentralWidget(central_widget)

    def save_text(self):

        # Get QTextEdit text as plain text and save to a file
        # named 'saved_text.txt'
        text = self.text_edit.toPlainText()
        with open('saved_text.txt', 'w') as file:
            file.write(text)

    def center(self):

        # Get the geometry of the screen
        screen = QApplication.primaryScreen().size()

        # Calculate the center point of the screen
        x = (screen.width() - self.width()) // 2
        y = (screen.height() - self.height()) // 2

        # Move the window to the center
        self.move(x, y)


if __name__ == "__main__":
    app = QApplication(sys.argv)

    # Create new app window with title, and dimensions
    window = AppWindow("The PyQt QTextEdit: A Text Editing Widget", 640, 480)

    # Center app window on screen
    window.center()

    # show app window on screen
    window.show()

    sys.exit(app.exec())
In this example, we added a QPushButton labeled “Save” to the main window. When you click on the button, the save_text() method will be called, which saves the entered text to a file named “saved_text.txt” in the current directory.
Undo and Redo
The QTextEdit widget comes with built-in undo and redo functionalities. You can use the undo() and redo() methods to undo and redo the changes made to the text content. Let’s enhance our previous example by adding “Undo” and “Redo” buttons:
import sys

from PyQt6.QtWidgets import QApplication, QMainWindow, QTextEdit, QVBoxLayout, QWidget, QPushButton


class AppWindow(QMainWindow):

    def __init__(self, title, width, height, left=100, top=100):
        super().__init__()

        self.setWindowTitle(title)

        # Set the window location and size
        self.setGeometry(left, top, width, height)

        self.initUI()

    def initUI(self):

        # Create a QTextEdit
        text_edit = QTextEdit(self)

        undo_button = QPushButton('Undo')
        undo_button.clicked.connect(text_edit.undo)

        redo_button = QPushButton('Redo')
        redo_button.clicked.connect(text_edit.redo)

        # Create a QVBoxLayout
        layout = QVBoxLayout()

        # Add Widgets to the layout container
        layout.addWidget(text_edit)
        layout.addWidget(undo_button)
        layout.addWidget(redo_button)

        central_widget = QWidget(self)

        # Set the QVBoxLayout as the layout manager for the QWidget
        central_widget.setLayout(layout)

        self.setCentralWidget(central_widget)

    def center(self):

        # Get the geometry of the screen
        screen = QApplication.primaryScreen().size()

        # Calculate the center point of the screen
        x = (screen.width() - self.width()) // 2
        y = (screen.height() - self.height()) // 2

        # Move the window to the center
        self.move(x, y)


if __name__ == "__main__":
    app = QApplication(sys.argv)

    # Create new app window with title, and dimensions
    window = AppWindow("The PyQt QTextEdit: A Text Editing Widget", 640, 480)

    # Center app window on screen
    window.center()

    # show app window on screen
    window.show()

    sys.exit(app.exec())
In this example, we added “Undo” and “Redo” buttons that call the undo() and redo() methods of the QTextEdit widget, respectively. Now, when you make changes to the text and click the “Undo” button, the text will revert to the previous state.
Copy and Paste
QTextEdit also supports copying and pasting text. You can use the copy() and paste() methods to perform these operations programmatically. Let’s add “Copy” and “Paste” buttons to our previous example:
import sys

from PyQt6.QtWidgets import QApplication, QMainWindow, QTextEdit, QVBoxLayout, QWidget, QPushButton


class AppWindow(QMainWindow):

    def __init__(self, title, width, height, left=100, top=100):
        super().__init__()

        self.setWindowTitle(title)

        # Set the window location and size
        self.setGeometry(left, top, width, height)

        self.initUI()

    def initUI(self):

        # Create a QTextEdit
        text_edit = QTextEdit(self)

        copy_button = QPushButton('Copy')
        copy_button.clicked.connect(text_edit.copy)

        paste_button = QPushButton('Paste')
        paste_button.clicked.connect(text_edit.paste)

        # Create a QVBoxLayout
        layout = QVBoxLayout()

        # Add Widgets to the layout container
        layout.addWidget(text_edit)
        layout.addWidget(copy_button)
        layout.addWidget(paste_button)

        central_widget = QWidget(self)

        # Set the QVBoxLayout as the layout manager for the QWidget
        central_widget.setLayout(layout)

        self.setCentralWidget(central_widget)

    def center(self):

        # Get the geometry of the screen
        screen = QApplication.primaryScreen().size()

        # Calculate the center point of the screen
        x = (screen.width() - self.width()) // 2
        y = (screen.height() - self.height()) // 2

        # Move the window to the center
        self.move(x, y)


if __name__ == "__main__":
    app = QApplication(sys.argv)

    # Create new app window with title, and dimensions
    window = AppWindow("The PyQt QTextEdit: A Text Editing Widget", 640, 480)

    # Center app window on screen
    window.center()

    # show app window on screen
    window.show()

    sys.exit(app.exec())
Now, you can copy text from the QTextEdit area by selecting the text and clicking the “Copy” button. Similarly, you can paste the copied text into the QTextEdit area by clicking the “Paste” button.
Conclusion
The PyQt QTextEdit is a powerful and versatile text editing widget that enables developers to implement various text-related functionalities in their applications. In this article, we explored the basic usage of QTextEdit and demonstrated some of its functions with code examples. You can leverage these capabilities to create sophisticated text editors, note-taking applications, and more.
I hope you found this article informative and useful. If you would like to receive more content, please consider subscribing to our newsletter!


