Imagine walking into a beautifully designed room. The furniture is arranged with ample space to breathe, creating a sense of calm and inviting you to explore. This concept of well-utilized space translates perfectly to the world of web design, and that’s where CSS padding comes in.

with hands-on learning.
get the skills and confidence to land your next move.
Padding, in the realm of CSS (Cascading Style Sheets, the language that styles webpages), is all about creating that breathing room for your website’s content. It defines the space between an element’s content and its border (or the edge of the element itself if there’s no border). This seemingly simple concept has a massive impact on the visual appeal, readability, and overall user experience of your webpage.
What is CSS Padding?
Padding in CSS refers to the space between an element’s content and its border. It provides breathing room, separating the content from the surrounding elements and the borders. Padding is a crucial component of the box model, which defines how elements are rendered on a web page.
In simple terms, when you apply padding to an element, you are essentially adding space inside that element, creating a buffer zone between the content and the outer boundaries.
The Box Model
To grasp the concept of CSS Padding, it’s essential to understand the box model. Each HTML element is treated as a rectangular box, consisting of content, padding, border, and margin. The padding, in particular, defines the space between the content and the border of the box.
The Basics of CSS Padding
The syntax for setting padding in CSS is straightforward. You can use the padding property followed by one, two, three, or four values. The value can be specified in different units such as pixels (px), em units (em), or percentages (%).
selector {
  padding: top right bottom left;
}- top: Padding value for the top side.
- right: Padding value for the right side.
- bottom: Padding value for the bottom side.
- left: Padding value for the left side.
If you specify only one value, it applies to all sides. If you provide two values, the first is for the top and bottom, and the second is for the right and left. Three values apply to top, right, and bottom, while four values cover top, right, bottom, and left padding. Here’s a basic example:
<!DOCTYPE html>
<html lang="en">
    <head>

        <!-- Set the character encoding for the document -->
        <meta charset="UTF-8">

        <!-- Configure the viewport for better responsiveness on various devices -->
        <meta name="viewport" content="width=device-width, initial-scale=1.0">

        <!-- Document Title -->
        <title>CSS | Padding</title>

        <style>

            /* Apply a border to all paragraphs for visualization purposes */
            p {
                border: 1px solid cornflowerblue;
            }

            /* 10px Padding for paragraph-1 */
            #paragraph-1 {
                padding: 10px;
            }

            /* 10px top and bottom, 20px left and right Padding for paragraph-2 */
            #paragraph-2 {
                padding: 10px 20px;
            }

            /* 10px top, 20px left and right, 30px bottom Padding for paragraph-3 */
            #paragraph-3 {
                padding: 10px 20px 30px;
            }

            /* 10px top, 20px right, 30px bottom, 40px left Padding for paragraph-4 */
            #paragraph-4 {
                padding: 10px 20px 30px 40px;
            }

        </style>

    </head>
    <body>

        <h1>CSS | Padding</h1>

        <!-- Paragraph with no Padding -->
        <p id="paragraph-0">
            Lorem ipsum dolor sit amet, consectetur adipiscing elit.
            Suspendisse condimentum nulla non orci molestie, nec eleifend ligula congue.
        </p>

        <!-- 10px Padding for paragraph-1 -->
        <p id="paragraph-1">
            Lorem ipsum dolor sit amet, consectetur adipiscing elit.
            Suspendisse condimentum nulla non orci molestie, nec eleifend ligula congue.
        </p>

        <!-- 10px top and bottom, 20px left and right Padding for paragraph-2 -->
        <p id="paragraph-2">
            Lorem ipsum dolor sit amet, consectetur adipiscing elit.
            Suspendisse condimentum nulla non orci molestie, nec eleifend ligula congue.
        </p>

        <!-- 10px top, 20px left and right, 30px bottom Padding for paragraph-3 -->
        <p id="paragraph-3">
            Lorem ipsum dolor sit amet, consectetur adipiscing elit.
            Suspendisse condimentum nulla non orci molestie, nec eleifend ligula congue.
        </p>

        <!-- 10px top, 20px right, 30px bottom, 40px left Padding for paragraph-4 -->
        <p id="paragraph-4">
            Lorem ipsum dolor sit amet, consectetur adipiscing elit.
            Suspendisse condimentum nulla non orci molestie, nec eleifend ligula congue.
        </p>

    </body>
</html>
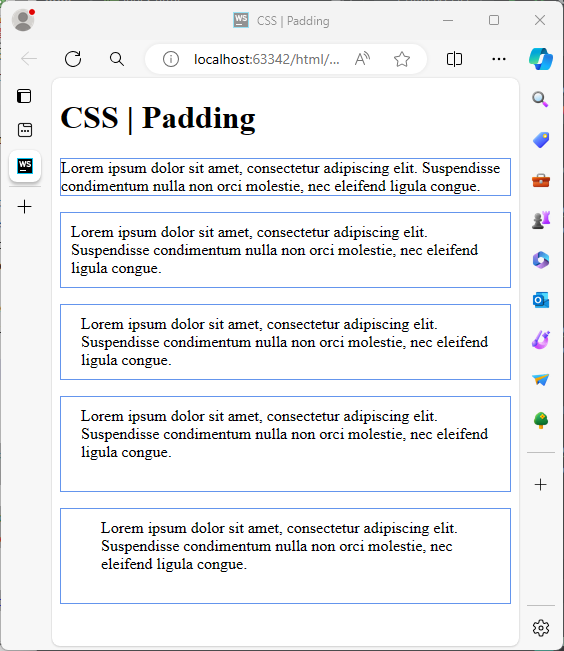
In this example, we use the CSS padding property to control the internal spacing of paragraphs. Each paragraph is assigned a specific padding value, influencing the space between its content and the border. The first paragraph, with the ID paragraph-1, has a uniform 10-pixel padding on all sides. Subsequently, the following paragraphs (paragraph-2, paragraph-3, and paragraph-4) demonstrate variations in padding—ranging from 10 pixels on one side to different combinations, such as 10 pixels on top, 20 pixels on the left and right, and 30 pixels at the bottom. This showcases how adjusting the padding property can significantly impact the visual presentation and spacing within web page elements.
Individual Sides
You can also apply padding to specific sides of an element using properties like padding-top, padding-right, padding-bottom, and padding-left. Here’s a basic example:
<!DOCTYPE html>
<html lang="en">
    <head>

        <!-- Set the character encoding for the document -->
        <meta charset="UTF-8">

        <!-- Configure the viewport for better responsiveness on various devices -->
        <meta name="viewport" content="width=device-width, initial-scale=1.0">

        <!-- Document Title -->
        <title>CSS | Padding</title>

        <style>

            /* Apply a border and set padding for the <p> element */
            p {
                border: 1px solid cornflowerblue;
                padding-top: 15px;     /* 15 pixels padding at the top */
                padding-right: 30px;   /* 30 pixels padding on the right */
                padding-bottom: 45px;  /* 45 pixels padding at the bottom */
                padding-left: 60px;    /* 60 pixels padding on the left */
            }

        </style>

    </head>
    <body>

        <h1>CSS | Padding</h1>

        <p>
            Lorem ipsum dolor sit amet, consectetur adipiscing elit.
            Suspendisse condimentum nulla non orci molestie, nec eleifend ligula congue.
        </p>

    </body>
</html>
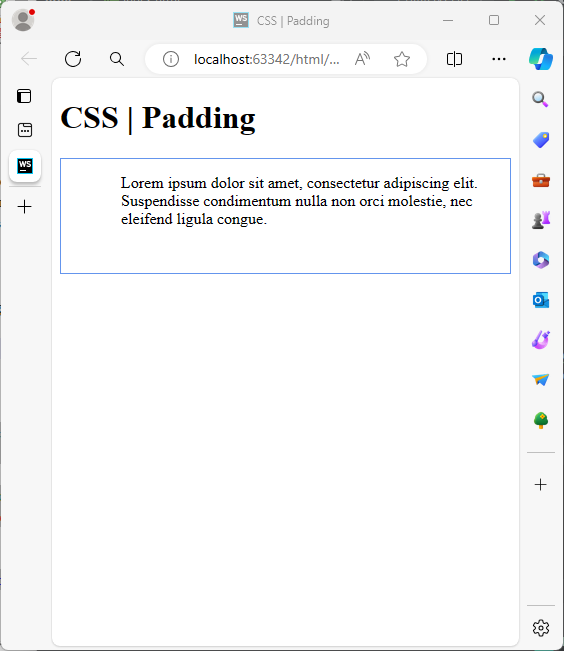
In this example, the <p> element is styled using CSS to include a subtle border and specific padding values for each side. The specified padding not only adds space around the content but also contributes to the overall visual appeal and readability of the paragraph. The combination of a border and well-adjusted padding exemplifies how these CSS properties can be employed to enhance the presentation of text within a web page.
Conclusion
In conclusion, understanding and mastering CSS Padding is essential for creating visually appealing and well-organized web pages. Whether you’re a novice or an experienced developer, incorporating padding effectively can elevate the design and user experience of your website. For more content, please subscribe to our newsletter.
