Python Tkinter is a powerful library for creating graphical user interfaces (GUI) in Python. When building GUI applications, it’s essential to understand how to organize and display widgets (e.g., buttons, labels, text boxes) effectively. Tkinter provides three layout managers, and in this article, we will focus on one of them – the pack() geometry manager. We’ll explain how to use the pack() method to arrange widgets within a window.

with hands-on learning.
get the skills and confidence to land your next move.
Understanding the pack() Geometry Manager
Tkinter’s pack() geometry manager is simple yet flexible for arranging widgets in containers, such as frames or the main window. The pack() method automatically sizes and positions widgets based on a few key parameters, such as the side, fill, expand, and padding.
The basic syntax of the pack() method is as follows:
widget.pack(options)
Where widget is the widget you want to add to the container, and options are the parameters that control how the widget will be packed.
Packing Widgets Horizontally
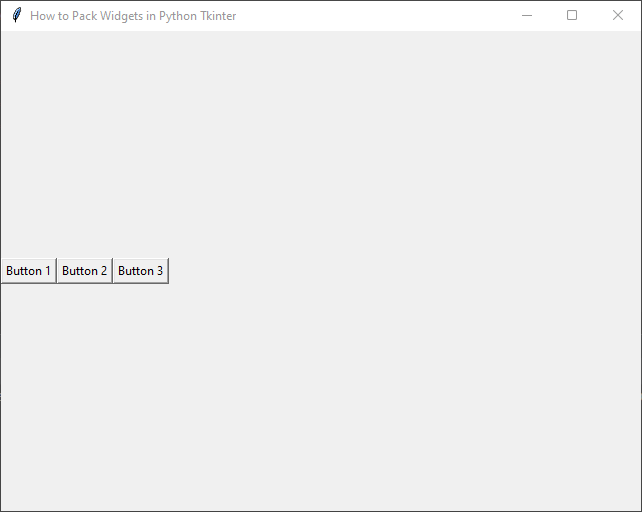
To demonstrate packing widgets horizontally, we’ll create a simple example with three buttons placed side by side in a horizontal layout.
import tkinter as tk


class PyFrame(tk.Tk):

    def __init__(self, width, height):
        super().__init__()

        self.width = width
        self.height = height

        self.geometry(f"{self.width}x{self.height}")

    def center_on_screen(self):
        left = (self.winfo_screenwidth() - self.width) // 2
        top = (self.winfo_screenheight() - self.height) // 2

        self.geometry(f"{self.width}x{self.height}+{left}+{top}")


def on_button_click(button_num):
    print(f"Button {button_num} clicked!")


if __name__ == '__main__':
    # Create the main application window
    root = PyFrame(640, 480)
    root.title("How to Pack Widgets in Python Tkinter")

    # center window on the screen
    root.center_on_screen()

    # Create a variable to store the state of the CheckBox
    var = tk.BooleanVar()

    button1 = tk.Button(root, text="Button 1", command=lambda: on_button_click(1))
    button2 = tk.Button(root, text="Button 2", command=lambda: on_button_click(2))
    button3 = tk.Button(root, text="Button 3", command=lambda: on_button_click(3))

    button1.pack(side=tk.LEFT)
    button2.pack(side=tk.LEFT)
    button3.pack(side=tk.LEFT)

    # Run the main event loop
    root.mainloop()
In this example, we create three buttons and place them side by side using pack(side=tk.LEFT). The on_button_click() function is a simple callback that prints a message when a button is clicked.
Packing Widgets Vertically
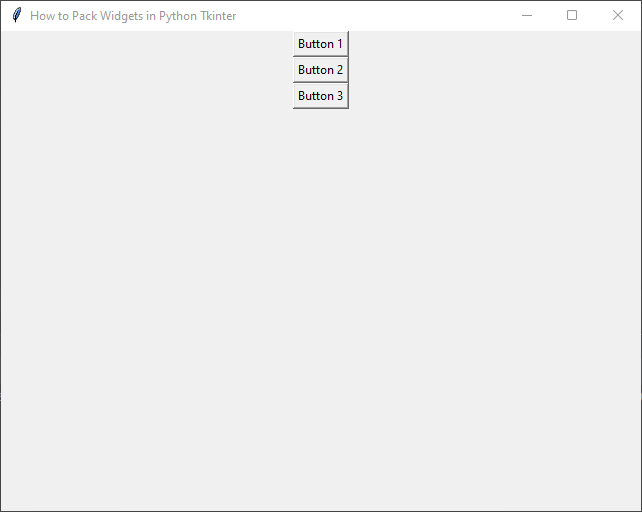
Similarly, we can pack widgets vertically. Let’s create an example with three buttons stacked vertically.
import tkinter as tk


class PyFrame(tk.Tk):

    def __init__(self, width, height):
        super().__init__()

        self.width = width
        self.height = height

        self.geometry(f"{self.width}x{self.height}")

    def center_on_screen(self):
        left = (self.winfo_screenwidth() - self.width) // 2
        top = (self.winfo_screenheight() - self.height) // 2

        self.geometry(f"{self.width}x{self.height}+{left}+{top}")


def on_button_click(button_num):
    print(f"Button {button_num} clicked!")


if __name__ == '__main__':
    # Create the main application window
    root = PyFrame(640, 480)
    root.title("How to Pack Widgets in Python Tkinter")

    # center window on the screen
    root.center_on_screen()

    # Create a variable to store the state of the CheckBox
    var = tk.BooleanVar()

    # Create widgets (buttons)
    button1 = tk.Button(root, text="Button 1", command=lambda: on_button_click(1))
    button2 = tk.Button(root, text="Button 2", command=lambda: on_button_click(2))
    button3 = tk.Button(root, text="Button 3", command=lambda: on_button_click(3))

    button1.pack()
    button2.pack()
    button3.pack()

    # Run the main event loop
    root.mainloop()
Here, we omit the side parameter in the pack() method, which defaults to tk.TOP, causing the buttons to be stacked vertically.
Expanding and Filling Widgets
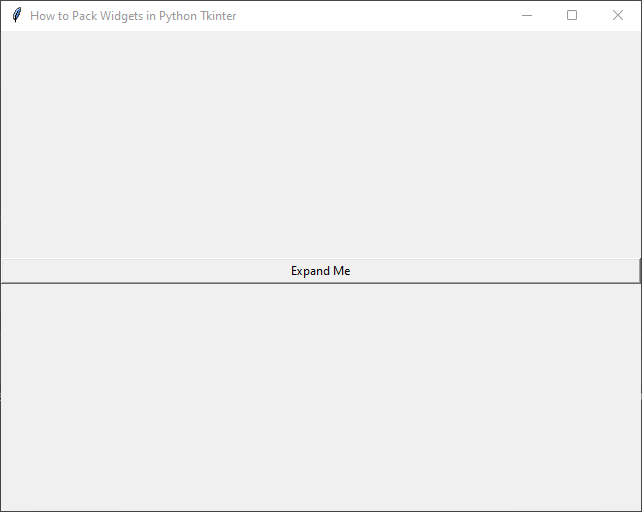
The pack() method allows widgets to expand and fill the available space. Let’s create a button that expands horizontally to fill the window’s width.
import tkinter as tk


class PyFrame(tk.Tk):

    def __init__(self, width, height):
        super().__init__()

        self.width = width
        self.height = height

        self.geometry(f"{self.width}x{self.height}")

    def center_on_screen(self):
        left = (self.winfo_screenwidth() - self.width) // 2
        top = (self.winfo_screenheight() - self.height) // 2

        self.geometry(f"{self.width}x{self.height}+{left}+{top}")


def on_button_click():
    print("Button clicked!")


if __name__ == '__main__':
    # Create the main application window
    root = PyFrame(640, 480)
    root.title("How to Pack Widgets in Python Tkinter")

    # center window on the screen
    root.center_on_screen()

    button = tk.Button(root, text="Expand Me", command=on_button_click)
    button.pack(expand=True, fill=tk.X)

    # Run the main event loop
    root.mainloop()
In this example, expand=True tells the button to expand when the window is resized, and fill=tk.X instructs the button to fill the available horizontal space.
Order of Packing
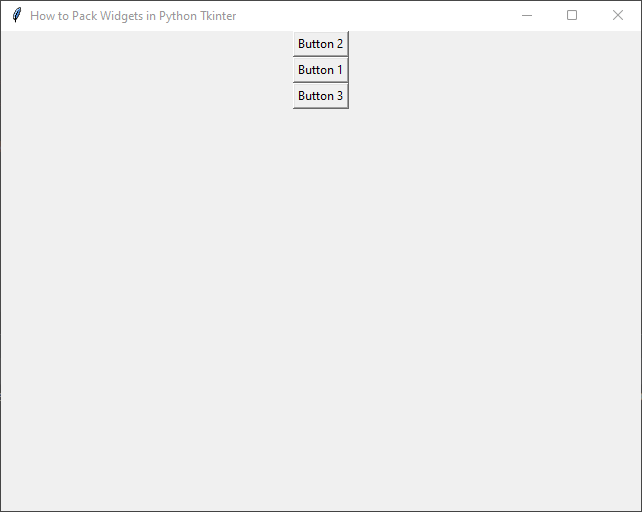
The ‘pack’ manager organizes widgets based on the order they are packed into the window. The last widget packed is placed on top, and others are stacked below it. Let’s demonstrate this with an example:
import tkinter as tk


class PyFrame(tk.Tk):

    def __init__(self, width, height):
        super().__init__()

        self.width = width
        self.height = height

        self.geometry(f"{self.width}x{self.height}")

    def center_on_screen(self):
        left = (self.winfo_screenwidth() - self.width) // 2
        top = (self.winfo_screenheight() - self.height) // 2

        self.geometry(f"{self.width}x{self.height}+{left}+{top}")


def on_button_click(button_num):
    print(f"Button {button_num} clicked!")


if __name__ == '__main__':
    # Create the main application window
    root = PyFrame(640, 480)
    root.title("How to Pack Widgets in Python Tkinter")

    # center window on the screen
    root.center_on_screen()

    # Create widgets (buttons)
    button1 = tk.Button(root, text="Button 1", command=lambda: on_button_click(1))
    button2 = tk.Button(root, text="Button 2", command=lambda: on_button_click(2))
    button3 = tk.Button(root, text="Button 3", command=lambda: on_button_click(3))

    # Pack widgets in different orders
    button2.pack()
    button1.pack()
    button3.pack()

    # Run the main event loop
    root.mainloop()
Nested Layouts
In this example, we’ll create a more complex layout by nesting frames within the main window.
import tkinter as tk


class PyFrame(tk.Tk):

    def __init__(self, width, height):
        super().__init__()

        self.width = width
        self.height = height

        self.geometry(f"{self.width}x{self.height}")

    def center_on_screen(self):
        left = (self.winfo_screenwidth() - self.width) // 2
        top = (self.winfo_screenheight() - self.height) // 2

        self.geometry(f"{self.width}x{self.height}+{left}+{top}")


if __name__ == '__main__':
    # Create the main application window
    root = PyFrame(640, 480)
    root.title("How to Pack Widgets in Python Tkinter")

    # center window on the screen
    root.center_on_screen()

    # Create frames
    frame1 = tk.Frame(root, bg="lightblue")
    frame2 = tk.Frame(root, bg="lightgreen")
    frame3 = tk.Frame(root, bg="lightyellow")

    # Pack frames horizontally
    frame1.pack(fill=tk.X)
    frame2.pack(fill=tk.X)
    frame3.pack(fill=tk.X)

    # Create labels within frames
    label1 = tk.Label(frame1, text="Label 1", padx=10, pady=5)
    label2 = tk.Label(frame2, text="Label 2", padx=10, pady=5)
    label3 = tk.Label(frame3, text="Label 3", padx=10, pady=5)

    # Pack labels within frames
    label1.pack(side=tk.LEFT)
    label2.pack(side=tk.LEFT)
    label3.pack(side=tk.LEFT)

    # Run the main event loop
    root.mainloop()
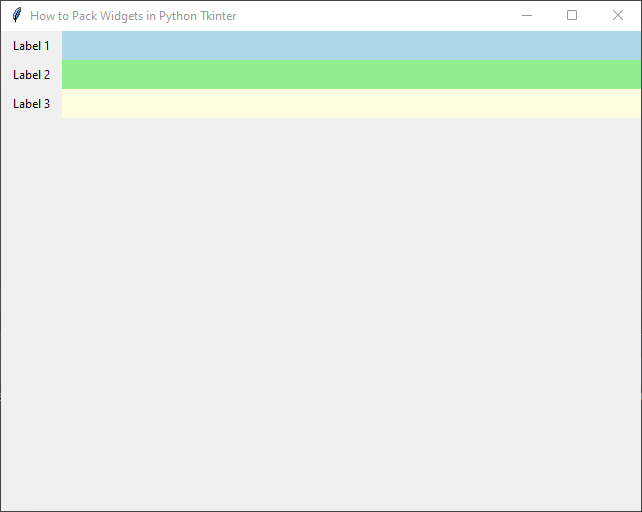
Anchoring Widgets
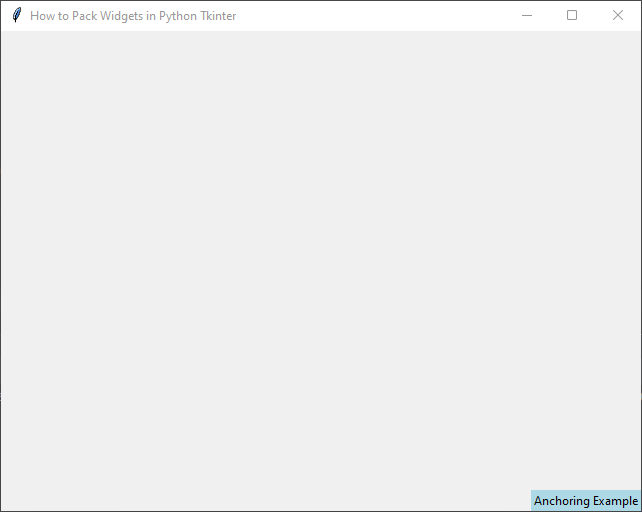
Anchoring refers to the position of a widget within its allocated space when there is extra room available. By default, when a widget is packed using pack(), it is centered within its container. However, you can change this behavior by using the “anchor” parameter.
The anchor parameter accepts values like N (north/top), S (south/bottom), W (west/left), E (east/right), NW (northwest), NE (northeast), SW (southwest), and SE (southeast). These values determine where the widget will be placed inside its allocated space when there is extra space available in the container.
In this example, the label widget will be anchored to the bottom-right corner (SE) of the container. If you resize the window, the label will maintain its position relative to the bottom-right corner as long as there is additional space available.
import tkinter as tk


class PyFrame(tk.Tk):

    def __init__(self, width, height):
        super().__init__()

        self.width = width
        self.height = height

        self.geometry(f"{self.width}x{self.height}")

    def center_on_screen(self):
        left = (self.winfo_screenwidth() - self.width) // 2
        top = (self.winfo_screenheight() - self.height) // 2

        self.geometry(f"{self.width}x{self.height}+{left}+{top}")


if __name__ == '__main__':
    # Create the main application window
    root = PyFrame(640, 480)
    root.title("How to Pack Widgets in Python Tkinter")

    # center window on the screen
    root.center_on_screen()

    label = tk.Label(root, text="Anchoring Example", bg="lightblue")

    label.pack(expand=True, anchor=tk.SE)

    # Run the main event loop
    root.mainloop()
Conclusion
In this article, we explored the pack() geometry manager in Python Tkinter for arranging widgets within a GUI. We covered packing widgets both horizontally and vertically, as well as how to make them expand and fill available space.
Additionally, we learnt by using the “anchor” parameter we could easily customize the alignment of widgets when there is extra space available. Whether it’s aligning to the top, bottom, left, right, or any corner.
By using the pack() method effectively, you can create well-organized and visually appealing GUIs for your Python applications.
Remember that Tkinter also provides other geometry managers like grid() and place(), each with its strengths, but pack() is an excellent choice for many straightforward layout scenarios. Keep practicing and experimenting with different options to master the art of widget packing in Tkinter!
I hope you found this code informative and useful. If you would like to receive more content, please consider subscribing to our newsletter!
