JavaFX is a powerful platform for creating rich, interactive user interfaces in Java applications. Among its many features, JavaFX provides excellent support for working with images, making it a go-to choice for developers looking to manipulate and enhance images in their applications. In this article, we will explore image cropping and scaling in JavaFX, uncovering techniques and strategies to help you take control of your image-processing needs.

with hands-on learning.
get the skills and confidence to land your next move.
Why Image Cropping and Scaling Matter
Image cropping and scaling are fundamental operations in image processing. Cropping allows you to select a specific region of an image, while scaling enables you to resize images, preserving the aspect ratio or not. These operations are essential for a wide range of applications, from building photo editors and image galleries to implementing responsive web design or creating thumbnails. With JavaFX, you have the tools at your disposal to perform these tasks efficiently and effectively.
Image Cropping
Cropping allows you to select a specific region of an image and discard the rest. JavaFX provides a flexible way to achieve this using the Viewport property of the ImageView. It involves creating a Rectangle that defines the cropping region and then applying this rectangle as a viewport to your ImageView. Here’s how you can crop an image:
import javafx.application.Application;
import javafx.geometry.Rectangle2D;
import javafx.scene.Scene;
import javafx.scene.image.Image;
import javafx.scene.image.ImageView;
import javafx.scene.layout.StackPane;
import javafx.stage.Stage;

public class ImageCropping extends Application {

    private static final double WIDTH = 640;
    private static final double HEIGHT = 480;

    /* The parent layout manager */
    private final StackPane parent = new StackPane();

    @Override
    public void start(Stage stage) throws Exception {

        Scene scene = new Scene(this.parent, WIDTH, HEIGHT);

        // Sets the stage title
        stage.setTitle("Image Cropping");

        // Set the stage scene
        stage.setScene(scene);

        // Center stage on screen
        stage.centerOnScreen();

        // Show stage on screen
        stage.show();

    }

    @Override
    public void init() throws Exception {
        super.init();

        Image image = new Image("scorpion.jpg");
        ImageView imageView = new ImageView(image);

        // Crop the image to a specific region
        Rectangle2D cropRegion = new Rectangle2D(270, 30, 400, 400);
        imageView.setViewport(cropRegion);

        /* Add the ImageView to the StackPane */
        this.parent.getChildren().addAll(imageView);

    }

}
The cropRegion represents the area you want to keep, and the imageView will display only that part of the image.

Image Scaling
Scaling an image involves resizing it while maintaining its aspect ratio. This can be essential for adapting images to various screen sizes or creating thumbnails.
Scaling an Image Proportionally
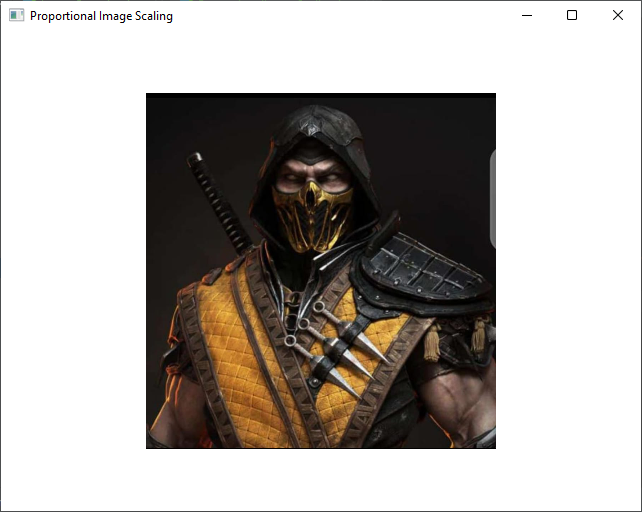
In JavaFX, you can scale an image proportionally using the ImageView class. Here’s an example:
import javafx.application.Application;
import javafx.scene.Scene;
import javafx.scene.image.Image;
import javafx.scene.image.ImageView;
import javafx.scene.layout.StackPane;
import javafx.stage.Stage;

public class ProportionalImageScaling extends Application {

    private static final double WIDTH = 640;
    private static final double HEIGHT = 480;

    /* The parent layout manager */
    private final StackPane parent = new StackPane();

    @Override
    public void start(Stage stage) throws Exception {

        Scene scene = new Scene(this.parent, WIDTH, HEIGHT);

        // Sets the stage title
        stage.setTitle("Proportional Image Scaling");

        // Set the stage scene
        stage.setScene(scene);

        // Center stage on screen
        stage.centerOnScreen();

        // Show stage on screen
        stage.show();

    }

    @Override
    public void init() throws Exception {
        super.init();

        Image image = new Image("scorpion.jpg");
        ImageView imageView = new ImageView(image);

        // Scale the image proportionally to fit a specific width
        imageView.setPreserveRatio(true);
        imageView.setFitWidth(350);

        /* Add the ImageView to the StackPane */
        this.parent.getChildren().addAll(imageView);

    }

}
In this code, setPreserveRatio(true) ensures that the aspect ratio of the original image is maintained, and setFitWidth(350) sets the desired width for the scaled image.

Scaling an Image Non-Proportionally
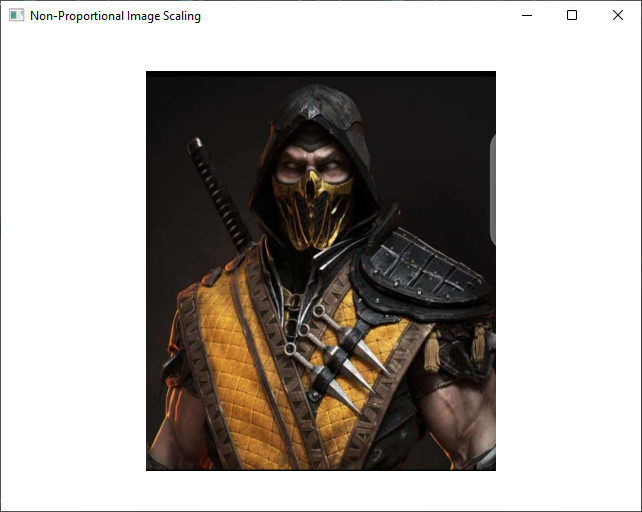
If you need to scale an image without preserving its aspect ratio, you can use the following code:
import javafx.application.Application;
import javafx.scene.Scene;
import javafx.scene.image.Image;
import javafx.scene.image.ImageView;
import javafx.scene.layout.StackPane;
import javafx.stage.Stage;

public class NonProportionalImageScaling extends Application {

    private static final double WIDTH = 640;
    private static final double HEIGHT = 480;

    /* The parent layout manager */
    private final StackPane parent = new StackPane();

    @Override
    public void start(Stage stage) throws Exception {

        Scene scene = new Scene(this.parent, WIDTH, HEIGHT);

        // Sets the stage title
        stage.setTitle("Non-Proportional Image Scaling");

        // Set the stage scene
        stage.setScene(scene);

        // Center stage on screen
        stage.centerOnScreen();

        // Show stage on screen
        stage.show();

    }

    @Override
    public void init() throws Exception {
        super.init();

        Image image = new Image("scorpion.jpg");
        ImageView imageView = new ImageView(image);

        // Scale the image non-proportionally to fit a specific width
        imageView.setFitWidth(350);
        imageView.setFitHeight(400);

        /* Add the ImageView to the StackPane */
        this.parent.getChildren().addAll(imageView);

    }

}
In this case, you set both the width and height independently, allowing you to distort the image if necessary.

Combining Cropping and Scaling
In some cases, you might want to crop and scale an image simultaneously. JavaFX makes it easy to achieve this by applying both techniques sequentially.
Crop and Then Scale
You can crop the image as previously described and then scale the resulting cropped image. This approach is useful when you need to focus on a specific part of an image and display it at a different size.
import javafx.application.Application;
import javafx.geometry.Rectangle2D;
import javafx.scene.Scene;
import javafx.scene.image.Image;
import javafx.scene.image.ImageView;
import javafx.scene.layout.StackPane;
import javafx.stage.Stage;

public class CropAndThenScaleImage extends Application {

    private static final double WIDTH = 640;
    private static final double HEIGHT = 480;

    /* The parent layout manager */
    private final StackPane parent = new StackPane();

    @Override
    public void start(Stage stage) throws Exception {

        Scene scene = new Scene(this.parent, WIDTH, HEIGHT);

        // Sets the stage title
        stage.setTitle("Crop and Then Scale");

        // Set the stage scene
        stage.setScene(scene);

        // Center stage on screen
        stage.centerOnScreen();

        // Show stage on screen
        stage.show();

    }

    @Override
    public void init() throws Exception {
        super.init();

        Image image = new Image("scorpion.jpg");
        ImageView imageView = new ImageView(image);

        // Crop the image to a specific region
        Rectangle2D cropRegion = new Rectangle2D(270, 30, 400, 400);
        imageView.setViewport(cropRegion);

        // Scale the image proportionally to fit a specific width
        imageView.setPreserveRatio(true);
        imageView.setFitWidth(350);

        /* Add the ImageView to the StackPane */
        this.parent.getChildren().addAll(imageView);

    }

}
Scale and Then Crop
Alternatively, you can scale the image first and then apply cropping. This is helpful when you want to resize an image and then select a region from the resized version.
import javafx.application.Application;
import javafx.geometry.Rectangle2D;
import javafx.scene.Scene;
import javafx.scene.image.Image;
import javafx.scene.image.ImageView;
import javafx.scene.layout.StackPane;
import javafx.stage.Stage;

public class ScaleAndThenCropImage extends Application {

    private static final double WIDTH = 640;
    private static final double HEIGHT = 480;

    /* The parent layout manager */
    private final StackPane parent = new StackPane();

    @Override
    public void start(Stage stage) throws Exception {

        Scene scene = new Scene(this.parent, WIDTH, HEIGHT);

        // Sets the stage title
        stage.setTitle("Scale and Then Crop");

        // Set the stage scene
        stage.setScene(scene);

        // Center stage on screen
        stage.centerOnScreen();

        // Show stage on screen
        stage.show();

    }

    @Override
    public void init() throws Exception {
        super.init();

        Image image = new Image("scorpion.jpg");
        ImageView imageView = new ImageView(image);

        // Scale the image proportionally to fit a specific width
        imageView.setPreserveRatio(true);
        imageView.setFitWidth(350);

        // Crop the image to a specific region
        Rectangle2D cropRegion = new Rectangle2D(270, 30, 400, 400);
        imageView.setViewport(cropRegion);

        /* Add the ImageView to the StackPane */
        this.parent.getChildren().addAll(imageView);

    }

}
Saving the Cropped and Scaled Image
So, you’ve successfully cropped and scaled your image, but how do you save the result? JavaFX doesn’t provide a direct way to save the manipulated image. You’ll need to use Java’s BufferedImage and ImageIO classes for this task. Here’s a code snippet to save your cropped and scaled image:
import javafx.application.Application;
import javafx.embed.swing.SwingFXUtils;
import javafx.event.ActionEvent;
import javafx.event.EventHandler;
import javafx.geometry.Pos;
import javafx.geometry.Rectangle2D;
import javafx.scene.Scene;
import javafx.scene.control.Button;
import javafx.scene.image.Image;
import javafx.scene.image.ImageView;
import javafx.scene.image.WritableImage;
import javafx.scene.layout.StackPane;
import javafx.scene.layout.VBox;
import javafx.stage.Stage;

import javax.imageio.ImageIO;
import java.awt.image.BufferedImage;
import java.io.File;
import java.io.FileOutputStream;
import java.io.IOException;

public class SavingManipulatedImage extends Application {

    private static final double WIDTH = 640;
    private static final double HEIGHT = 480;

    /* The parent layout manager */
    private final StackPane parent = new StackPane();

    @Override
    public void start(Stage stage) throws Exception {

        Scene scene = new Scene(this.parent, WIDTH, HEIGHT);

        // Sets the stage title
        stage.setTitle("Saving Manipulated Image");

        // Set the stage scene
        stage.setScene(scene);

        // Center stage on screen
        stage.centerOnScreen();

        // Show stage on screen
        stage.show();

    }

    @Override
    public void init() throws Exception {
        super.init();

        Image image = new Image("scorpion.jpg");
        ImageView imageView = new ImageView(image);

        // Crop the image to a specific region
        Rectangle2D cropRegion = new Rectangle2D(270, 30, 400, 400);
        imageView.setViewport(cropRegion);

        // Scale the image proportionally to fit a specific width
        imageView.setPreserveRatio(true);
        imageView.setFitWidth(350);

        Button btnSaveImage = new Button("Save Image");

        // Set save image button action using the SaveImageAction handler
        btnSaveImage.setOnAction(
                new SaveImageAction(imageView, "cropped-scaled.png", "png")
        );

        // Create a VBox container to hold the ImageView and Save Image Button
        VBox container = new VBox(10, imageView, btnSaveImage);
        container.setAlignment(Pos.CENTER);

        /* Add the VBox container to the StackPane */
        this.parent.getChildren().addAll(container);

    }

    static class SaveImageAction implements EventHandler<ActionEvent> {

        private final ImageView imageView;
        private final String outputPath;
        private final String formatName;

        public SaveImageAction(ImageView imageView, String outputPath, String formatName) {
            this.imageView = imageView;
            this.outputPath = outputPath;
            this.formatName = formatName;
        }

        @Override
        public void handle(ActionEvent actionEvent) {

            // Convert JavaFX Image to BufferedImage
            WritableImage image = this.imageView.snapshot(null, null);
            BufferedImage bufferedImage = SwingFXUtils.fromFXImage(image, null);

            File outputFile = new File(this.outputPath);

            try (FileOutputStream output = new FileOutputStream(outputFile)) {

                // Save the image using ImageIO
                ImageIO.write(bufferedImage, this.formatName, output);

            } catch (IOException e) {
                e.printStackTrace();
            }

        }
    }
}
Ensure that you replace “cropped-scaled.png” with the desired output file path. This code takes the current ImageView content, converts it to a writable format, and saves it to the specified location.
Conclusion
JavaFX provides a robust set of tools for image cropping and scaling, making it an excellent choice for developers looking to incorporate these capabilities into their applications. With just a few lines of code, you can crop and scale images, opening the door to a wide range of creative possibilities. As you become more familiar with JavaFX, you can explore advanced techniques to take your image-processing skills to the next level. Whether you’re building a photo editor, an image gallery, or a responsive web design, JavaFX has you covered.
I hope you found this article informative and useful. If you would like to receive more content, please consider subscribing to our newsletter.


