Lighting can significantly impact the visual appeal of user interfaces and graphical applications. In JavaFX, you can use various lighting effects to make your UI elements stand out, and one of these effects is Light.Distant. This article explores the JavaFX Light.Distant class and how it can be used to create captivating lighting effects in your Java applications.

with hands-on learning.
get the skills and confidence to land your next move.
Introduction to Lighting Effects in JavaFX
JavaFX is a versatile and powerful framework for building modern, interactive graphical user interfaces. One of the standout features of JavaFX is its support for visual effects, which includes lighting effects. These effects allow you to simulate lighting conditions and create a more immersive and visually appealing user experience.
Lighting effects in JavaFX are achieved through the Light and Lighting classes. The Light class represents a light source, and there are various subclasses of Light, each simulating different types of light sources, such as Distant, Point, and Spot lights. The Lighting class, on the other hand, is responsible for applying lighting effects to the graphical elements in your JavaFX application.
In this article, we will focus on the Light.Distant class and explore how it can be used to create stunning lighting effects in JavaFX applications.
The Light.Distant Class
Light.Distant is a part of the JavaFX package javafx.scene.effect and represents a distant light source. It defines two important properties that determine the direction and intensity of the light:
- azimuthProperty: This property represents the horizontal direction of the distant light source. It can range from 0 to 360 degrees, where 0 degrees is to the right and 180 degrees is to the left.
- elevationProperty: The elevation property represents the vertical direction of the distant light source. It can range from 0 to 360 degrees, with 0 degrees being directly above and 180 degrees directly below.
These properties allow you to control the direction from which the light is coming, affecting how it interacts with the objects in your JavaFX scene.
Light.Distant Example Application
To better understand the Light.Distant effect, let’s create a simple JavaFX application that demonstrates its usage. We’ll load an image and apply the Light.Distant effect to it, allowing us to manipulate the lighting properties dynamically. This will help you grasp how lighting can be used to create compelling visual effects.
import javafx.application.Application;
import javafx.scene.Scene;
import javafx.scene.effect.Light;
import javafx.scene.effect.Lighting;
import javafx.scene.image.Image;
import javafx.scene.image.ImageView;
import javafx.scene.layout.BorderPane;
import javafx.stage.Stage;

public class DistantLightApp extends Application {

    private static final double WIDTH = 640;
    private static final double HEIGHT = 480;

    // The parent layout manager for the application's UI
    private final BorderPane parent = new BorderPane();

    @Override
    public void start(Stage stage) throws Exception {

        Scene scene = new Scene(this.parent, WIDTH, HEIGHT);

        // Set the stage title
        stage.setTitle("Lighting Effect: Light.Distant");

        // Set the stage scene
        stage.setScene(scene);

        // Center the stage on the screen
        stage.centerOnScreen();

        // Show the stage on the screen
        stage.show();
    }

    @Override
    public void init() throws Exception {
        super.init();

        // Load an image from a file
        Image image = new Image("scorpion.jpg");

        // Create an ImageView for the loaded image
        ImageView imageView = new ImageView(image);
        imageView.setPreserveRatio(true);
        imageView.setFitWidth(250);

        // Create a Distant Light source
        Light.Distant distantLight = new Light.Distant();

        // Create a Lighting effect and set the light source
        Lighting lighting = new Lighting();
        lighting.setLight(distantLight);

        // Apply the Lighting effect to the ImageView
        imageView.setEffect(lighting);

        // Add the ImageView to the BorderPane's center region
        this.parent.setCenter(imageView);

        // Create a control panel for configuring the Lighting and Distant Light properties
        LightingControlPanel lightingControlPanel = new LightingControlPanel(lighting, distantLight);
        this.parent.setLeft(lightingControlPanel);
    }

}
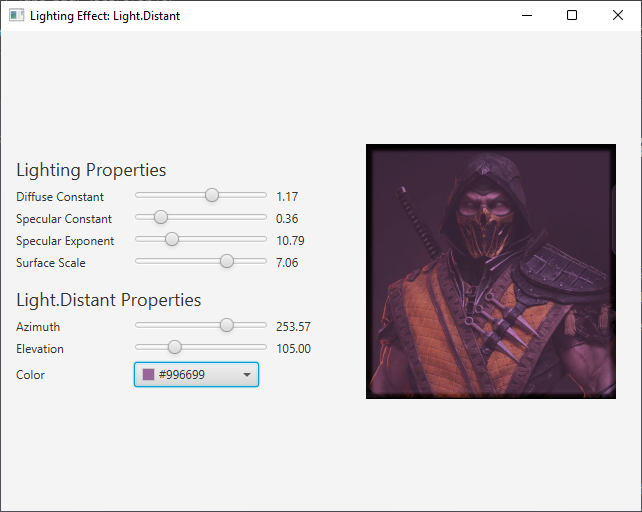
In this example, we create a JavaFX application that loads an image and applies the Light.Distant effect to it. The LightingControlPanel class provides sliders to dynamically adjust the lighting properties, allowing you to see the immediate impact of changing the azimuth and elevation values.
Customizing the Lighting Effect
The Light.Distant effect can be customized by adjusting the azimuth and elevation properties. Here’s how you can change these properties to create different lighting effects:
Azimuth Property
The azimuth property controls the horizontal direction of the distant light source. By changing the azimuth value, you can make the light appear to come from different directions. A value of 0 degrees represents light coming from the right, while 180 degrees represents light coming from the left. You can adjust this property to achieve the desired lighting direction for your scene.
Elevation Property
The elevation property controls the vertical direction of the distant light source. You can manipulate this property to simulate light coming from different angles. A value of 0 degrees means the light comes from directly above, while 180 degrees implies light from directly below. Adjusting the elevation property allows you to create effects like overhead lighting or bottom-up illumination.
Creating a Control Panel for Lighting Properties
To make it easier for users to customize the lighting effect, we’ve created a control panel that provides sliders for adjusting both the Lighting and Light.Distant properties. The LightingControlPanel class contains labeled sliders for diffuseConstant, specularConstant, specularExponent, surfaceScale, azimuth, and elevation. Users can interact with these sliders to see the immediate impact on the displayed image.
import javafx.beans.property.DoubleProperty;
import javafx.geometry.Insets;
import javafx.geometry.Pos;
import javafx.scene.Node;
import javafx.scene.control.ColorPicker;
import javafx.scene.control.Label;
import javafx.scene.control.Slider;
import javafx.scene.effect.Light;
import javafx.scene.effect.Lighting;
import javafx.scene.layout.HBox;
import javafx.scene.layout.VBox;
import javafx.scene.paint.Color;
import javafx.scene.text.Font;

public class LightingControlPanel extends VBox {

    /**
     * Constructor for the LightingControlPanel.
     *
     * @param lighting The Lighting object to configure.
     * @param distantLight The Distant Light object to configure.
     */
    public LightingControlPanel(Lighting lighting, Light.Distant distantLight) {
        super(15);

        // Create a label for lighting properties
        Label lightingPropertiesHeader = new Label("Lighting Properties");
        lightingPropertiesHeader.setFont(new Font(18.0));

        // Create a VBox for lighting properties with sliders
        VBox lightingProperties = new VBox(
                5,
                lightingPropertiesHeader,
                createLabeledBoundSlider(lighting.diffuseConstantProperty(), "Diffuse Constant", 2.0, 1.0),
                createLabeledBoundSlider(lighting.specularConstantProperty(), "Specular Constant", 2.0, 0.3),
                createLabeledBoundSlider(lighting.specularExponentProperty(), "Specular Exponent", 40.0, 20.0),
                createLabeledBoundSlider(lighting.surfaceScaleProperty(), "Surface Scale", 10.0, 1.5)
        );

        // Create a label for distant light properties
        Label distantLightPropertiesHeader = new Label("Light.Distant Properties");
        distantLightPropertiesHeader.setFont(new Font(18.0));

        // Create the ColorPicker, and set BLACK as the default color
        ColorPicker colorPicker = new ColorPicker(Color.BLACK);

        // Bind the Light.Distant colorProperty to the ColorPicker valueProperty
        distantLight.colorProperty().bind(colorPicker.valueProperty());

        // Create the HBox to arrange the Label, and the ColorPicker
        HBox colorContainer = this.createLabeledNode( 40, colorPicker, "Color" );

        // Create a VBox for distant light properties with sliders
        VBox distantLightProperties = new VBox(
                5,
                distantLightPropertiesHeader,
                createLabeledBoundSlider(distantLight.azimuthProperty(), "Azimuth", 360.0, 45.0),
                createLabeledBoundSlider(distantLight.elevationProperty(), "Elevation", 360.0, 45.0),
                colorContainer
        );

        // Add lighting and distant light property sections to the main VBox
        getChildren().addAll(
                lightingProperties,
                distantLightProperties
        );

        // Set alignment and padding for the control panel
        setAlignment(Pos.CENTER_LEFT);
        setPadding(new Insets(15));
    }

    /**
     * Create an HBox with a labeled bound slider for a property.
     *
     * @param property The DoubleProperty to bind to the slider.
     * @param label The label for the slider.
     * @param max The maximum value for the slider.
     * @param defaultValue The default value for the slider.
     * @return An HBox containing the labeled slider and its value label.
     */
    private HBox createLabeledBoundSlider(DoubleProperty property, String label, double max, double defaultValue) {
        Slider slider = new Slider(0.0, max, defaultValue);
        property.bind(slider.valueProperty());

        Label value = new Label();
        value.setMinWidth(50);
        value.textProperty().bind(slider.valueProperty().asString("%.2f"));

        Label lblLabel = new Label(String.format("%-20s", label));
        lblLabel.setMinWidth(110);
        lblLabel.setAlignment(Pos.CENTER_LEFT);

        return new HBox(5, lblLabel, slider, value);
    }

    private HBox createLabeledNode(double spacing, Node node, String label) {

        HBox container = new HBox(
                spacing,
                new Label(String.format("%-20s", label)),
                node
        );

        container.setAlignment(Pos.CENTER_LEFT);

        return container;

    }

}
The LightingControlPanel class contains sliders for properties like diffuseConstant, specularConstant, specularExponent, and surfaceScale under “Lighting Properties,” as well as sliders for the azimuth and elevation properties under “Light.Distant Properties.” These sliders allow you to fine-tune the lighting effect according to your requirements.
Conclusion
In this article, we’ve explored the Light.Distant effect in JavaFX, which enables you to simulate distant light sources and create captivating lighting effects for your JavaFX applications. We’ve provided a practical example of how to use the Light.Distant effect to illuminate an image and create a control panel for adjusting lighting properties dynamically.
I hope you found this article informative and useful. If you would like to receive more content, please consider subscribing to our newsletter.


