The Document Object Model (DOM) is like a living map of all the elements on a webpage. It lets JavaScript talk to the page, find elements, and change them in real time. Every HTML element can have a unique identifier called an ID. Think of an ID as the element’s personal name tag — no two elements should have the same one on a page. This makes IDs very special because they help JavaScript find exactly one element fast and direct.

with hands-on learning.
get the skills and confidence to land your next move.
When you want your JavaScript to work with a specific part of your webpage — maybe a headline, a button, or an input box — getting that element by its ID is the simplest and most direct method. The function document.getElementById() is like a searchlight, zooming in on the element with the matching ID so you can change its content, style, or behavior with ease.
Basic Syntax of getElementById
Using getElementById is straightforward. You call it on the document object and pass the ID name as a string. If an element with that ID exists, it returns the element; otherwise, it returns null. Let’s see this in action with a playful example.
Imagine a webpage with a <div> representing a mighty lion, the king of the jungle:
<!DOCTYPE html>
<html>
<head>
  <title>Animal ID Example</title>
</head>
<body>

  <div id="lion">King of the jungle</div>

  <script>

    const lion = document.getElementById('lion');
    console.log(lion.textContent); // Output: King of the jungle

  </script>

</body>
</html>Here, we tell JavaScript to find the element with the ID lion. Once found, we log its text content to the console. This example shows how simple it is to grab a single element by its ID and use its content.
Accessing Different Element Types by ID
The getElementById method works the same way regardless of the type of element you are targeting. Whether it’s a paragraph, a button, or an input box, the process is the same: call document.getElementById() and supply the ID.
Let’s imagine a button themed after a playful dolphin. The dolphin invites users to “click me!” Here’s how you can get the button by its ID and change its text:
<!DOCTYPE html>
<html>
<head>
  <title>Button Example</title>
</head>
<body>

  <button id="dolphin">Click me!</button>

  <script>

    const dolphinButton = document.getElementById('dolphin');
    dolphinButton.innerText = "Swim now!";

  </script>

</body>
</html>In this example, we find the button with ID dolphin and change its text to “Swim now!”. It’s a quick way to change the page dynamically using JavaScript.
Changing Element Content Using ID
Once you have a reference to an element via its ID, you can easily update what the element says or contains. This is done by modifying the textContent, innerText or innerHTML properties.
Suppose we have a paragraph about a sleepy Beagle dog breed. Initially, it says, “I am sleepy.” We can update this message when needed:
<!DOCTYPE html>
<html>
<head>
  <title>Change Text Content</title>
</head>
<body>

  <p id="beagle">I am sleepy.</p>

  <script>

    const beagle = document.getElementById('beagle');
    beagle.textContent = "I love naps!";

  </script>

</body>
</html>Here, JavaScript finds the paragraph with ID beagle and changes its text to “I love naps!” The page updates right away, showing the new message.
Changing Element Styles Using ID
Not only can you change the text, but you can also alter the style of an element by accessing its style property. This lets you modify colors, backgrounds, fonts, and more — all through JavaScript.
For example, let’s take a movie title, “Inception”, and change its text color and background color:
<!DOCTYPE html>
<html>
<head>
  <title>Style Change Example</title>
</head>
<body>

  <h2 id="inception">Inception</h2>

  <script>

    const inception = document.getElementById('inception');
    inception.style.color = "blue";
    inception.style.backgroundColor = "yellow";

  </script>

</body>
</html>In this snippet, the heading with ID inception becomes blue text on a bright yellow background. Changing styles this way is a powerful way to bring pages to life.
Adding or Removing Attributes via ID
Elements can have attributes like title, alt, or disabled. JavaScript allows you to add new attributes or remove existing ones on the fly by using setAttribute() and removeAttribute() methods.
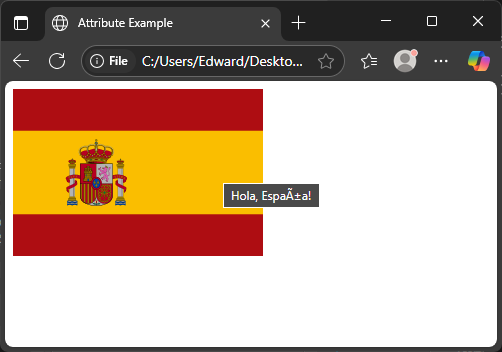
Let’s use a picture of the Spanish flag. We’ll add a tooltip title and then remove the alt text attribute:
<!DOCTYPE html>
<html>
<head>
  <title>Attribute Example</title>
</head>
<body>

  <img id="spanishFlag" src="flag.png" alt="Flag" />

  <script>

    const spanishFlag = document.getElementById('spanishFlag');
    spanishFlag.setAttribute('title', 'Hola, España!');
    spanishFlag.removeAttribute('alt');

  </script>

</body>
</html>In this case, the image gains a friendly title that shows when hovered, and the alt attribute is removed, changing how browsers interpret the image.

Handling User Input Elements by ID
Forms and input boxes often need to be accessed by JavaScript to read or set user data. Using an ID makes it easy to grab input fields and work with their values.
Imagine a text input related to the programming language Python. We want to get its current value and print it in the console:
<!DOCTYPE html>
<html>
<head>
  <title>Input Value Example</title>
</head>
<body>

  <input id="pythonInput" type="text" value="Hello!" />

  <script>

    const pythonInput = document.getElementById('pythonInput');
    console.log(pythonInput.value); // Output: Hello!

  </script>

</body>
</html>Here, the input field starts with the value “Hello!”. JavaScript retrieves this value using .value and logs it.
Using ID to Add Event Listeners
You can also attach events to elements by first selecting them with getElementById. Event listeners react to user actions like clicks, key presses, or mouse movements.
For instance, a chess-themed button labeled “Move Queen” can pop up an alert when clicked:
<!DOCTYPE html>
<html>
<head>
  <title>Event Listener Example</title>
</head>
<body>

  <button id="queenMove">Move Queen</button>

  <script>

    const queenMove = document.getElementById('queenMove');

    queenMove.addEventListener('click', function() {
          alert('Queen moves diagonally!')
      });

  </script>

</body>
</html>When the user clicks the button, the alert box appears, explaining how the queen moves in chess. This simple interactivity is easy to implement by getting the button by its ID.
Conclusion
In this article, we explored how to use document.getElementById() to locate and work with elements on a webpage. From grabbing simple text containers and changing their content, to modifying styles, managing attributes, handling form inputs, and adding event listeners, getting elements by ID is the foundation for many JavaScript interactions with the DOM.
By giving each element a unique ID, you unlock a direct line to that element, allowing your JavaScript to shape and animate the webpage in countless ways. Whether you are changing a dog’s message, coloring a movie title, or creating interactive chess moves, getElementById is the starting point for these creative tasks.
References
If you’re curious to explore further or want to double-check what you’ve learned, these trusted documentation pages offer more detailed explanations and examples:
- MDN Web Docs: Document.getElementById()
Comprehensive and official documentation covering howgetElementById()works, including examples and browser compatibility. - W3Schools: JavaScript getElementById()
Easy-to-understand tutorial with simple examples showing how to usegetElementById()in practical scenarios. - JavaScript.info: The Document Object Model
Detailed guide explaining the DOM structure and how JavaScript interacts with HTML elements.


