Interacting with HTML using JavaScript becomes truly powerful when you tap into the Document Object Model (DOM). The DOM represents the entire structure of your web page as a tree of nodes, where every element—like a paragraph, div, image, or list—is a branch that can be accessed and manipulated. JavaScript lets you grab these elements using various methods, and one of the most straightforward ways is by their tag name.
The getElementsByTagName() method gives you a collection of all elements that match a specific tag name. Whether you’re trying to update text in all <p> tags, style every <li>, or loop through all <input> fields in a form, this method gives you exactly what you need. It’s simple, fast, and perfect for beginners looking to dive into DOM manipulation without overcomplicating things.
Basic Usage of getElementsByTagName()
Let’s start with the simplest use: selecting all elements by their tag name from the entire document. The method takes one argument, the tag name as a string (like "p", "div", or "li"), and returns a live HTMLCollection of all matching elements. Here’s a fun example where we change the text color of all paragraphs to green and add a smiley.
<!DOCTYPE html>
<html>
<head>
  <title>Paragraph Painter</title>
</head>
<body>

  <p>Hello world!</p>
  <p>This is a great day.</p>
  <p>We love JavaScript!</p>

  <script>

    const paragraphs = document.getElementsByTagName('p');

    for (let para of paragraphs) {
      para.style.color = 'green';
      para.textContent += ' 😊';
    }

  </script>

</body>
</html>In this example, we grabbed all <p> tags in the page using document.getElementsByTagName('p'). Then, using a for...of loop, we updated each paragraph’s color and added an emoji to the end. This small change makes the page more cheerful and gives a sense of control over page elements.
Looping Through the Result
Once you retrieve elements by tag name, they come as a collection. To actually do something with them, you usually loop through them. Here’s another fun example where we grab all <li> tags in a list and number them automatically.
<!DOCTYPE html>
<html>
<head>
  <title>List Numberer</title>
</head>
<body>

  <ul>
    <li>Elephant</li>
    <li>Giraffe</li>
    <li>Zebra</li>
  </ul>

  <script>

    const items = document.getElementsByTagName('li');

    let counter = 1;

    for (let item of items) {
      item.textContent = `${counter}. ${item.textContent}`;
      counter++;
    }

  </script>

</body>
</html>We get all the <li> elements and use a counter to prepend a number before each item. This turns a plain list into an ordered one—without even using the <ol> tag.
Accessing Elements by Index
When you use getElementsByTagName(), the result you get is an HTMLCollection. This collection looks and behaves a lot like a regular array, but technically, it’s not one. You can’t use all array methods like map() or forEach() directly on it. Still, it supports basic array-like features, such as indexing, looping with a for loop, and accessing the length property.
Here’s a quick example that highlights how easy it is to access elements by their position in the collection:
<!DOCTYPE html>
<html>
<head>
  <title>Index Access</title>
</head>
<body>

  <h2>Title 1</h2>
  <h2>Title 2</h2>
  <h2>Title 3</h2>

  <script>

    const headings = document.getElementsByTagName('h2');

    // Change the text of the second heading (index 1)
    headings[1].textContent = 'Updated Title 2 ✨';

    // Log the total number of h2 tags
    console.log('Total H2s:', headings.length);

  </script>

</body>
</html>In this example, we directly accessed the second <h2> element using headings[1] (remember, counting starts at zero). We updated its text to something a little more exciting, and then printed the total number of <h2> elements using .length.
This kind of direct indexing is perfect when you only need to work with specific elements—like the first image in a gallery, the last paragraph in a story, or just the second button on the page.
Getting All Elements in the Document
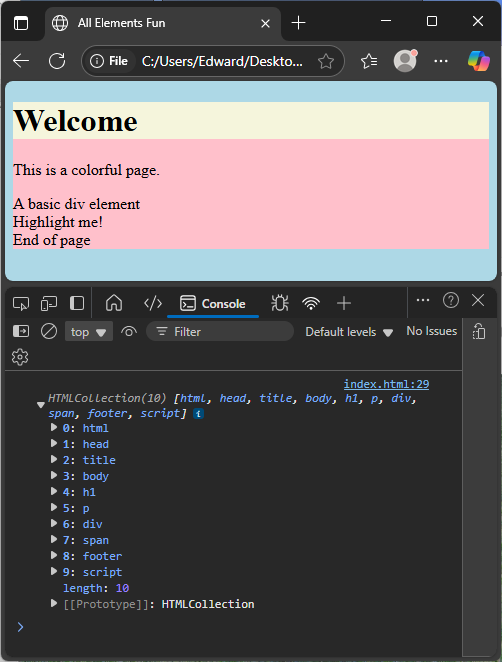
There may be times when you want to select every single element on the page—no matter what tag it is. JavaScript makes this very easy with a special wildcard: the asterisk "*". When passed to getElementsByTagName("*"), it returns a live collection of every HTML element in the document, in the order they appear in the DOM.
Let’s look at an example where we grab everything and apply a rainbow of background colors to the first few elements, just for fun.
<!DOCTYPE html>
<html>
<head>
  <title>All Elements Fun</title>
</head>
<body>

  <!-- Sample elements on the page -->
  <h1>Welcome</h1>
  <p>This is a colorful page.</p>
  <div>A basic div element</div>
  <span>Highlight me!</span>
  <footer>End of page</footer>

  <script>

    // Select every single element in the document using "*"
    const allElements = document.getElementsByTagName("*");

    // Create an array of background colors to apply
    const colors = ['lightblue', 'lightgreen', 'lavender', 'pink', 'beige'];

    // Loop through the first five elements and set a background color
    for (let i = 0; i < 5; i++) {
      allElements[i].style.backgroundColor = colors[i];
    }

    // Print the full collection of elements to the console
    console.log(allElements);

  </script>

</body>
</html>In this example, document.getElementsByTagName("*") gives us a live collection of all elements on the page—starting from the <html> tag all the way down to the innermost tags. We then use a regular for loop and index into the collection using allElements[i] to access and style each element.
Working Inside a Specific Element
Sometimes you don’t want to grab every element on the whole page. You only want the ones inside a specific section. In such cases, you can use getElementsByTagName() on a specific element instead of the whole document.
<!DOCTYPE html>
<html>
<head>
  <title>Scoped Tag Selection</title>
</head>
<body>

  <!-- Jungle section with wild animals -->
  <div id="jungle">
    <div>Lion</div>
    <div>Leopard</div>
  </div>

  <!-- Farm section with domestic animals -->
  <div id="farm">
    <div>Cow</div>
    <div>Goat</div>
  </div>

  <script>

    // Get the jungle section by its ID
    const jungle = document.getElementById('jungle');

    // Get all <div> elements inside the jungle only
    const wildAnimals = jungle.getElementsByTagName('div');

    // Loop through each wild animal and add a green border
    for (let animal of wildAnimals) {
      animal.style.border = '2px solid green';
    }

  </script>

</body>
</html>Here, we target only the <div> tags inside the #jungle section. We style them with green borders to visually mark them as wild animals. The ones inside #farm remain untouched, which proves how scoped selection works.
Nested Tag Selection and Styling
You can also select tags that are nested within other tags. For example, maybe you have multiple <span> elements inside different paragraphs, and you want to style them all the same way.
<!DOCTYPE html>
<html>
<head>
  <title>Span Highlighter</title>
</head>
<body>

  <p>The <span>tiger</span> is fast.</p>
  <p>The <span>peacock</span> is colorful.</p>

  <script>

    const spans = document.getElementsByTagName('span');

    for (let span of spans) {
      span.style.backgroundColor = 'yellow';
    }

  </script>

</body>
</html>Each <span> tag gets a yellow background, making the highlighted words stand out. It’s a quick way to emphasize specific inline content across your document.
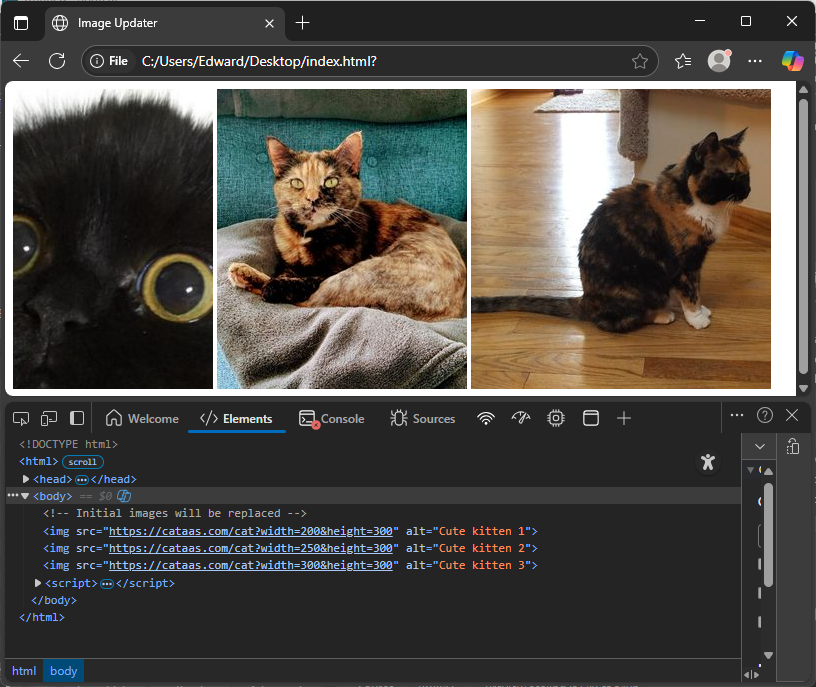
Changing Attributes of Retrieved Elements
Another powerful use of getElementsByTagName() is when you want to modify attributes of elements. Let’s say you want to update all image sources or set alt texts in a gallery.
<!DOCTYPE html>
<html>
<head>
    <title>Image Updater</title>
</head>
<body>

  <!-- Initial images will be replaced -->
  <img src="old1.jpg">
  <img src="old2.jpg">
  <img src="old3.jpg">

  <script>

    // Get all <img> elements on the page
    const images = document.getElementsByTagName('img');

    // Array of reliable kitten image sizes
    const sizes = [
      [200, 300],
      [250, 300],
      [300, 300]
    ];

    // Loop through each image and update its src and alt
    for (let i = 0; i < images.length; i++) {
      const [width, height] = sizes[i];
      images[i].setAttribute('src', `https://cataas.com/cat?width=${width}&height=${height}`);
      images[i].setAttribute('alt',`Cute kitten ${i + 1}`);
    }

  </script>

</body>
</html>Each <img> tag is updated with a new kitten image and a friendly alt description. This makes your page more dynamic and accessible.
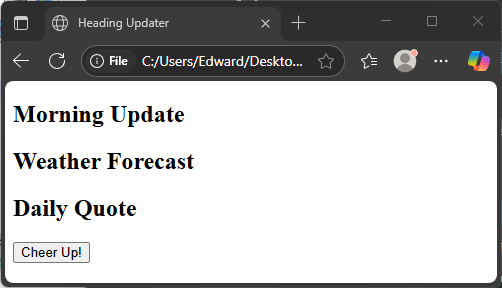
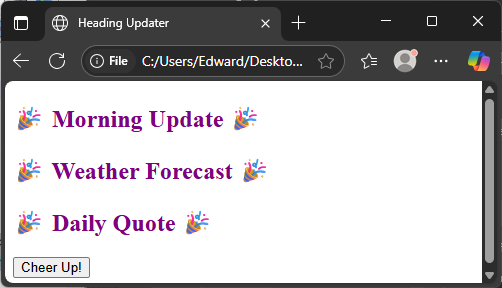
Dynamic Interaction Example
Let’s finish with an interactive page where clicking a button updates all <h2> tags in a fun way. It’s like turning on a happy mood across your headings.
<!DOCTYPE html>
<html>
<head>
  <title>Heading Updater</title>
</head>
<body>

  <h2>Morning Update</h2>
  <h2>Weather Forecast</h2>
  <h2>Daily Quote</h2>

  <button id="cheer">Cheer Up!</button>

  <script>

    const button = document.getElementById('cheer');

    button.addEventListener('click', () => {

      const headings = document.getElementsByTagName('h2');

      for (let heading of headings) {
        heading.textContent = '🎉 ' + heading.textContent + ' 🎉';
        heading.style.color = 'purple';
      }

    });

  </script>

</body>
</html>This example shows how you can combine user events (clicks) with tag-based selection. Clicking the button makes every heading more festive!
Using in Real-World Structures
Web pages often include forms. You can use getElementsByTagName() to select all input fields and modify or validate them. Here’s a quick sample that sets placeholder text on every input:
<!DOCTYPE html>
<html>
<head>
  <title>Form Helper</title>
</head>
<body>

  <form>
    <p><input type="text"></p>
    <p><input type="email"></p>
    <p><input type="password"></p>
  </form>

  <script>

    const inputs = document.getElementsByTagName('input');

    for (let input of inputs) {
      input.placeholder = 'Please enter something...';
    }

  </script>

</body>
</html>Each input field now gives the user a friendly hint. And again, all done just by grabbing elements by their tag.
Conclusion
The getElementsByTagName() method is one of the simplest and most useful tools for accessing and changing elements in your webpage. Whether you’re styling paragraphs, looping through images, modifying form fields, or building fun interactions, this method is always ready to help. It works with any tag and can be used on the whole document or scoped to a specific part of it.
Once you’re comfortable using this, you’ll find yourself experimenting more and building even cooler things with JavaScript and the DOM.
References
If you’re curious to explore further or want to double-check what you’ve learned, these trusted documentation pages offer more detailed explanations and examples:
- MDN Web Docs: Document.getElementsByTagName()
Detailed technical guide with specs and browser compatibility. - W3Schools: JavaScript getElementsByTagName()
Beginner-friendly explanation with short examples. - JavaScript.info: DOM Navigation
Teaches how to move around and select nodes in the DOM.