
HTML elements are more than just tags — they carry extra information through attributes. Attributes define how an element behaves or appears. You’ve seen them everywhere:
<input type="text" placeholder="Enter your name" required />Here’s what each attribute does:
typedefines the kind of input — in this case, text.placeholdershows a helpful hint inside the field.requiredtells the browser the field must be filled before submitting.
Attributes like these give meaning to elements and guide how they behave in the browser. With JavaScript, we can go a step further — we can read, change, add, or even remove these attributes as our page runs.
Attributes vs. Properties
Before we go further, let’s understand one small — but important — difference.
In HTML, we write things like this:
<input type="text" value="Old Value" />In JavaScript, we can access that same input using both attributes and properties, but they behave a little differently:
- Attributes come from the HTML. They’re what you wrote in the tag.
- Properties live in JavaScript. They change while the page is running.
They often seem the same, but they don’t always stay in sync. For example, imagine you run this code in JavaScript:
const input = document.querySelector("input");
input.value = "New Value";Now the user sees "New Value" in the input box — but if you check the attribute like this:
input.getAttribute("value"); // Still "Old Value"You’ll notice it still shows "Old Value" — the one from the original HTML.
That’s because:
input.valuechanges the property, which affects the input the user interacts with.- But it does not update the
valueattribute in the HTML.
If you want to change the actual HTML attribute, you must use:
input.setAttribute("value", "New Value");This article will focus only on attributes — how to read them, change them, and remove them — using JavaScript.
Accessing Attributes Using getAttribute()
Sometimes we want to know more about an element on the page — like which image is showing, what link is being used, or what placeholder text is inside a form field. To do this, we can use the JavaScript method getAttribute().
Let’s say you have an image of a cat on your page. You want to show the user which file is being used — maybe to prepare for changing it later.
<!DOCTYPE html>
<html>
<head>
  <title>Cat Viewer</title>
</head>
<body>

  <img id="catPic" src="bing-cat.jpg" />
  <p id="info"></p>

  <script>

    const cat = document.getElementById("catPic");
    const info = document.getElementById("info");

    const imageSource = cat.getAttribute("src");
    info.textContent = "Current cat picture: " + imageSource;

  </script>

</body>
</html>In this example, the image has a src attribute set to "bing-cat.jpg" (a bing generated cat image). Using getAttribute("src"), we ask the browser to give us that exact value from the HTML. We store it in a variable called imageSource.
Then, we update the paragraph’s text using info.textContent. It now shows the message:
“Current cat picture: bing-cat.jpg” — which is the value we just got from the attribute.
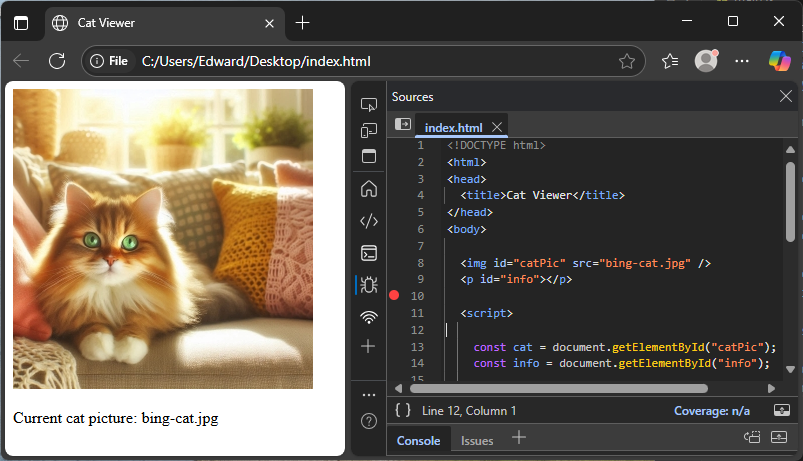
This is how you can read any attribute from an element using JavaScript. You give the attribute name as a string, and getAttribute() gives you its current value from the HTML.
Setting Attributes Using setAttribute()
Just like we can read attributes from HTML elements, we can also change them — or even add new ones — using JavaScript. The method we use for this is called setAttribute().
Let’s see how it works in a fun little example with a dog image. Suppose we have a web page showing a dog picture and a button. When the user clicks the button, we want the image to change — both the file (src) and the description (alt) should update.
<!DOCTYPE html>
<html>
<head>
  <title>Dog Switcher</title>
</head>
<body>

  <div>
    <img id="dogPic" src="bing-dog1.jpg" alt="A small dog" width="200" />
  </div>

  <button onclick="changeDog()">Show New Dog</button>

  <script>

    function changeDog() {

      const dog = document.getElementById("dogPic");

      dog.setAttribute("src", "bing-dog2.jpg");
      dog.setAttribute("alt", "A big happy dog");

    }

  </script>

</body>
</html>In this code, we start with an image showing a small dog (bing-dog1.jpg) and a short alt description. When the user clicks the “Show New Dog” button, the changeDog() function runs.
Inside the function, we first grab the image using document.getElementById("dogPic"). Then we call setAttribute("src", "bing-dog2.jpg"), which changes the image file to bing-dog2.jpg. Right after that, we update the alt attribute too, setting it to "A big happy dog" — so the description matches the new image.
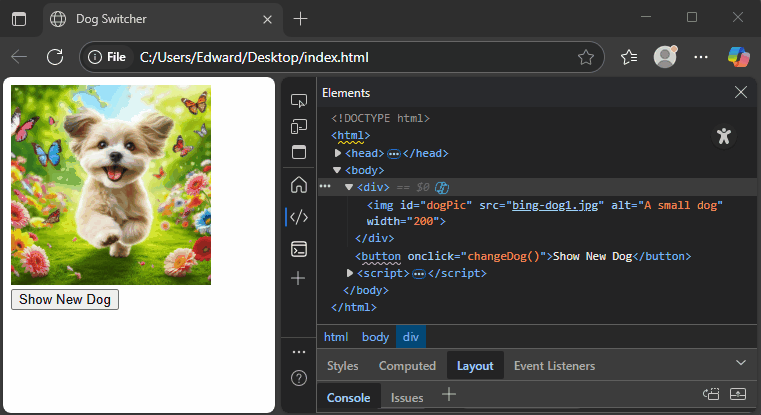
Now, when the button is clicked, the picture changes instantly, and the browser also updates the alt text.
This is how you can change any attribute on the fly using setAttribute(). It’s powerful, simple, and works on almost every HTML element.
Checking for the Existence of an Attribute
Sometimes you don’t want to get or set an attribute — you just want to know if it’s there. For that, JavaScript gives us the method hasAttribute().
This is useful for things like checking if an input is required, if a link opens in a new tab, or — like in this example — whether a button is disabled.
Let’s say there’s a button on the page. We want to check if it has the disabled attribute, and then show a message based on that.
<!DOCTYPE html>
<html>
<head>
  <title>Check Attribute</title>
</head>
<body>

  <button id="myButton" disabled>Click Me</button>
  <p id="result"></p>

  <script>

    const button = document.getElementById("myButton");
    const result = document.getElementById("result");

    if (button.hasAttribute("disabled")) {
      result.textContent = "Button is currently disabled.";
    }

  </script>

</body>
</html>In this example, the button has the disabled attribute set in the HTML. In the script, we use hasAttribute("disabled") to check if that attribute exists on the button.
If it does, we update the paragraph text to say, “Button is currently disabled.”
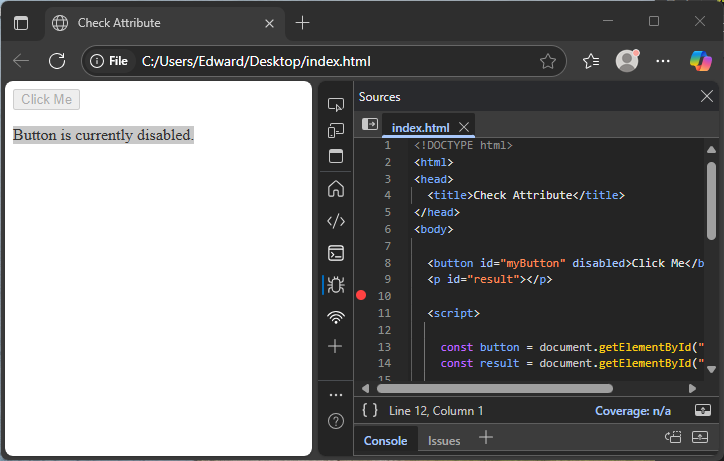
This method returns true or false, depending on whether the attribute is present — no need to read its value or compare strings.
Removing Attributes
Sometimes, we want to take away an attribute completely — not change it, not check it, but remove it. That’s where the removeAttribute() method comes in.
This can be useful for enabling form fields, unlocking buttons, or hiding tooltips when they’re no longer needed.
Imagine you have a form where the input starts out disabled. After a short delay, the field should become active so the user can type. Here’s how you can do that using JavaScript:
<!DOCTYPE html>
<html>
<head>
  <title>Remove Attribute Demo</title>
</head>
<body>

  <input type="text" id="username" placeholder="Enter name" disabled />
  <p>Field will be enabled in 3 seconds...</p>

  <script>

    setTimeout(() => {

      const input = document.getElementById("username");
      input.removeAttribute("disabled");

    }, 3000);

  </script>

</body>
</html>At the start, the input field is disabled — the user can’t type anything. But after 3 seconds, the script runs removeAttribute("disabled") on the input element.
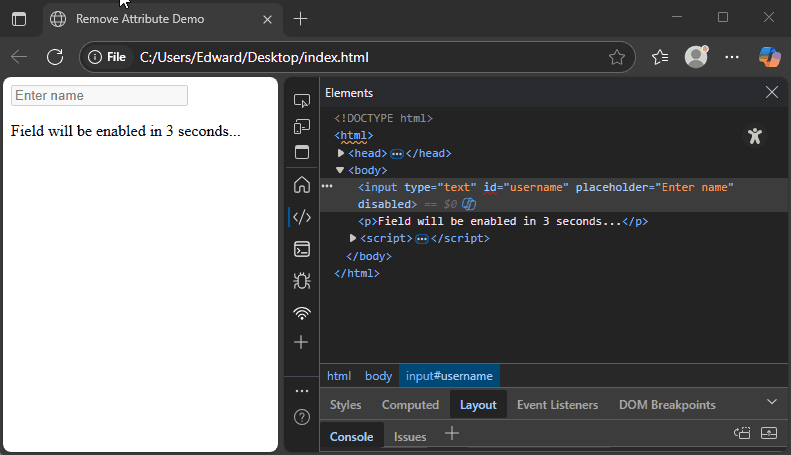
This makes the field active, just like flipping a switch. The user can now click and type into the box.
You can remove any attribute this way — not just disabled. It works with readonly, required, checked, style, and many others.
Working with Custom Attributes (data-*)
Not every piece of information fits into a regular HTML attribute like id, class, or href. Sometimes, you need to store your own little bits of data—like a user’s favorite language, score, or mood.
That’s where custom attributes come in. HTML lets you safely store extra data on elements using the special format:
data-something="value"These are called data attributes, and you can name them however you like—as long as they start with data-.
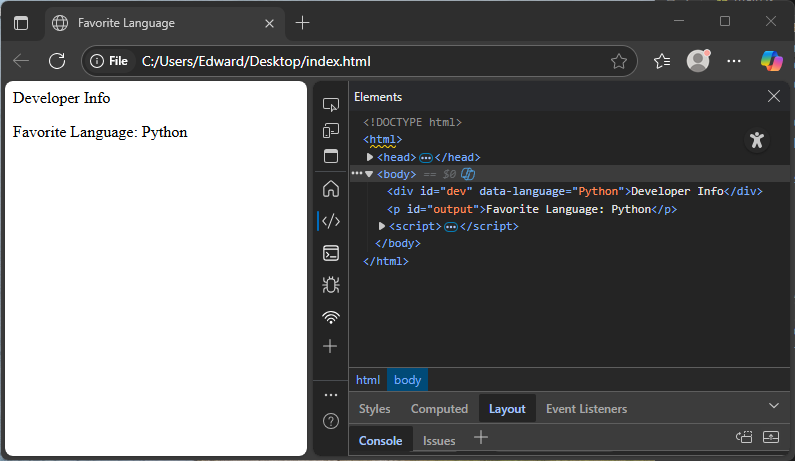
Let’s say we want to store and show someone’s favorite programming language. We’ll hide that info inside a div using a custom data-language attribute. Then, JavaScript will read it and display it on the page.
<!DOCTYPE html>
<html>
<head>
  <title>Favorite Language</title>
</head>
<body>

  <div id="dev" data-language="Python">Developer Info</div>
  <p id="output"></p>

  <script>
    const dev = document.getElementById("dev");
    const favorite = dev.getAttribute("data-language");

    document.getElementById("output").textContent =
      "Favorite Language: " + favorite;
  </script>

</body>
</html>The div has a special custom attribute:
data-language="Python"This doesn’t affect how the element looks, but it quietly holds the text "Python" for us.
In JavaScript, we grab the element with getElementById, then use getAttribute("data-language") to pull out the value. That gives us the text "Python". Finally, we show it in the paragraph below.
When the page loads, you’ll see:
Favorite Language: Python
If you change the data-language value to something else—like "Ruby" or "C++" — JavaScript will pick it up right away.
This is a great way to keep hidden information in your HTML without cluttering the layout. And best of all, it’s clean, flexible, and totally valid HTML.
Changing data-* Attributes with setAttribute()
Custom data-* attributes aren’t just for reading — you can also change them anytime using JavaScript. Just like with other attributes, we use setAttribute() to update the value.
Let’s say we have a developer’s favorite programming language stored in data-language, and we want to change it from "Python" to "JavaScript" when a button is clicked.
<!DOCTYPE html>
<html>
<head>
  <title>Update Data Attribute</title>
</head>
<body>

  <div id="dev" data-language="Python">Developer Info</div>
  <button onclick="changeLang()">Switch Language</button>

  <script>

    function changeLang() {
      const dev = document.getElementById("dev");
      dev.setAttribute("data-language", "JavaScript");
    }

  </script>

</body>
</html>When the page loads, the div contains a custom attribute:
data-language="Python"Once the user clicks the “Switch Language” button, the changeLang() function runs. Inside that function, we first get the div using getElementById("dev"). Then we call:
dev.setAttribute("data-language", "JavaScript");This replaces the old value ("Python") with the new one ("JavaScript"). If you check the element in your browser’s dev tools after clicking the button, you’ll see the attribute has changed.
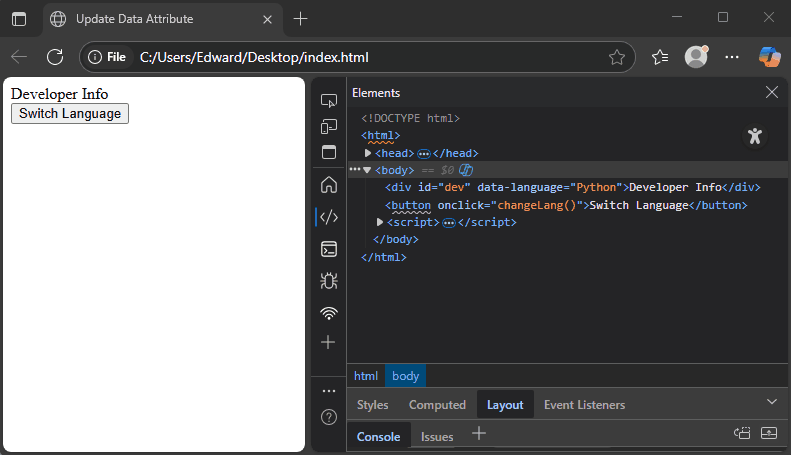
This is a simple and effective way to store and update custom information in your HTML using JavaScript.
Attribute Values and Form Elements
When working with form elements like inputs, it’s important to understand the difference between the attribute value and the current value users see or type. This section shows how to set the initial value with attributes, and how JavaScript reads both the original attribute and what the user may have changed.
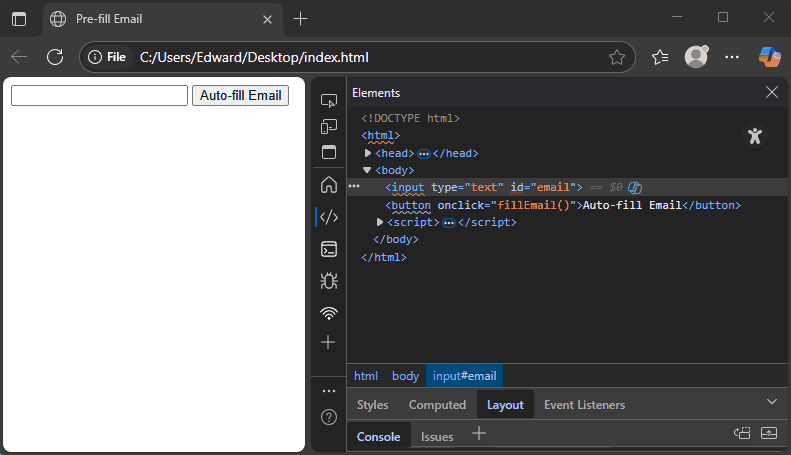
Setting the value Attribute
You can pre-fill a form field by setting its value attribute with JavaScript using setAttribute(). This means the field starts with some text before the user types anything.
Here’s a simple example with an email input:
<!DOCTYPE html>
<html>
<head>
  <title>Pre-fill Email</title>
</head>
<body>

  <input type="text" id="email" />
  <button onclick="fillEmail()">Auto-fill Email</button>

  <script>

    function fillEmail() {
      document.getElementById("email").setAttribute("value", "user@example.com");
    }

  </script>

</body>
</html>When you click the “Auto-fill Email” button, JavaScript sets the value attribute of the input to "user@example.com".
Getting Current value vs. Attribute value
Now, here’s something interesting. The value attribute is the original value set in HTML or with setAttribute(). But the input’s .value property shows the current value — what the user has typed or changed.
Let’s look at an example:
<!DOCTYPE html>
<html>
<head>
  <title>Show Values</title>
</head>
<body>

  <input type="text" id="city" value="Lusaka" />
  <button onclick="showValues()">Show Both</button>
  <p id="output"></p>

  <script>

    function showValues() {

      const city = document.getElementById("city");
      const attrValue = city.getAttribute("value");  // original attribute
      const currentValue = city.value;                // current input value

      document.getElementById("output").innerHTML = `
        Attribute Value: ${attrValue}<br>
        Current Value: ${currentValue}
      `;

    }

  </script>

</body>
</html>The input starts with the attribute value "Lusaka". If you type something different into the box, the current value changes — but the attribute value stays the same unless you update it.
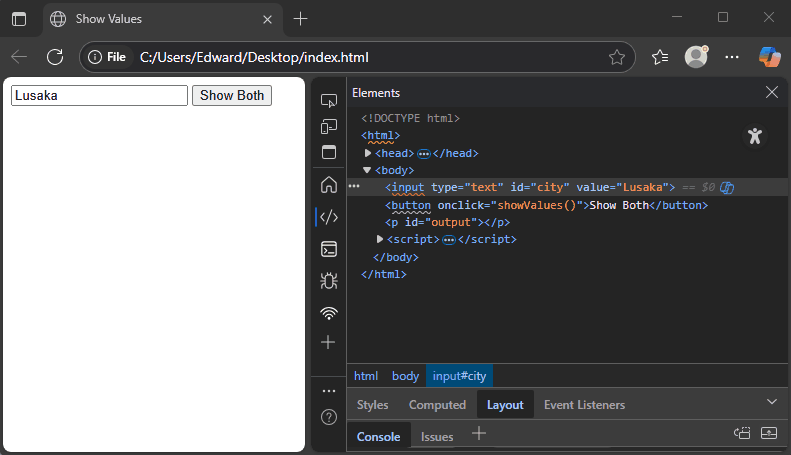
When you click “Show Both”, the page shows both values:
- Attribute Value: What was originally set or assigned with
setAttribute(). - Current Value: What the user sees or typed in the box right now.
This difference is important when you want to know what the user typed vs. what was originally there.
Summary Table: Attribute Methods
| Method | What It Does |
|---|---|
getAttribute() | Gets the value of an attribute |
setAttribute() | Sets or updates an attribute |
hasAttribute() | Checks if an attribute exists |
removeAttribute() | Removes an attribute from the element |
This table clearly shows the main JavaScript methods you use to work with element attributes. It’s a quick reminder of what each method does.
Conclusion
JavaScript makes it easy to read, change, and remove HTML attributes on the fly. With these tools, you can create web pages that feel alive and respond to what users do.
Whether you’re working with forms, images, buttons, or even your own custom data attributes, controlling attributes with JavaScript helps make your pages more dynamic and interactive.
Now you have everything you need to start using element attributes with confidence!
References
- MDN Web Docs: Element.getAttribute()
Learn how to get the value of any attribute on an HTML element using JavaScript. - MDN Web Docs: Element.setAttribute()
See how to add or update attributes on elements with JavaScript. - MDN Web Docs: Element.hasAttribute()
Find out how to check if an element has a specific attribute. - MDN Web Docs: Element.removeAttribute()
Learn how to remove attributes from HTML elements using JavaScript. - MDN Web Docs: Using data attributes
Understand how to use custom data attributes (data-*) to store extra info in HTML.
These official docs give detailed explanations and examples for all attribute methods discussed here.