Graphical User Interfaces (GUIs) play a crucial role in modern software development, enabling developers to create user-friendly applications. PyQt, a set of Python bindings for the Qt application framework, is a popular choice for building GUIs. Among the many widgets offered by PyQt, the QRadioButton stands out as a powerful tool for creating options and selecting choices. In this article, we will explore the PyQt QRadioButton widget, understand its usage, and provide some code examples to demonstrate its capabilities.

with hands-on learning.
get the skills and confidence to land your next move.
What is a QRadioButton?
QRadioButton is a GUI element that represents a selectable button with two states: checked and unchecked. It is often used in groups where users need to select a single option from multiple choices. Only one QRadioButton within a group can be checked at a time, ensuring exclusive selection.
Key Features of QRadioButton
Text and Icon
QRadioButton can display both text and an optional icon to represent the available options. This provides a user-friendly interface and improves the overall user experience.
State Management
The QRadioButton widget maintains its state, allowing developers to query whether a particular option is selected or not. This is particularly useful when you need to take different actions based on the user’s choice.
Exclusive Selection
As mentioned earlier, QRadioButton ensures that only one option can be selected within a specific group. This property helps in creating organized and intuitive user interfaces.
Creating a Basic QRadioButton
Let’s start by creating a basic PyQt application with a single QRadioButton. First, ensure that you have PyQt6 installed. If not, you can install it using pip:
pip install PyQt6
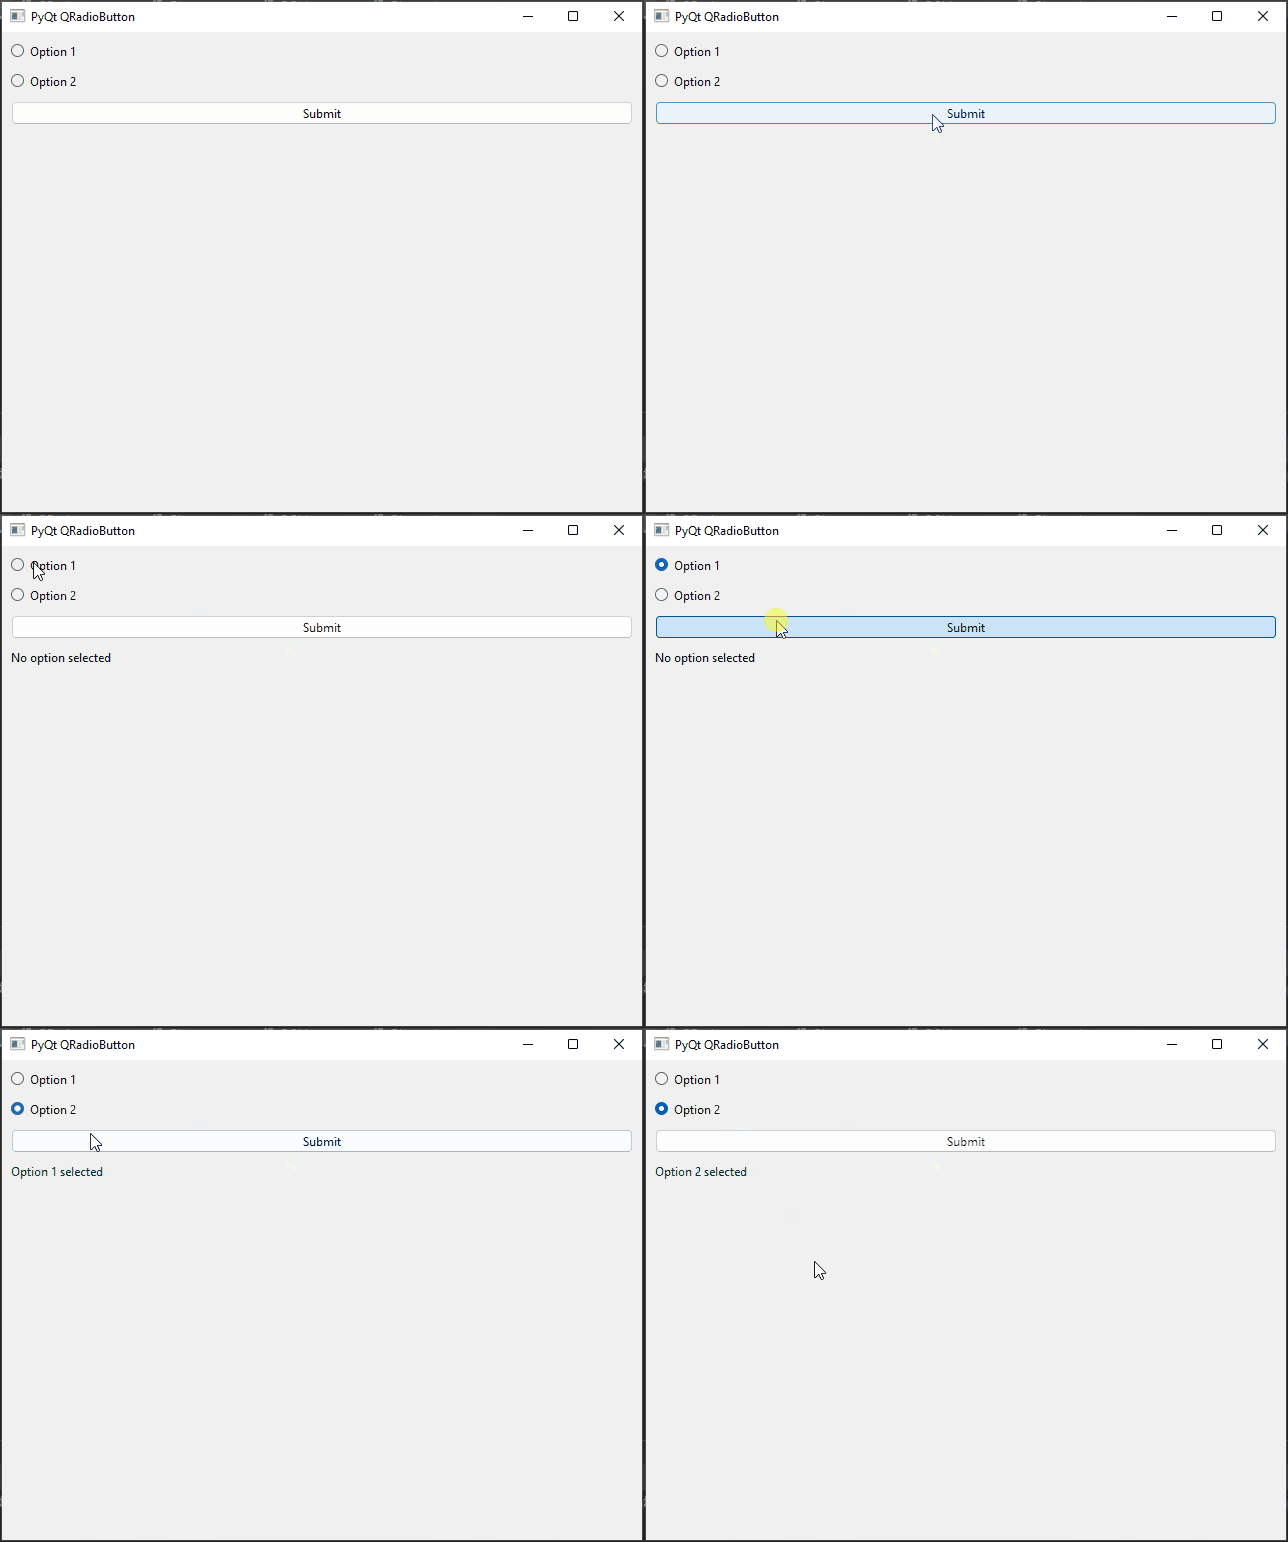
Now, let’s write the code for a simple application with two radio buttons and display a message based on the user’s selection:
import sys

from PyQt6.QtCore import Qt
from PyQt6.QtWidgets import *


# Create a QMainWindow subclass
class AppWindow(QMainWindow):

    def __init__(self, title, width, height, left=100, top=100):
        super().__init__()

        # Set the window title
        self.setWindowTitle(title)

        # Set the window location and size
        self.setGeometry(left, top, width, height)

        # Create a central widget to hold the layout
        self.central_widget = QWidget()
        self.setCentralWidget(self.central_widget)

        # Initialize the user interface
        self.initUI()

    def initUI(self):
        # Create a QVBoxLayout for the central widget
        layout = QVBoxLayout(self.central_widget)

        # Set spacing between widgets
        layout.setSpacing(10)

        # Set the alignment of the layout (optional)
        layout.setAlignment(Qt.AlignmentFlag.AlignTop)

        # Create radio buttons, a result label, and a submit button
        self.radio_button1 = QRadioButton('Option 1')
        self.radio_button2 = QRadioButton('Option 2')

        self.result_label = QLabel()

        button = QPushButton('Submit')

        # Connect the button click event to the showResult method
        button.clicked.connect(self.showResult)

        # Add widgets to the layout
        layout.addWidget(self.radio_button1)
        layout.addWidget(self.radio_button2)
        layout.addWidget(button)
        layout.addWidget(self.result_label)

    def showResult(self):
        # Display a result based on the selected radio button
        if self.radio_button1.isChecked():
            self.result_label.setText('Option 1 selected')
        elif self.radio_button2.isChecked():
            self.result_label.setText('Option 2 selected')
        else:
            self.result_label.setText('No option selected')

    def center(self):
        # Get the geometry of the screen
        screen = QApplication.primaryScreen().size()

        # Calculate the center point of the screen
        x = (screen.width() - self.width()) // 2
        y = (screen.height() - self.height()) // 2

        # Move the window to the center
        self.move(x, y)


if __name__ == "__main__":
    app = QApplication(sys.argv)

    # Create a new app window with title and dimensions
    window = AppWindow("PyQt QRadioButton", 640, 480)

    # Center the app window on the screen
    window.center()

    # Show the app window on the screen
    window.show()

    # Run the application event loop
    sys.exit(app.exec())
In this example, we import the necessary PyQt modules, create a QRadioButton for each option, and connect a QPushButton to a method that displays the selected option in a QLabel.
Working with QRadioButton Groups
QRadioButton widgets are often used in groups to ensure exclusive selection behavior. PyQt provides a convenient way to group radio buttons using the QButtonGroup class. Let’s enhance our previous example by using a button group to manage the radio buttons.
import sys

from PyQt6.QtCore import Qt
from PyQt6.QtWidgets import *


# Create a QMainWindow subclass
class AppWindow(QMainWindow):

    def __init__(self, title, width, height, left=100, top=100):
        super().__init__()

        # Set the window title
        self.setWindowTitle(title)

        # Set the window location and size
        self.setGeometry(left, top, width, height)

        # Create a central widget to hold the layout
        self.central_widget = QWidget()
        self.setCentralWidget(self.central_widget)

        # Initialize the user interface
        self.initUI()

    def initUI(self):
        # Create a QVBoxLayout for the central widget
        layout = QVBoxLayout(self.central_widget)

        # Set spacing between widgets
        layout.setSpacing(10)

        # Set the alignment of the layout (optional)
        layout.setAlignment(Qt.AlignmentFlag.AlignTop)

        # Create a QButtonGroup to manage radio buttons
        self.button_group = QButtonGroup()

        # Create radio buttons, a result label, and a submit button
        self.radio_button1 = QRadioButton('Option 1')
        self.radio_button2 = QRadioButton('Option 2')

        self.result_label = QLabel()

        button = QPushButton('Submit')

        # Connect the button click event to the showResult method
        button.clicked.connect(self.showResult)

        # Add widgets to the layout
        layout.addWidget(self.radio_button1)
        layout.addWidget(self.radio_button2)
        layout.addWidget(button)
        layout.addWidget(self.result_label)

        # Add radio buttons to the button group for exclusive selection
        self.button_group.addButton(self.radio_button1)
        self.button_group.addButton(self.radio_button2)

    def showResult(self):
        # Display a result based on the selected radio button
        selected_button = self.button_group.checkedButton()
        if selected_button == self.radio_button1:
            self.result_label.setText('Option 1 selected')
        elif selected_button == self.radio_button2:
            self.result_label.setText('Option 2 selected')
        else:
            self.result_label.setText('No option selected')

    def center(self):
        # Get the geometry of the screen
        screen = QApplication.primaryScreen().size()

        # Calculate the center point of the screen
        x = (screen.width() - self.width()) // 2
        y = (screen.height() - self.height()) // 2

        # Move the window to the center
        self.move(x, y)


if __name__ == "__main__":
    app = QApplication(sys.argv)

    # Create a new app window with title and dimensions
    window = AppWindow("PyQt QRadioButton", 640, 480)

    # Center the app window on the screen
    window.center()

    # Show the app window on the screen
    window.show()

    # Run the application event loop
    sys.exit(app.exec())
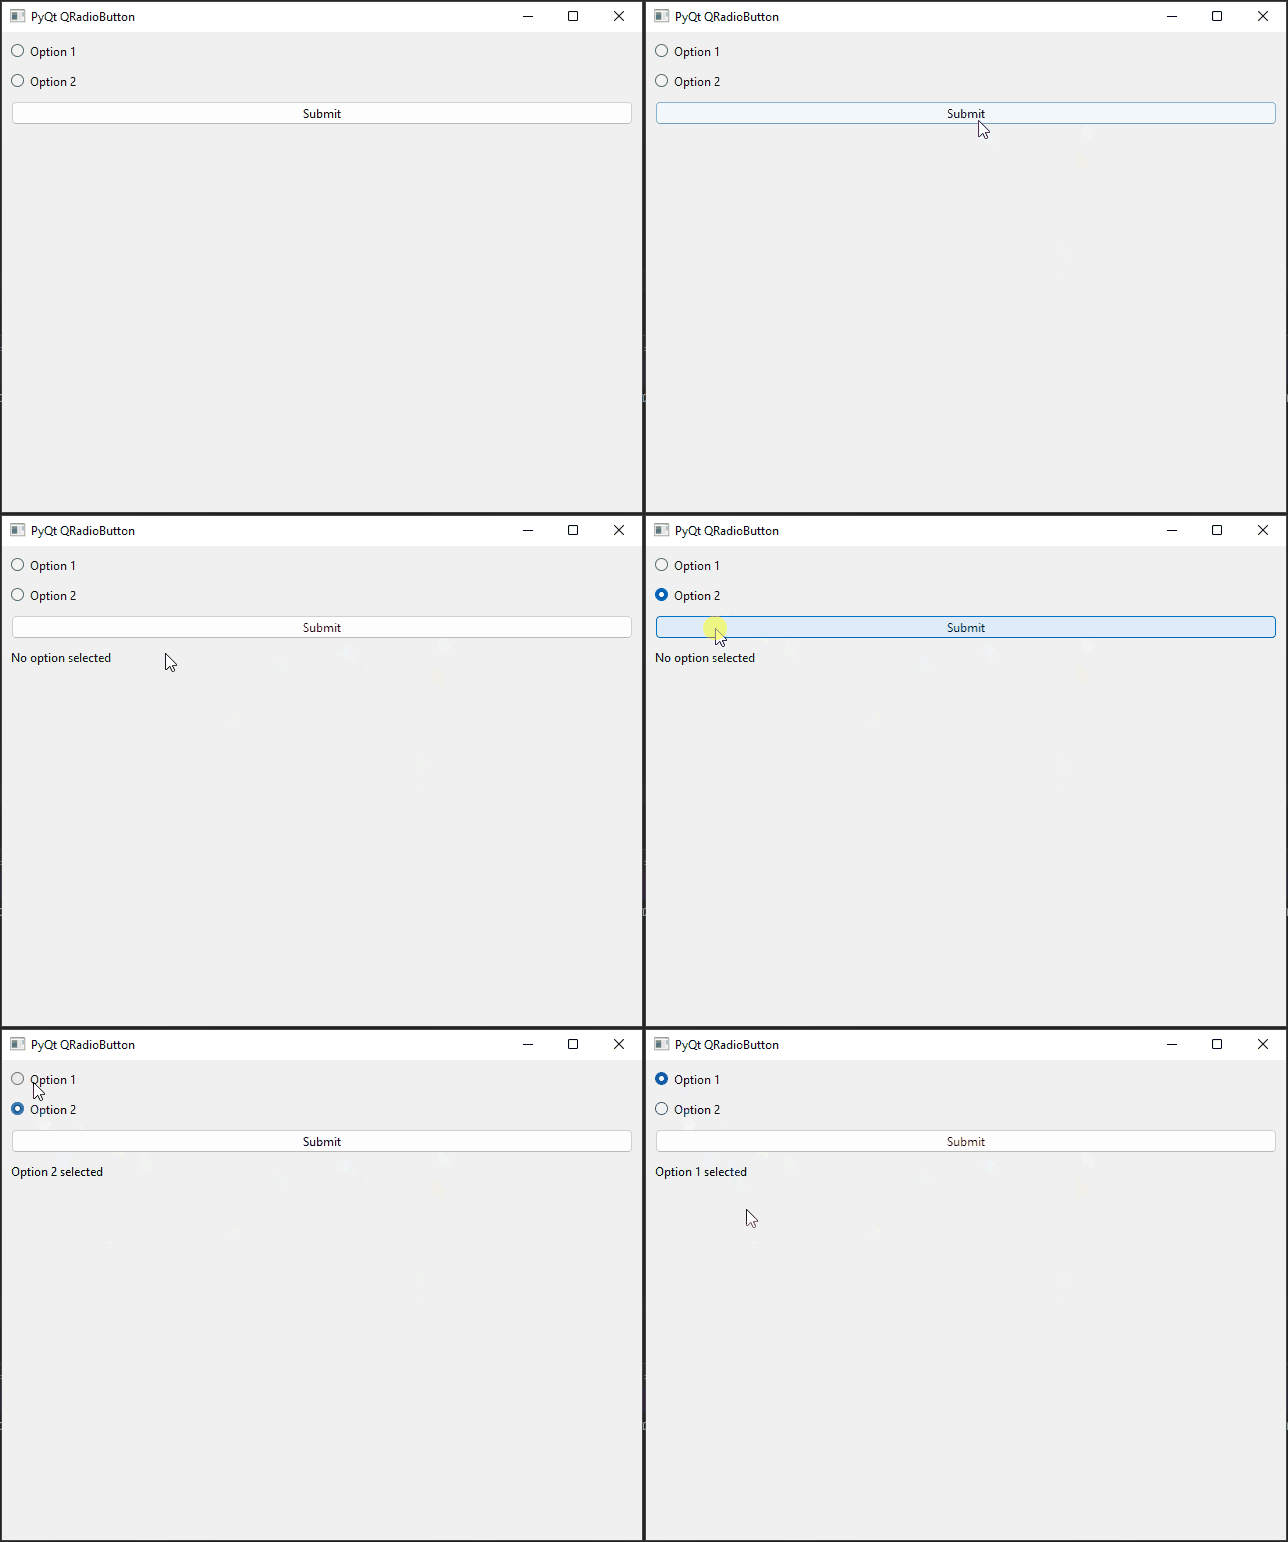
In this updated example, we use a QButtonGroup to group the radio buttons together. This ensures that only one radio button in the group can be selected at a time. The checkedButton() method of the QButtonGroup is used to determine which radio button is currently selected.
Handling QRadioButton State Changes
To perform some action when the state of a QRadioButton changes, we can connect a slot to its toggled signal. The signal is emitted whenever the button’s state changes (selected or deselected).
Let’s enhance our previous example to demonstrate how to handle QRadioButton state changes:
import sys

from PyQt6.QtCore import Qt
from PyQt6.QtWidgets import *


# Create a QMainWindow subclass
class AppWindow(QMainWindow):

    def __init__(self, title, width, height, left=100, top=100):
        super().__init__()

        # Set the window title
        self.setWindowTitle(title)

        # Set the window location and size
        self.setGeometry(left, top, width, height)

        # Create a central widget to hold the layout
        self.central_widget = QWidget()
        self.setCentralWidget(self.central_widget)

        # Initialize the user interface
        self.initUI()

    def initUI(self):
        # Create a QVBoxLayout for the central widget
        layout = QVBoxLayout(self.central_widget)

        # Set spacing between widgets
        layout.setSpacing(10)

        # Set the alignment of the layout (optional)
        layout.setAlignment(Qt.AlignmentFlag.AlignTop)

        self.radio_btn1 = QRadioButton('Option 1')
        self.radio_btn1.toggled.connect(self.on_radio_btn_toggled)

        self.radio_btn2 = QRadioButton('Option 2')
        self.radio_btn2.toggled.connect(self.on_radio_btn_toggled)

        layout.addWidget(self.radio_btn1, 0)
        layout.addWidget(self.radio_btn2, 0)

    def on_radio_btn_toggled(self):
        sender = self.sender()
        if sender.isChecked():
            print(f'{sender.text()} selected.')

    def center(self):
        # Get the geometry of the screen
        screen = QApplication.primaryScreen().size()

        # Calculate the center point of the screen
        x = (screen.width() - self.width()) // 2
        y = (screen.height() - self.height()) // 2

        # Move the window to the center
        self.move(x, y)


if __name__ == "__main__":
    app = QApplication(sys.argv)

    # Create a new app window with title and dimensions
    window = AppWindow("PyQt QRadioButton", 640, 480)

    # Center the app window on the screen
    window.center()

    # Show the app window on the screen
    window.show()

    # Run the application event loop
    sys.exit(app.exec())
In this example, we connected both QRadioButton widgets to the on_radio_btn_toggled slot. When a radio button is selected, the corresponding message will be printed to the console.
Using icons with QRadioButtons
Using icons with QRadioButtons in PyQt can enhance the visual appeal and provide a more intuitive user experience. PyQt allows you to incorporate icons with QRadioButtons using the QIcon class.
import sys

from PyQt6.QtCore import Qt
from PyQt6.QtGui import QIcon
from PyQt6.QtWidgets import *


# Create a QMainWindow subclass
class AppWindow(QMainWindow):

    def __init__(self, title, width, height, left=100, top=100):
        super().__init__()

        # Set the window title
        self.setWindowTitle(title)

        # Set the window location and size
        self.setGeometry(left, top, width, height)

        # Create a central widget to hold the layout
        self.central_widget = QWidget()
        self.setCentralWidget(self.central_widget)

        # Initialize the user interface
        self.initUI()

    def initUI(self):
        # Create a QVBoxLayout for the central widget
        layout = QVBoxLayout(self.central_widget)

        # Set spacing between widgets
        layout.setSpacing(10)

        # Set the alignment of the layout (optional)
        layout.setAlignment(Qt.AlignmentFlag.AlignTop)

        # Replace 'icon1.png' with the path to your first icon image.
        icon1 = QIcon('icon1.png')
        self.radio_btn1 = QRadioButton('Option 1')
        self.radio_btn1.setIcon(icon1)

        # Replace 'icon2.png' with the path to your second icon image.
        icon2 = QIcon('icon2.png')
        self.radio_btn2 = QRadioButton('Option 2')
        self.radio_btn2.setIcon(icon2)

        layout.addWidget(self.radio_btn1, 0)
        layout.addWidget(self.radio_btn2, 0)

    def center(self):
        # Get the geometry of the screen
        screen = QApplication.primaryScreen().size()

        # Calculate the center point of the screen
        x = (screen.width() - self.width()) // 2
        y = (screen.height() - self.height()) // 2

        # Move the window to the center
        self.move(x, y)


if __name__ == "__main__":
    app = QApplication(sys.argv)

    # Create a new app window with title and dimensions
    window = AppWindow("PyQt QRadioButton", 640, 480)

    # Center the app window on the screen
    window.center()

    # Show the app window on the screen
    window.show()

    # Run the application event loop
    sys.exit(app.exec())
In this example, we created two QRadioButtons, each associated with an icon loaded using the QIcon class. Replace ‘icon1.png’ and ‘icon2.png’ with the paths to your own icon images.
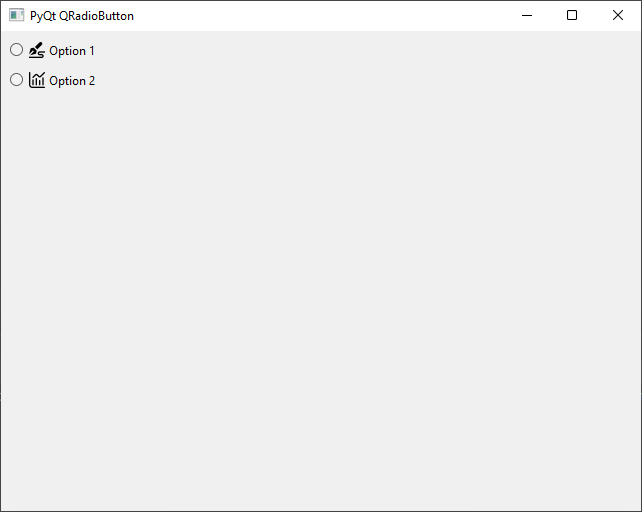
Make sure to have the icon images (‘icon1.png’ and ‘icon2.png’) present in the same directory as the script, or provide the correct path to the icons.
Conclusion
The PyQt QRadioButton is a valuable widget for creating interactive options in Python GUI applications. Its exclusive group behavior ensures that users can only select one option at a time, making it ideal for preference settings, configuration dialogs, and more.
In this article, we’ve explored the basics of working with QRadioButton in PyQt and demonstrated how to create a simple application with event handling. As you delve further into PyQt and GUI development, you’ll discover numerous possibilities to enhance the user experience and create powerful applications with ease.
I hope you found this article informative and useful. If you would like to receive more content, please consider subscribing to our newsletter!
