In the realm of modern Java user interfaces, Ribbon Menus have emerged as a sleek and intuitive way to organize and access application functionality. Inspired by Microsoft’s Office suite, Ribbon Menus provide a visually appealing and user-friendly approach to managing a wide array of features and actions within your JavaFX application. In this article, we’ll dive deep into the world of Ribbon Menus in JavaFX, exploring the FXRibbon library, installation, and more importantly event handling, and how to add a quick access bar.

with hands-on learning.
get the skills and confidence to land your next move.
What Are Ribbon Menus?
A Ribbon Menu is a graphical control element that consists of a series of tabs, each containing various groups of related functionality. These tabs are presented at the top of the application window, making it easy for users to navigate and access different features. Ribbon Menus excel in applications with extensive sets of tools and actions, as they allow for efficient organization and quick access to these resources.
Installation of FXRibbon
To implement Ribbon Menus in JavaFX, we’ll utilize the FXRibbon library, which simplifies the creation and management of Ribbon-based interfaces. Before we begin, make sure you have JavaFX and FXRibbon installed in your development environment.
FXRibbon can be effortlessly incorporated into your JavaFX project using either Maven or Gradle. Alternatively, if you prefer a manual approach or are not using a build tool, you can download the FXRibbon JAR file directly from the Maven Repository here, where you’ll also find build tool code snippets to include this library in your project.
Creating a Basic Ribbon Menu
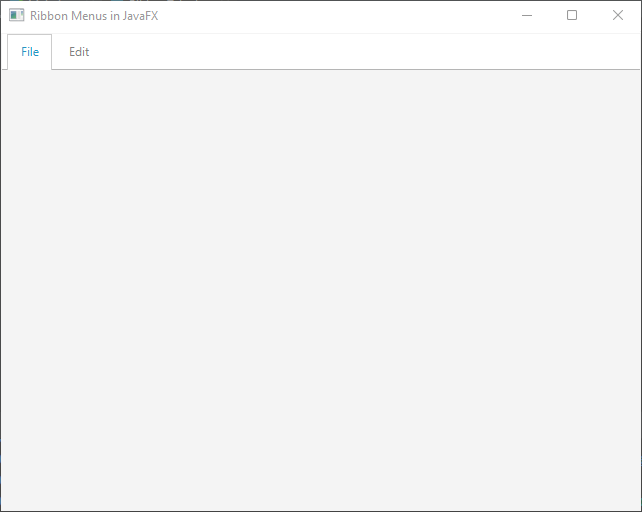
Let’s start with a simple example of creating a Ribbon Menu using FXRibbon. In this example, we’ll create a Ribbon Menu with two tabs: “File” and “Edit.”
import com.pixelduke.control.Ribbon;
import com.pixelduke.control.ribbon.RibbonTab;
import javafx.application.Application;
import javafx.scene.Scene;
import javafx.scene.layout.*;
import javafx.stage.Stage;

public class Main extends Application {

    // The parent layout manager
    private final BorderPane parent = new BorderPane();

    @Override
    public void init() throws Exception {
        super.init();
        buildUI();
    }

    private void buildUI() {

        // Create a Ribbon control
        Ribbon ribbon = new Ribbon();

        // Create a "File" Ribbon Tab
        RibbonTab fileTab = new RibbonTab("File");

        // Create an "Edit" Ribbon Tab
        RibbonTab editTab = new RibbonTab("Edit");

        // Add the tabs to the Ribbon
        ribbon.getTabs().addAll(fileTab, editTab);

        // Add the Ribbon to the center of the parent layout
        this.parent.setCenter(ribbon);
    }

    @Override
    public void start(Stage stage) throws Exception {

        // Create a scene with the BorderPane as the root
        Scene scene = new Scene(parent, 640, 480);

        // Set the stage title
        stage.setTitle("Ribbon Menus in JavaFX");

        // Set the scene for the stage
        stage.setScene(scene);

        // Center the stage on the screen
        stage.centerOnScreen();

        // Display the stage
        stage.show();
    }
}
In this example, we create a basic JavaFX application with two Ribbon tabs, “File” and “Edit.” The Ribbon itself is added to the application’s scene, which you can further customize to suit your application’s needs.

Handling Events in Ribbon Menus
Event handling in Ribbon Menus is crucial for responding to user interactions and executing actions associated with different Ribbon elements. FXRibbon provides a straightforward way to handle events.
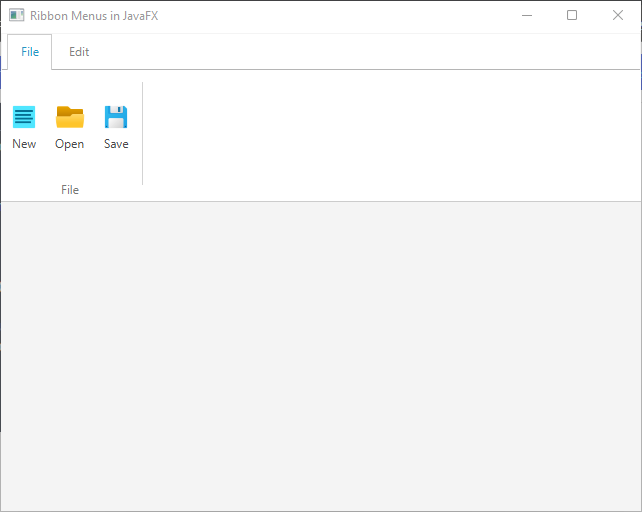
Let’s enhance our previous example by adding buttons to the “File” tab and handling their click events:
import com.pixelduke.control.Ribbon;
import com.pixelduke.control.ribbon.RibbonGroup;
import com.pixelduke.control.ribbon.RibbonTab;
import javafx.application.Application;
import javafx.event.ActionEvent;
import javafx.event.EventHandler;
import javafx.scene.Scene;
import javafx.scene.control.Button;
import javafx.scene.control.ContentDisplay;
import javafx.scene.image.Image;
import javafx.scene.image.ImageView;
import javafx.scene.layout.*;
import javafx.stage.Stage;
import javafx.util.Builder;

public class Main extends Application {

    // The parent layout manager
    private final BorderPane parent = new BorderPane();

    @Override
    public void init() throws Exception {
        super.init();
        buildUI();
    }

    private void buildUI() {

        // Create a Ribbon control
        Ribbon ribbon = new Ribbon();

        // Create a "File" Ribbon Tab
        RibbonTab fileTab = new RibbonTab("File");

        // Create an "Edit" Ribbon Tab
        RibbonTab editTab = new RibbonTab("Edit");

        // Add a RibbonGroup to the "File" tab
        fileTab.getRibbonGroups().add(new FileGroup("File"));

        // Add the tabs to the Ribbon
        ribbon.getTabs().addAll(fileTab, editTab);

        // Add the Ribbon to the center of the parent layout
        this.parent.setCenter(ribbon);
    }

    @Override
    public void start(Stage stage) throws Exception {

        // Create a scene with the BorderPane as the root
        Scene scene = new Scene(parent, 640, 480);

        // Set the stage title
        stage.setTitle("Ribbon Menus in JavaFX");

        // Set the scene for the stage
        stage.setScene(scene);

        // Center the stage on the screen
        stage.centerOnScreen();

        // Display the stage
        stage.show();
    }

    static class FileGroup extends RibbonGroup {

        public FileGroup(String title) {

            // Set the title for the RibbonGroup
            this.setTitle(title);

            // Create buttons and add event handlers
            Button newButton = new ButtonBuilder("New", "new.png", event -> System.out.println("New"))
                    .build();

            Button openButton = new ButtonBuilder("Open", "open.png", event -> System.out.println("Open"))
                    .build();

            Button saveButton = new ButtonBuilder("Save", "save.png", event -> System.out.println("Save"))
                    .build();

            this.getNodes().addAll(newButton, openButton, saveButton); // Add buttons to the RibbonGroup
        }
    }

    static class ButtonBuilder implements Builder<Button> {

        private final Button button;

        public ButtonBuilder(String label, String imagePath, EventHandler<ActionEvent> eventHandler) {

            // Create a button with a label
            this.button = new Button(label);

            // Create an ImageView with an image
            ImageView image = new ImageView(new Image(imagePath));
            image.setFitWidth(30.0);
            image.setFitHeight(30.0);

            // Set the image as the button's graphic
            this.button.setGraphic(image);

            // Set content display to show the label on top of the image
            this.button.setContentDisplay(ContentDisplay.TOP);

            // Set the event handler for the button
            this.button.setOnAction(eventHandler);
        }

        @Override
        public Button build() {

            // Build and return the button
            return this.button;
        }
    }
}
In this example, we’ve added buttons to the “File” tab and attached event handlers to each. When any of the buttons is clicked, it prints a message to the console. You can replace the print statements with your specific logic for that button.

The Quick Access Bar
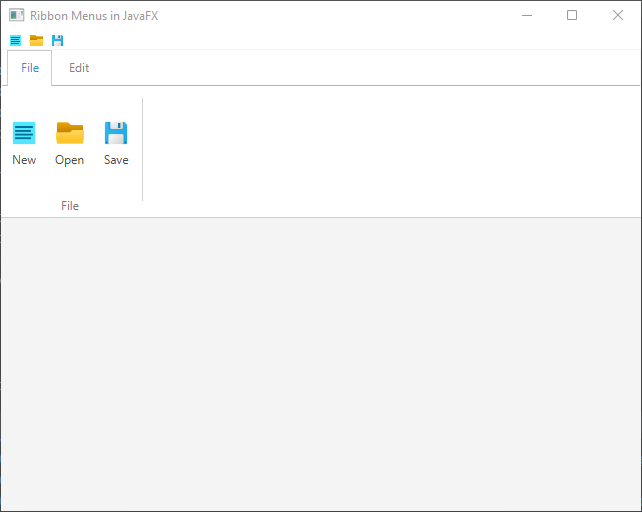
One of the distinguishing features of Ribbon Menus is the Quick Access Bar, which allows users to customize their toolbar with frequently used commands. Adding items to the Quick Access Bar is straightforward:
import com.pixelduke.control.Ribbon;
import com.pixelduke.control.ribbon.RibbonGroup;
import com.pixelduke.control.ribbon.RibbonTab;
import javafx.application.Application;
import javafx.event.ActionEvent;
import javafx.event.EventHandler;
import javafx.scene.Scene;
import javafx.scene.control.Button;
import javafx.scene.control.ContentDisplay;
import javafx.scene.image.Image;
import javafx.scene.image.ImageView;
import javafx.scene.layout.*;
import javafx.stage.Stage;
import javafx.util.Builder;

public class Main extends Application {

    // The parent layout manager
    private final BorderPane parent = new BorderPane();

    @Override
    public void init() throws Exception {
        super.init();
        buildUI();
    }

    private void buildUI() {

        // Create a Ribbon control
        Ribbon ribbon = new Ribbon();

        // Create a "File" Ribbon Tab
        RibbonTab fileTab = new RibbonTab("File");

        // Create an "Edit" Ribbon Tab
        RibbonTab editTab = new RibbonTab("Edit");

        // Add a RibbonGroup to the "File" tab
        fileTab.getRibbonGroups().add(new FileGroup("File"));

        // Add the tabs to the Ribbon
        ribbon.getTabs().addAll(fileTab, editTab);

        // Create quick access buttons
        Button newButton = new QuickAccessButtonBuilder("new.png", null).build();
        Button openButton = new QuickAccessButtonBuilder("open.png", null).build();
        Button saveButton = new QuickAccessButtonBuilder("save.png", null).build();

        ribbon.getQuickAccessBar().getButtons().addAll(
                newButton, openButton, saveButton
        );

        // Add the Ribbon to the center of the parent layout
        this.parent.setCenter(ribbon);

    }

    @Override
    public void start(Stage stage) throws Exception {

        // Create a scene with the BorderPane as the root
        Scene scene = new Scene(parent, 640, 480);

        // Set the stage title
        stage.setTitle("Ribbon Menus in JavaFX");

        // Set the scene for the stage
        stage.setScene(scene);

        // Center the stage on the screen
        stage.centerOnScreen();

        // Display the stage
        stage.show();
    }

    static class FileGroup extends RibbonGroup {

        public FileGroup(String title) {

            // Set the title for the RibbonGroup
            this.setTitle(title);

            // Create buttons and add event handlers
            Button newButton = new ButtonBuilder("New", "new.png", event -> System.out.println("New"))
                    .build();

            Button openButton = new ButtonBuilder("Open", "open.png", event -> System.out.println("Open"))
                    .build();

            Button saveButton = new ButtonBuilder("Save", "save.png", event -> System.out.println("Save"))
                    .build();

            // Add buttons to the RibbonGroup
            this.getNodes().addAll(newButton, openButton, saveButton);
        }

    }

    static class QuickAccessButtonBuilder implements Builder<Button> {

        private final Button button;

        public QuickAccessButtonBuilder(String imagePath, EventHandler<ActionEvent> eventHandler) {

            this.button = new Button();

            ImageView image = new ImageView(new Image(imagePath));
            image.setFitWidth(15.0);
            image.setFitHeight(15.0);

            // Set the image as the button's graphic
            this.button.setGraphic(image);

            // Display only the graphic
            this.button.setContentDisplay(ContentDisplay.GRAPHIC_ONLY);

            // Set the event handler for the button
            this.button.setOnAction(eventHandler);
        }

        @Override
        public Button build() {

            // Build and return the button
            return this.button;
        }
    }

    static class ButtonBuilder implements Builder<Button> {

        private final Button button;

        public ButtonBuilder(String label, String imagePath, EventHandler<ActionEvent> eventHandler) {

            // Create a button with a label
            this.button = new Button(label);

            // Create an ImageView with an image
            ImageView image = new ImageView(new Image(imagePath));
            image.setFitWidth(30.0);
            image.setFitHeight(30.0);

            // Set the image as the button's graphic
            this.button.setGraphic(image);

            // Display the label on top of the image
            this.button.setContentDisplay(ContentDisplay.TOP);

            // Set the event handler for the button
            this.button.setOnAction(eventHandler);
        }

        @Override
        public Button build() {

            // Build and return the button
            return this.button;
        }
    }
}
Conclusion
Ribbon Menus in JavaFX, powered by the FXRibbon library, offer a powerful way to organize and present functionality in your applications. In this article, we’ve covered the basics of creating Ribbon Menus, handling events, and adding a quick access bar.
As you delve deeper into JavaFX development, remember that Ribbon Menus are just one of the many tools at your disposal to create intuitive and user-friendly interfaces. Experiment, explore, and tailor your Ribbon Menus to meet the specific needs and aesthetics of your applications.
Sources:
I hope you found this article informative and useful. If you would like to receive more content, please consider subscribing to our newsletter.


