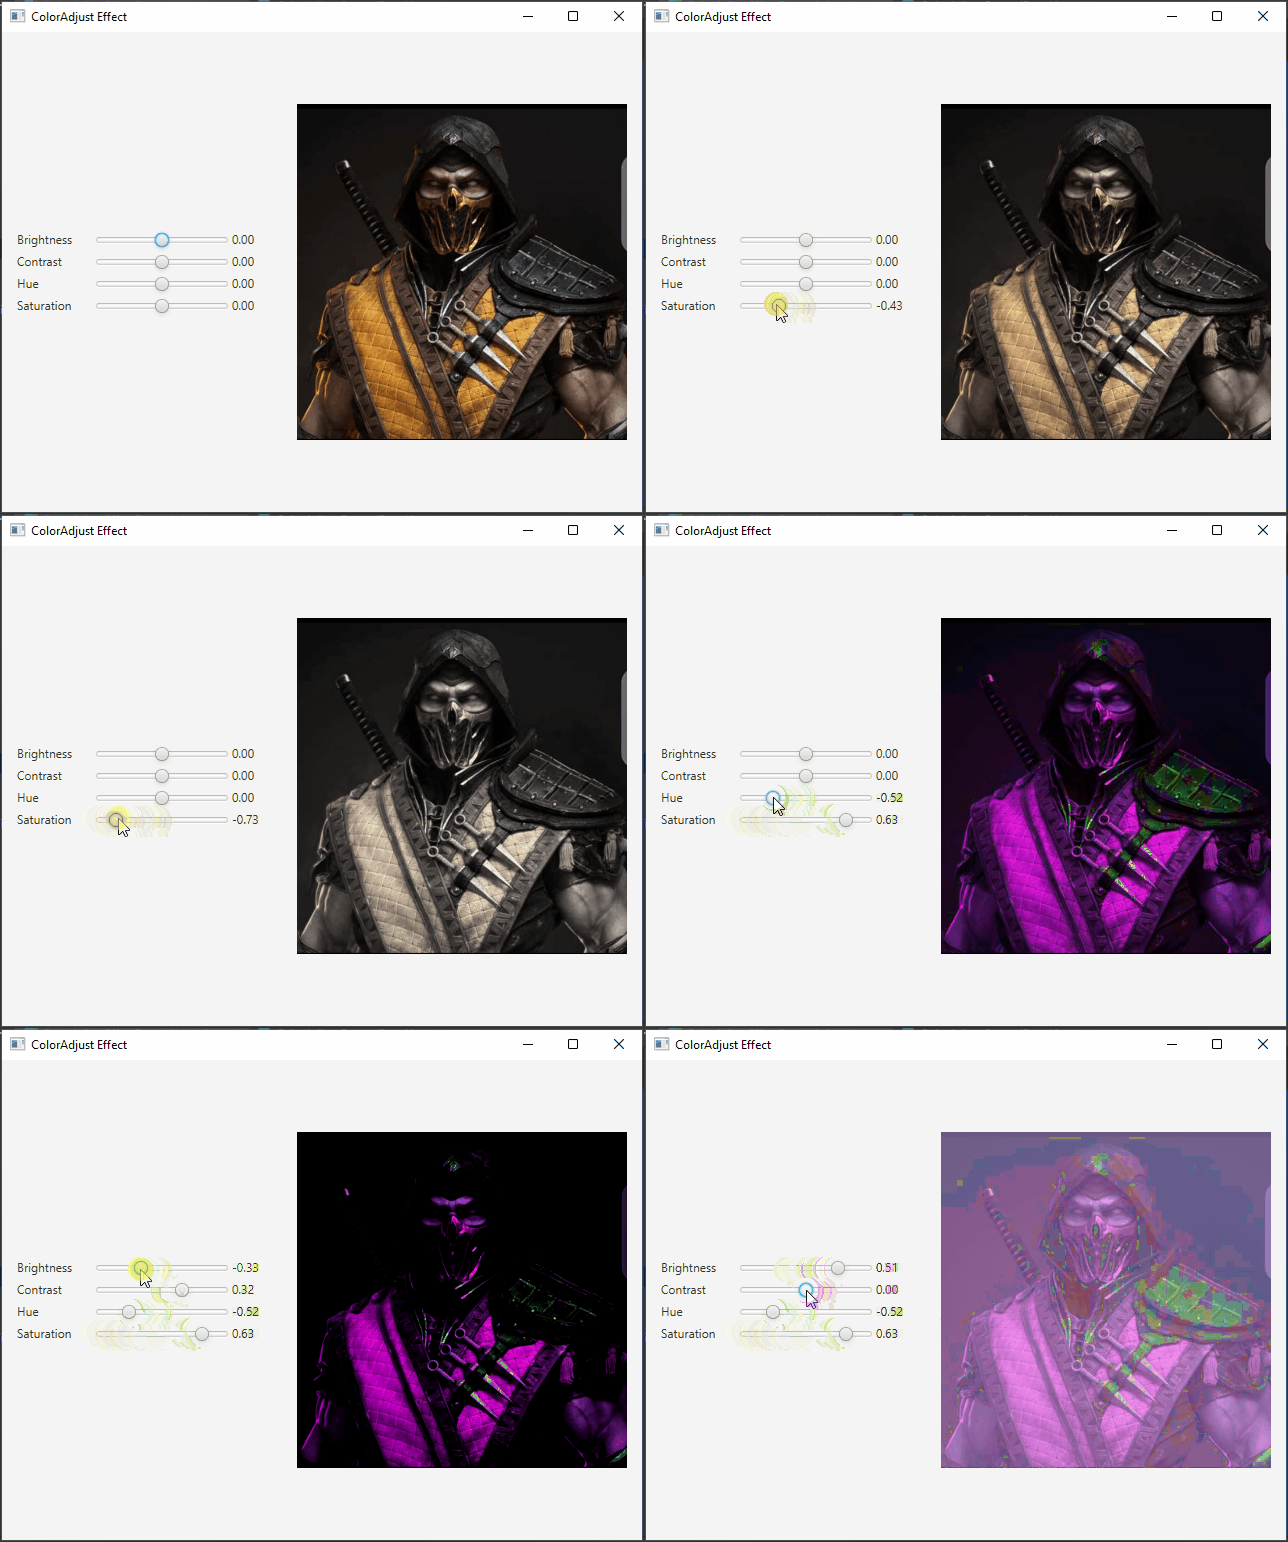
JavaFX is a versatile and powerful framework for building graphical user interfaces (GUIs) in Java. While JavaFX offers a plethora of tools and features for creating visually stunning applications, it also provides various effects to enhance the aesthetics of your GUI. In this article, we’ll explore JavaFX ColorAdjust Effect – a feature that lets you manipulate the color and contrast of your UI elements to create captivating user experiences.

with hands-on learning.
get the skills and confidence to land your next move.
The Power of Color in UI Design
Color is a fundamental aspect of user interface design. It has the power to influence emotions, convey meaning, and guide user attention. When used effectively, color can create a visually pleasing and immersive experience for users. However, there are situations where you might want to manipulate the colors in your application to achieve a specific visual effect or enhance user experience. This is where the ColorAdjust effect comes into play.
Understanding the ColorAdjust Effect
The ColorAdjust effect is a part of the JavaFX library that allows you to apply color and brightness adjustments to UI components, such as images, text, or shapes. With this effect, you can easily tweak the hue, saturation, brightness, and contrast of these components, giving you fine-grained control over the visual appearance of your application.
Here are the main properties of the ColorAdjust effect:
Hue
Hue represents the color itself. Using the hue property of ColorAdjust, you can shift the colors in your scene along the color wheel. This can be used to create striking visual effects and animations.
Saturation
Saturation refers to the intensity of colors. By adjusting the saturation property, you can make your visuals monochromatic or super vibrant, depending on your desired effect.
Brightness
Brightness governs the overall luminance of the scene. Tinkering with the brightness property allows you to make elements appear darker or brighter, effectively controlling the mood of your application.
Contrast
Contrast is the difference between the light and dark parts of an image. Modifying the contrast property can make the scene more vivid or muted.
Building the ColorAdjustEffect Example Application
To demonstrate the ColorAdjust effect, we’ll create a simple JavaFX application. We’ll load an image and apply the effect to it. Users can interact with sliders to adjust the effect’s properties in real-time. Below is the main application class:
import javafx.application.Application;
import javafx.geometry.Insets;
import javafx.geometry.Pos;
import javafx.scene.Scene;
import javafx.scene.effect.ColorAdjust;
import javafx.scene.image.Image;
import javafx.scene.image.ImageView;
import javafx.scene.layout.BorderPane;
import javafx.stage.Stage;

public class ColorAdjustEffectExampleApp extends Application {

    private static final double WIDTH = 640;
    private static final double HEIGHT = 480;

    /* The parent layout manager */
    private final BorderPane parent = new BorderPane();

    @Override
    public void start(Stage stage) throws Exception {

        Scene scene = new Scene(this.parent, WIDTH, HEIGHT);

        // Sets the stage title
        stage.setTitle("ColorAdjust Effect");

        // Set the stage scene
        stage.setScene(scene);

        // Center stage on screen
        stage.centerOnScreen();

        // Show stage on screen
        stage.show();

    }

    @Override
    public void init() throws Exception {
        super.init();

        Image image = new Image("scorpion.jpg");

        ImageView imageView = new ImageView(image);
        imageView.setPreserveRatio(true);
        imageView.setFitWidth(330);

        // Create a ColorAdjust effect
        ColorAdjust colorAdjust = new ColorAdjust();

        ColorAdjustControlPanel colorAdjustControlPanel = new ColorAdjustControlPanel(colorAdjust);

        // Set the ColorAdjust effect on the ImageView
        imageView.setEffect(colorAdjust);

        /* Add the ImageView to the BorderPane right region */
        this.parent.setRight(imageView);
        BorderPane.setAlignment(imageView,Pos.CENTER);
        BorderPane.setMargin(imageView, new Insets(15));

        this.parent.setLeft(colorAdjustControlPanel);

    }

}
In this code, we load an image (“scorpion.jpg” in this example) and create an ImageView to display it. The ColorAdjust effect is initialized and applied to the image. Additionally, we set up the user interface for adjusting the ColorAdjust properties on the left side of the application window.
The ColorAdjust Control Panel
The heart of our application is the control panel, where users can interact with sliders to modify the ColorAdjust properties. We’ve encapsulated this functionality in the ColorAdjustControlPanel class, which extends VBox. Here’s the code for the control panel:
import javafx.geometry.Insets;
import javafx.geometry.Pos;
import javafx.scene.control.Label;
import javafx.scene.control.Slider;
import javafx.scene.effect.ColorAdjust;
import javafx.scene.layout.HBox;
import javafx.scene.layout.VBox;

public class ColorAdjustControlPanel extends VBox {

    public ColorAdjustControlPanel(ColorAdjust colorAdjust) {
        super(5);

        // Create sliders for adjusting color properties
        Slider brightnessSlider = new Slider(-1.0, 1.0, 0.0);
        Slider contrastSlider = new Slider(-1.0, 1.0, 0.0);
        Slider hueSlider = new Slider(-1.0, 1.0, 0.0);
        Slider saturationSlider = new Slider(-1.0, 1.0, 0.0);

        // Bind the sliders to ColorAdjust properties
        colorAdjust.brightnessProperty().bind(brightnessSlider.valueProperty());
        colorAdjust.contrastProperty().bind(contrastSlider.valueProperty());
        colorAdjust.hueProperty().bind(hueSlider.valueProperty());
        colorAdjust.saturationProperty().bind(saturationSlider.valueProperty());

        // Create a VBox to arrange Sliders
        this.getChildren().addAll(
                this.createLabeledSlider(brightnessSlider, "Brightness"),
                this.createLabeledSlider(contrastSlider, "Contrast"),
                this.createLabeledSlider(hueSlider, "Hue"),
                this.createLabeledSlider(saturationSlider, "Saturation")
        );

        this.setAlignment(Pos.CENTER_LEFT);
        this.setPadding(new Insets(15));

    }

    private HBox createLabeledSlider(Slider slider, String label) {

        Label value = new Label();
        value.setMinWidth(30);

        // Format the slider value with two decimal places
        value.textProperty().bind(slider.valueProperty().asString("%.2f"));

        Label lblLabel = new Label(String.format("%-10s", label));
        lblLabel.setMinWidth(75);

        // Create the HBox to arrange UI components
        HBox container = new HBox(lblLabel, slider, value);
        container.setAlignment(Pos.CENTER);

        return container;

    }

}
In this class, we create sliders for each ColorAdjust property (brightness, contrast, hue, and saturation). We bind these sliders to the corresponding ColorAdjust properties. When you run the application, you’ll see the loaded image with sliders on the left (replace “scorpion.jpg” with the path to your image). When users interact with the sliders, the changes are automatically reflected in the image’s appearance.

Conclusion
The ColorAdjust effect in JavaFX is a valuable tool for enhancing the visual appeal and interactivity of your applications. By adjusting the hue, saturation, brightness, and contrast of your UI components, you can create stunning visual effects, provide dynamic user feedback, and improve the overall user experience. Whether you’re developing a photo editing app, a data visualization tool, or any other JavaFX application, the ColorAdjust effect can be a game-changer in your design and user interaction strategy.
I hope you found this article informative and useful. If you would like to receive more content, please consider subscribing to our newsletter.


