In today’s digital age, the ability to capture screenshots is invaluable. Whether you’re a developer, a designer, or simply an enthusiast, the need to document and share what’s happening on your screen arises frequently. JavaFX, the popular GUI toolkit for Java, offers a powerful way to capture screenshots programmatically. In this article, we’ll explore the various methods and techniques to capture screenshots with JavaFX, enabling you to create powerful applications or tools for screen capture and analysis.

with hands-on learning.
get the skills and confidence to land your next move.
The Robot Class: Your Screenshot Gateway
The javafx.scene.robot.Robot class serves as your gateway to capturing screenshots. This versatile class offers several methods that allow you to capture specific screen regions or the entire screen.
Capture the Entire Screen
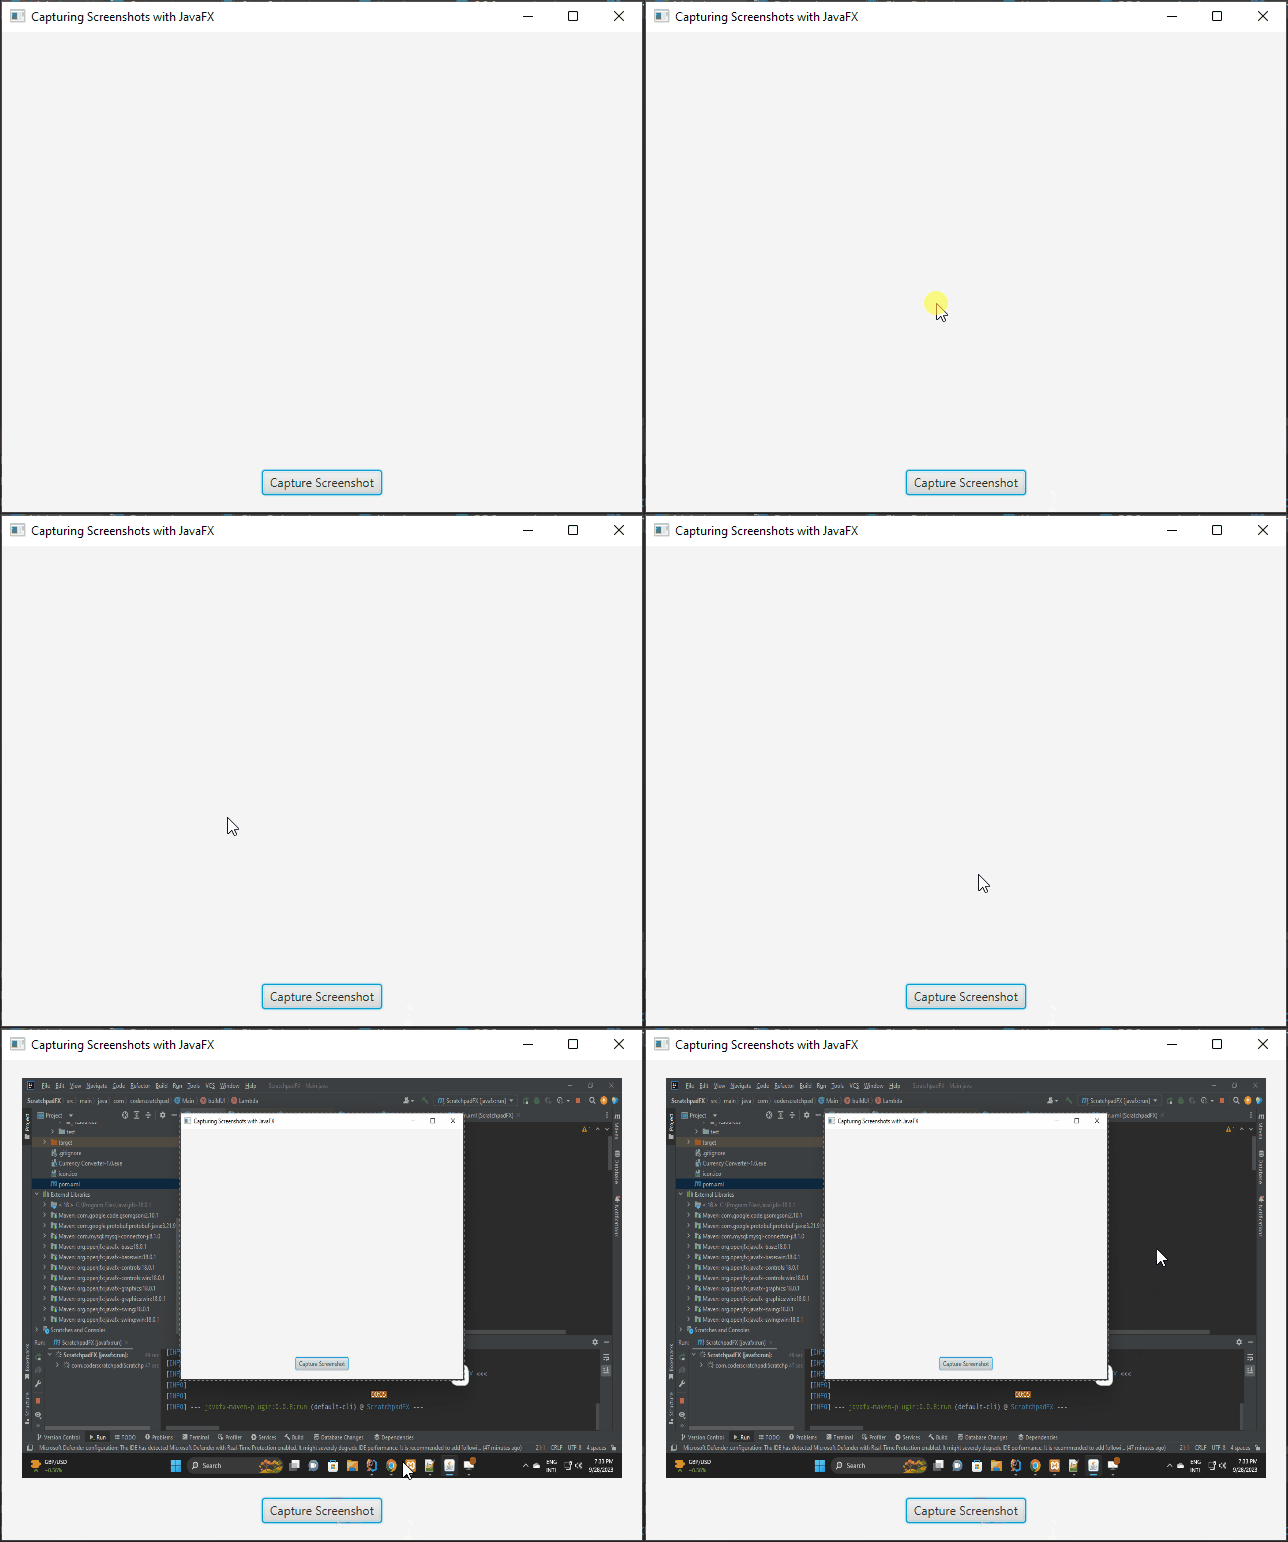
To capture the entire screen, you can use the getScreenCapture method:
import javafx.application.Application;
import javafx.geometry.Pos;
import javafx.scene.Scene;
import javafx.scene.control.Button;
import javafx.scene.image.ImageView;
import javafx.scene.image.WritableImage;
import javafx.scene.layout.*;
import javafx.scene.robot.Robot;
import javafx.stage.Stage;

import java.awt.*;

public class Main extends Application {

    // The parent layout manager
    private final StackPane parent = new StackPane();

    @Override
    public void init() throws Exception {
        super.init();
        buildUI();
    }

    private void buildUI() {

        // Create an ImageView to display the captured screenshot
        ImageView imageView = new ImageView();
        imageView.setFitWidth(600.0);
        imageView.setFitHeight(400.0);

        // Create a Button to trigger the screenshot capture
        Button buttonScreenshot = new Button("Capture Screenshot");

        // Define the action to take when the button is clicked
        buttonScreenshot.setOnAction(event -> {

            // Capture a screenshot
            WritableImage image = captureScreenshot();

            // Display the captured screenshot in the ImageView
            if (image != null) imageView.setImage(image);

        });

        // Create a container (VBox) to hold the ImageView and Button
        VBox container = new VBox(20, imageView, buttonScreenshot);

        // Center-align the container contents
        container.setAlignment(Pos.CENTER);

        // Add the Container to the parent layout (StackPane)
        this.parent.getChildren().add(container);
    }

    private WritableImage captureScreenshot() {

        try {

            // Get the default graphics device
            GraphicsDevice graphicsDevice = GraphicsEnvironment.getLocalGraphicsEnvironment().getDefaultScreenDevice();

            // Get the bounds of the default configuration
            Rectangle screenBounds = graphicsDevice.getDefaultConfiguration().getBounds();

            // Extract screen width and height
            int screenWidth = screenBounds.width;
            int screenHeight = screenBounds.height;

            // Create a JavaFX Robot instance for capturing the screenshot
            Robot robot = new Robot();

            // Capture the screenshot and return it as a WritableImage
            return robot.getScreenCapture(null, 0, 0, screenWidth, screenHeight);

        } catch (HeadlessException exception) {
            /* No screen device present, return null */
            return null;
        }
    }

    @Override
    public void start(Stage stage) throws Exception {

        // Create a scene with the StackPane as the root
        Scene scene = new Scene(parent, 640, 480);

        // Set the stage title
        stage.setTitle("Capturing Screenshots with JavaFX");

        // Set the scene for the stage
        stage.setScene(scene);

        // Center the stage on the screen
        stage.centerOnScreen();

        // Display the stage
        stage.show();
    }
}
In this code, screenWidth and screenHeight represent the dimensions of your screen, and the getScreenCapture method returns a WritableImage containing the entire screen’s contents.
Capture a Specific Region
If you need to capture a specific region of the screen, you can provide the coordinates and dimensions of that region:
import javafx.application.Application;
import javafx.geometry.Pos;
import javafx.scene.Scene;
import javafx.scene.control.Button;
import javafx.scene.control.Label;
import javafx.scene.control.TextField;
import javafx.scene.control.TextFormatter;
import javafx.scene.image.ImageView;
import javafx.scene.image.WritableImage;
import javafx.scene.layout.*;
import javafx.scene.robot.Robot;
import javafx.stage.Stage;
import javafx.util.Builder;
import javafx.util.converter.IntegerStringConverter;

public class Main extends Application {

    // The parent layout manager
    private final StackPane parent = new StackPane();

    private static final int SCENE_WIDTH = 640;
    private static final int SCENE_HEIGHT = 480;

    @Override
    public void init() throws Exception {
        super.init();
        buildUI();
    }

    private void buildUI() {

        // Create an ImageView to display the captured screenshot
        ImageView imageView = new ImageView();
        imageView.setFitWidth(600.0);
        imageView.setFitHeight(400.0);

        // Create a Button to trigger the screenshot capture
        Button buttonScreenshot = new Button("Capture Screenshot");

        // Create IntegerTextFields for input
        IntegerTextField textFieldX = new IntegerTextField();
        IntegerTextField textFieldY = new IntegerTextField();
        IntegerTextField textFieldWidth = new IntegerTextField();
        IntegerTextField textFieldHeight = new IntegerTextField();

        // Define the action to take when the button is clicked
        buttonScreenshot.setOnAction(event -> {

            // Retrieve the user input for X, Y, width, and height
            int x = textFieldX.getInteger();
            int y = textFieldY.getInteger();
            int width = textFieldWidth.getInteger();
            int height = textFieldHeight.getInteger();

            // Capture a screenshot of the specified region
            WritableImage image = captureScreenshot(x, y, width, height);

            // Display the captured screenshot in the ImageView
            if (image != null) {
                imageView.setImage(image);
            }
        });

        // Create an HBox to hold labeled text fields and the capture button
        HBox buttonTextFieldsContainer = new HBox(
                10,
                new LabeledTextField(5, "X: ", textFieldX).build(),
                new LabeledTextField(5, "Y: ", textFieldY).build(),
                new LabeledTextField(5, "WIDTH: ", textFieldWidth).build(),
                new LabeledTextField(5, "HEIGHT: ", textFieldHeight).build(),
                buttonScreenshot
        );

        buttonTextFieldsContainer.setAlignment(Pos.CENTER);

        // Create a VBox to hold the ImageView and the HBox
        VBox container = new VBox(20, imageView, buttonTextFieldsContainer);

        // Center-align the container contents
        container.setAlignment(Pos.CENTER);

        // Add the Container (VBox) to the parent layout (StackPane)
        this.parent.getChildren().add(container);
    }

    // Method to capture a screenshot of a specified region
    private WritableImage captureScreenshot(int x, int y, int width, int height) {
        Robot robot = new Robot();

        try {

            // Capture the screenshot and return it as a WritableImage
            return robot.getScreenCapture(null, x, y, width, height);

        } catch (IllegalArgumentException exception) {

            // Handle any exceptions (e.g., width or height less than or equal to 0)
            exception.printStackTrace();
            return null;
        }
    }

    @Override
    public void start(Stage stage) throws Exception {

        // Create a scene with the StackPane as the root
        Scene scene = new Scene(parent, SCENE_WIDTH, SCENE_HEIGHT);

        // Set the stage title
        stage.setTitle("Capturing Screenshots with JavaFX");

        // Set the scene for the stage
        stage.setScene(scene);

        // Center the stage on the screen
        stage.centerOnScreen();

        // Display the stage
        stage.show();
    }
}

// Custom class to create labeled text fields
class LabeledTextField implements Builder<HBox> {

    private final HBox hBox;

    public LabeledTextField(double spacing, String label, TextField textField) {
        hBox = new HBox(spacing, new Label(label), textField);
        hBox.setAlignment(Pos.CENTER);
    }

    @Override
    public HBox build() {
        return this.hBox;
    }
}

// Custom class for IntegerTextFields with input validation
class IntegerTextField extends TextField {

    public IntegerTextField() {
        super();

        this.setMaxWidth(50.0);

        this.setTextFormatter(new TextFormatter<>(new IntegerStringConverter(), 1, change -> {

            // Allow only integer values
            if (change.getControlNewText().matches("\\d+")) {
                return change;
            }

            return null;

        }));
    }

    public int getInteger() {
        return Integer.parseInt(this.getText());
    }
}
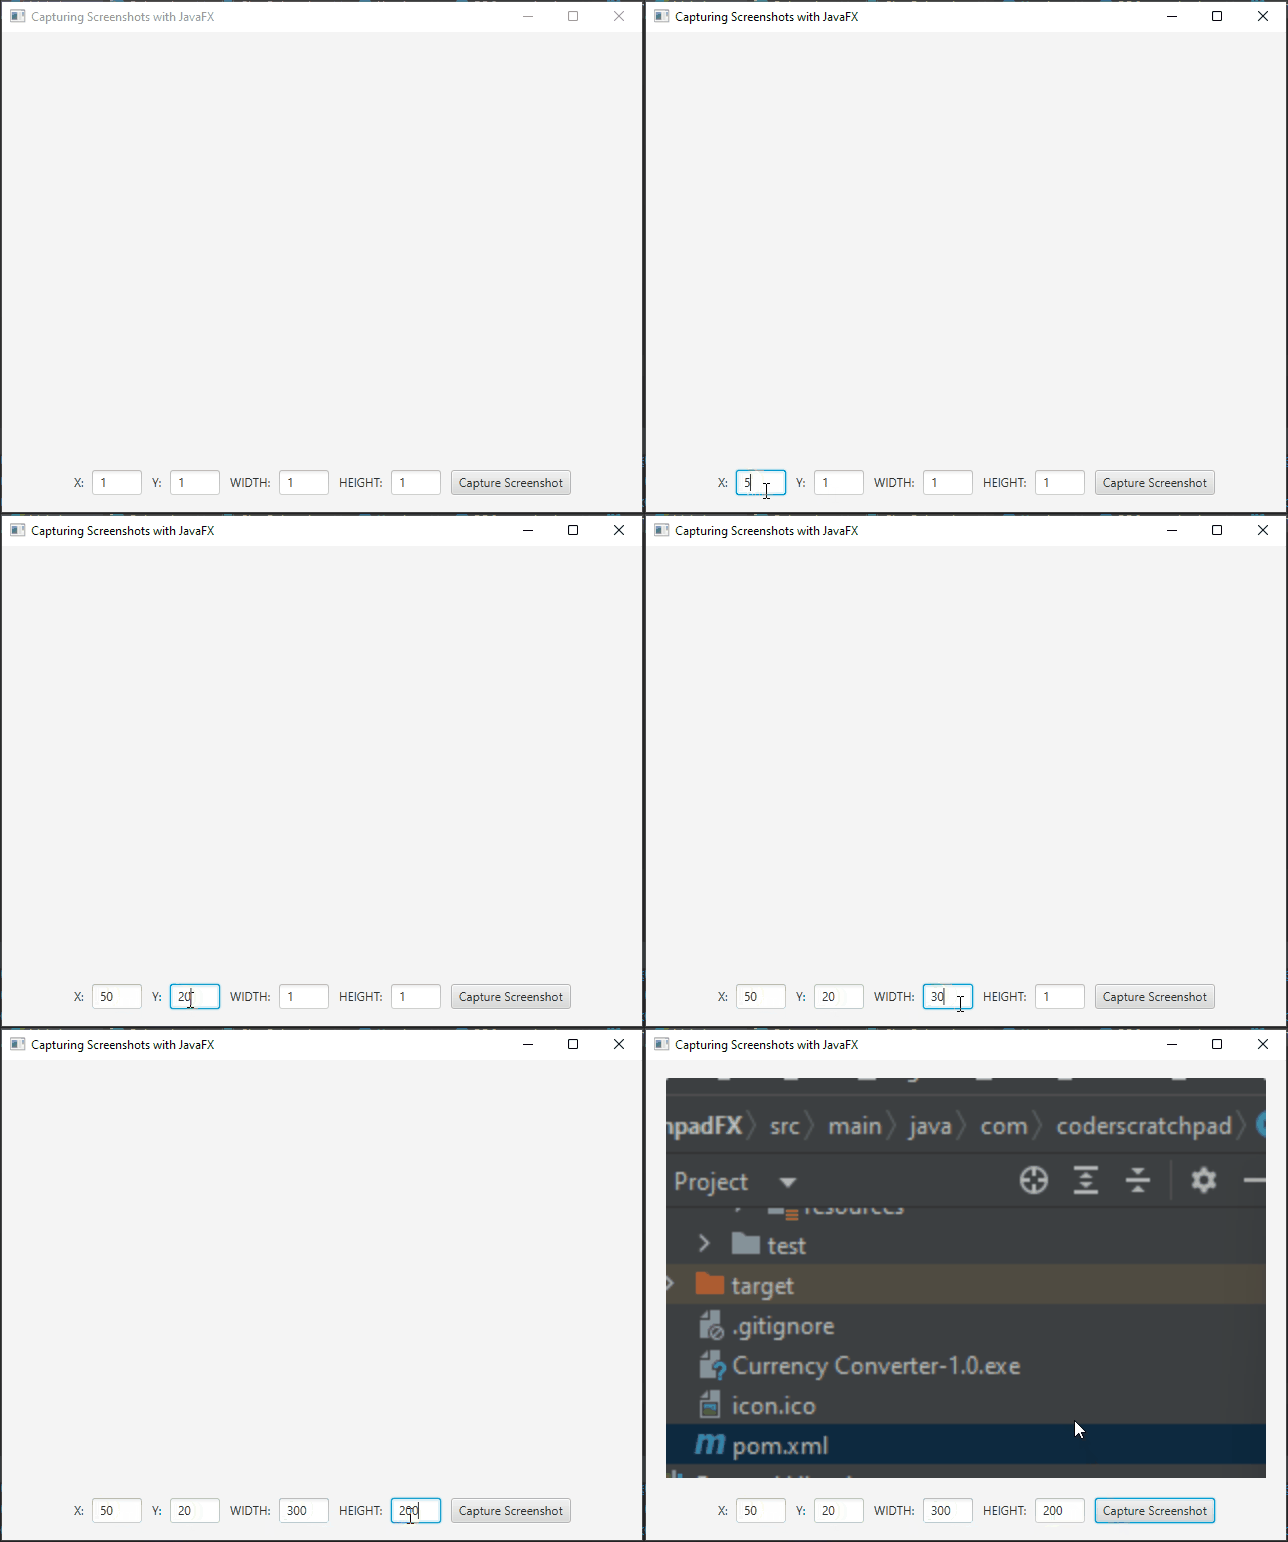
This code example captures a screenshot of the specified region, allowing you to focus on a particular area of interest.
Scaling Your Screenshot
You can also scale the captured screenshot to fit specified dimensions by setting the scaleToFit parameter to true. When this parameter is set to true, the returned image will be scaled to fit the requested dimensions if necessary. Otherwise, if set to false, the size of the returned image will depend on the output scale (DPI) of the primary screen.
private WritableImage captureScreenshot(int x, int y, int width, int height) {

    Robot robot = new Robot();

    try {

        // Capture the screenshot and return it as a WritableImage
        // The 'true' parameter indicates that the captured image will be scaled to fit the specified dimensions
        return robot.getScreenCapture(null, x, y, width, height, true);

    } catch (IllegalArgumentException exception) {

        exception.printStackTrace();
        return null;
    }
}
Scaling your screenshot can be helpful when you need consistent image dimensions for further processing or display.
Saving and Using the Screenshot
Once you’ve captured the screenshot, you can save it to a file or use it in your JavaFX application as needed. Here’s how you can save it as an image file:
import javafx.application.Application;
import javafx.embed.swing.SwingFXUtils;
import javafx.event.ActionEvent;
import javafx.geometry.Pos;
import javafx.scene.Scene;
import javafx.scene.control.Button;
import javafx.scene.control.Label;
import javafx.scene.control.TextField;
import javafx.scene.control.TextFormatter;
import javafx.scene.image.ImageView;
import javafx.scene.image.WritableImage;
import javafx.scene.layout.*;
import javafx.scene.robot.Robot;
import javafx.stage.FileChooser;
import javafx.stage.Stage;
import javafx.util.Builder;
import javafx.util.converter.IntegerStringConverter;

import javax.imageio.ImageIO;
import java.awt.image.BufferedImage;
import java.io.File;
import java.io.IOException;

public class Main extends Application {

    // The parent layout manager
    private final StackPane parent = new StackPane();

    private WritableImage screenshot;

    private static final int SCENE_WIDTH = 640;
    private static final int SCENE_HEIGHT = 480;

    @Override
    public void init() throws Exception {
        super.init();
        buildUI();
    }

    private void buildUI() {

        // Create an ImageView to display the captured screenshot
        ImageView imageView = new ImageView();
        imageView.setFitWidth(600.0);
        imageView.setFitHeight(400.0);

        // Create a Button to trigger the screenshot saving
        Button buttonSaveScreenshot = new Button("Save Screenshot");
        buttonSaveScreenshot.setDisable(true);
        buttonSaveScreenshot.setOnAction(this::saveScreenshot);

        // Create a Button to trigger the screenshot capture
        Button buttonScreenshot = new Button("Capture Screenshot");

        // Create IntegerTextFields for input
        IntegerTextField textFieldX = new IntegerTextField();
        IntegerTextField textFieldY = new IntegerTextField();
        IntegerTextField textFieldWidth = new IntegerTextField();
        IntegerTextField textFieldHeight = new IntegerTextField();

        // Define the action to take when the button is clicked
        buttonScreenshot.setOnAction(event -> {

            // Retrieve the user input for X, Y, width, and height
            int x = textFieldX.getInteger();
            int y = textFieldY.getInteger();
            int width = textFieldWidth.getInteger();
            int height = textFieldHeight.getInteger();

            // Capture a screenshot of the specified region
            WritableImage image = captureScreenshot(x, y, width, height);

            // Display the captured screenshot in the ImageView
            if (image != null) {
                this.screenshot = image;
                imageView.setImage(image);
                buttonSaveScreenshot.setDisable(false);
            }
        });

        // Create an HBox to hold labeled text fields and the capture button
        HBox buttonTextFieldsContainer = new HBox(
                10,
                new LabeledTextField(5, "X: ", textFieldX).build(),
                new LabeledTextField(5, "Y: ", textFieldY).build(),
                new LabeledTextField(5, "WIDTH: ", textFieldWidth).build(),
                new LabeledTextField(5, "HEIGHT: ", textFieldHeight).build(),
                buttonScreenshot, buttonSaveScreenshot
        );

        buttonTextFieldsContainer.setAlignment(Pos.CENTER);

        // Create a VBox to hold the ImageView and the HBox
        VBox container = new VBox(20, imageView, buttonTextFieldsContainer);

        // Center-align the container contents
        container.setAlignment(Pos.CENTER);

        // Add the Container (VBox) to the parent layout (StackPane)
        this.parent.getChildren().add(container);
    }

    // Method to save the captured screenshot
    private void saveScreenshot(ActionEvent actionEvent) {

        FileChooser dialog = new FileChooser();

        dialog.getExtensionFilters().add(
                new FileChooser.ExtensionFilter("PNG Image", "*.png")
        );

        File outputFile = dialog.showSaveDialog(((Button) actionEvent.getSource()).getScene().getWindow());

        if(outputFile != null && screenshot != null) {

            try {
                // Convert the WritableImage to a BufferedImage for saving
                BufferedImage bufferedImage = SwingFXUtils.fromFXImage(screenshot, null);
                ImageIO.write(bufferedImage, "png", outputFile);
                System.out.println("Screenshot saved as " + outputFile.getAbsolutePath());

            }catch(IOException exception) {
                // Handle any exceptions that may occur during saving
                exception.printStackTrace();
            }
        }
    }

    // Method to capture a screenshot of a specified region
    private WritableImage captureScreenshot(int x, int y, int width, int height) {
        Robot robot = new Robot();

        try {

            // Capture the screenshot and return it as a WritableImage
            return robot.getScreenCapture(null, x, y, width, height);

        } catch (IllegalArgumentException exception) {

            // Handle any exceptions (e.g., width or height less than or equal to 0)
            exception.printStackTrace();
            return null;
        }
    }

    @Override
    public void start(Stage stage) throws Exception {

        // Create a scene with the StackPane as the root
        Scene scene = new Scene(parent, SCENE_WIDTH, SCENE_HEIGHT);

        // Set the stage title
        stage.setTitle("Capturing Screenshots with JavaFX");

        // Set the scene for the stage
        stage.setScene(scene);

        // Center the stage on the screen
        stage.centerOnScreen();

        // Display the stage
        stage.show();
    }
}

// Custom class to create labeled text fields
class LabeledTextField implements Builder<HBox> {

    private final HBox hBox;

    public LabeledTextField(double spacing, String label, TextField textField) {
        hBox = new HBox(spacing, new Label(label), textField);
        hBox.setAlignment(Pos.CENTER);
    }

    @Override
    public HBox build() {
        return this.hBox;
    }
}

// Custom class for IntegerTextFields with input validation
class IntegerTextField extends TextField {

    public IntegerTextField() {
        super();

        this.setMaxWidth(50.0);

        this.setTextFormatter(new TextFormatter<>(new IntegerStringConverter(), 1, change -> {

            // Allow only integer values
            if (change.getControlNewText().matches("\\d+")) {
                return change;
            }

            return null;

        }));
    }

    public int getInteger() {
        return Integer.parseInt(this.getText());
    }
}
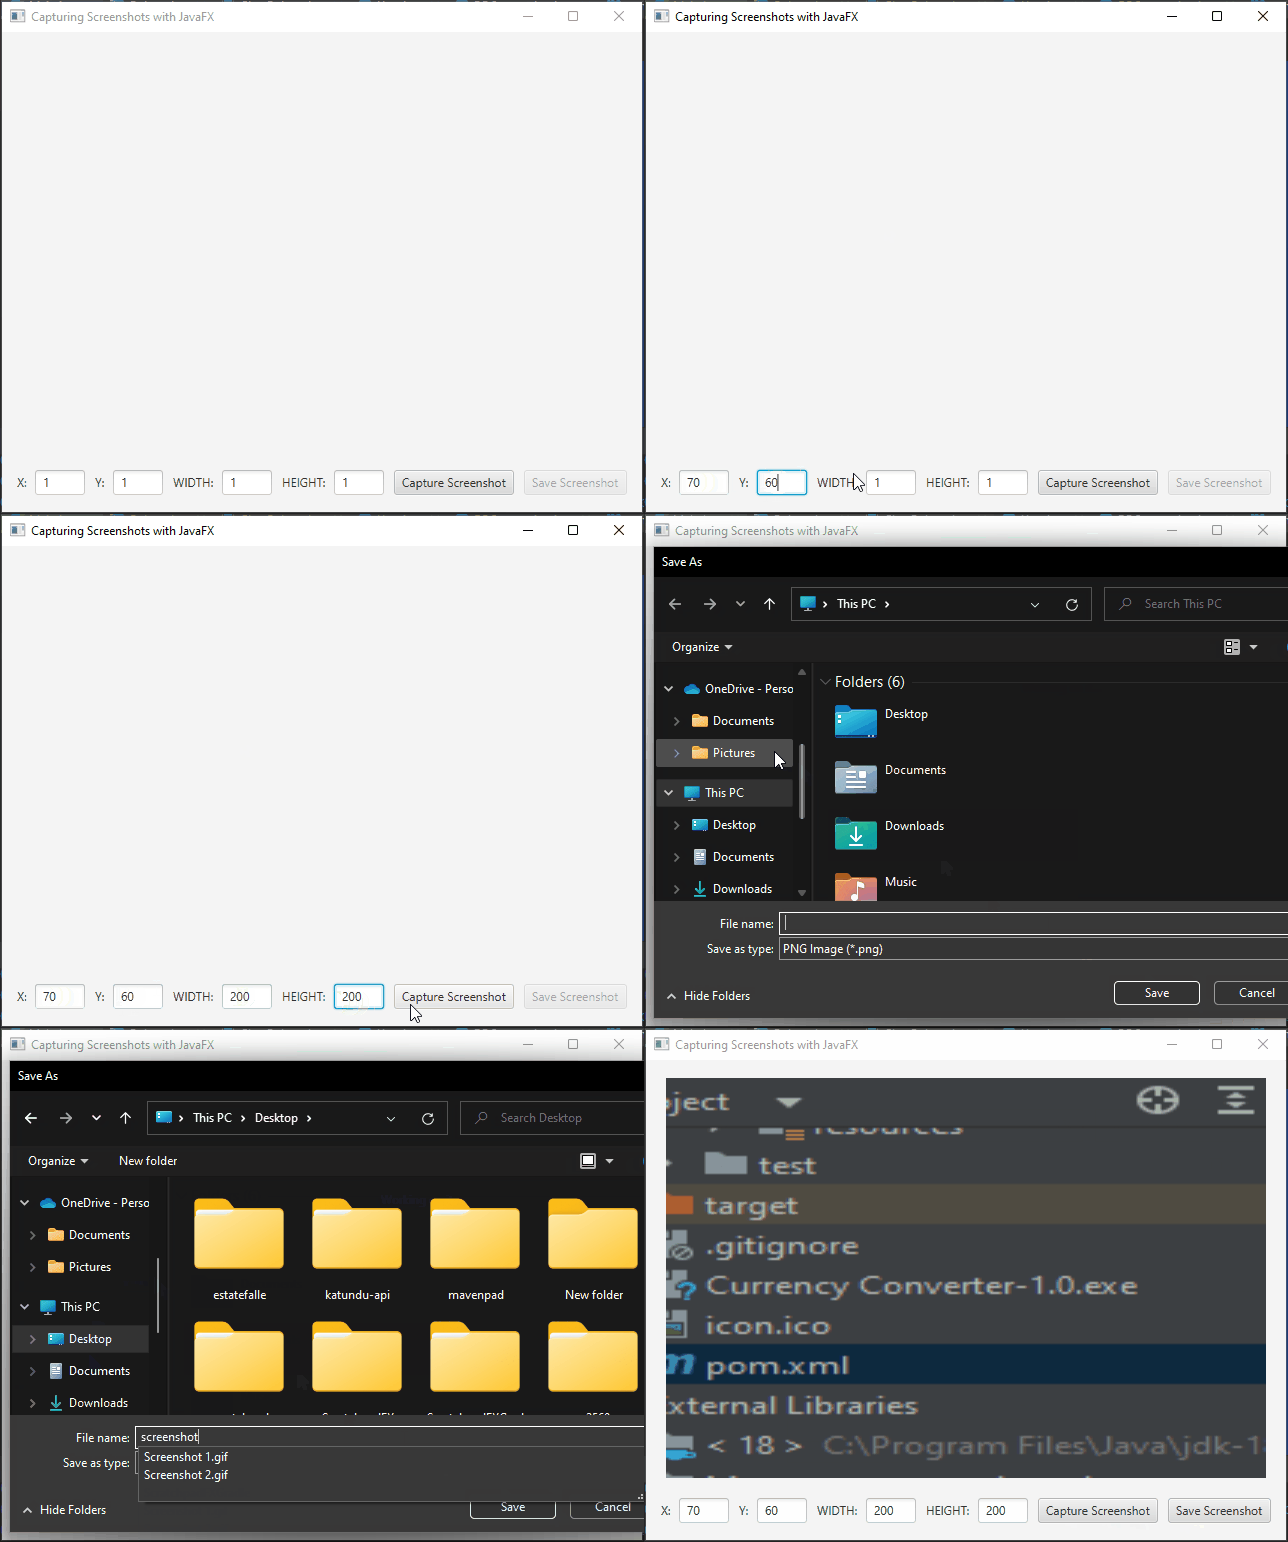
In this example, we use the ImageIO class to save the screenshot as a PNG image, but you can choose other formats depending on your requirements.
Conclusion
Capturing screenshots with JavaFX is a valuable skill for developers and anyone who needs to document or analyze on-screen content. The javafx.scene.robot.Robot class provides a versatile set of tools to capture the entire screen or specific regions with ease. By incorporating these techniques into your JavaFX applications, you can enhance user experiences and streamline your development workflow. So, whether you’re building a screen capture utility or adding screenshot functionality to your project, JavaFX has you covered. Start capturing your screens programmatically today!
I hope you found this article informative and useful. If you would like to receive more content, please consider subscribing to our newsletter.


