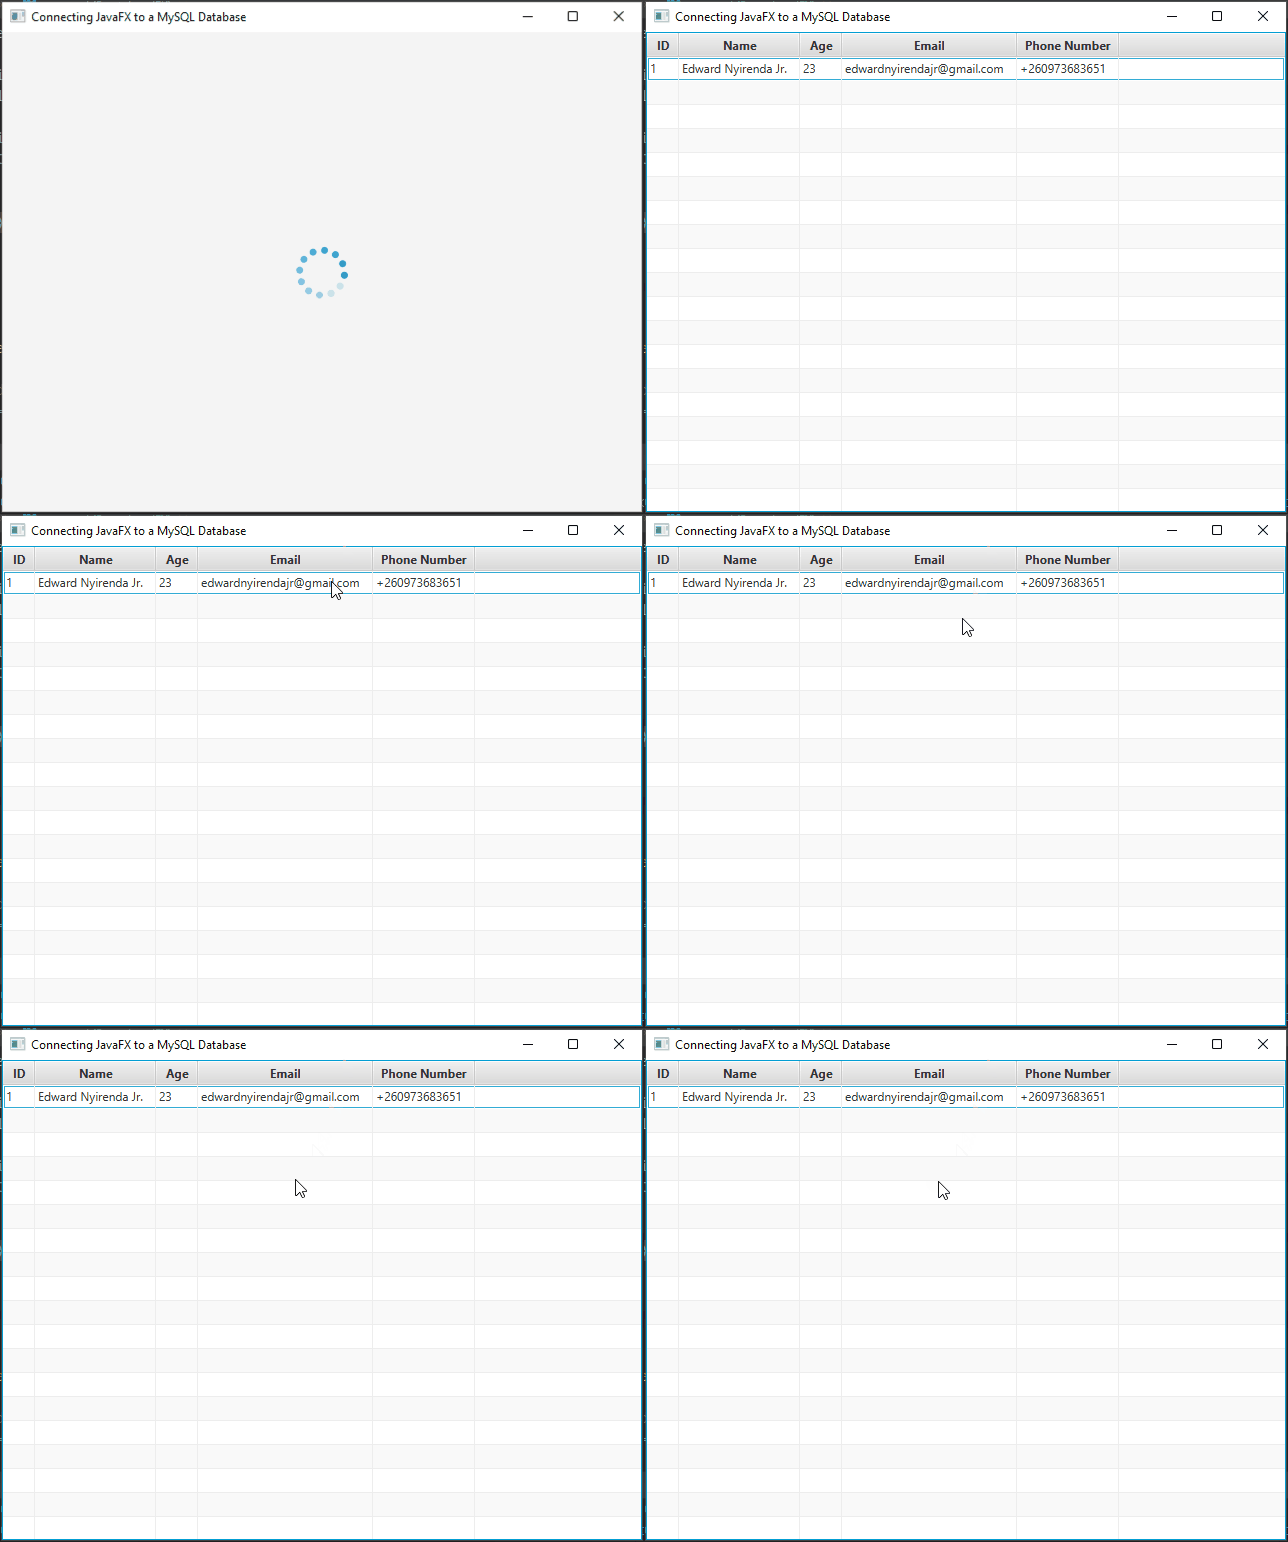
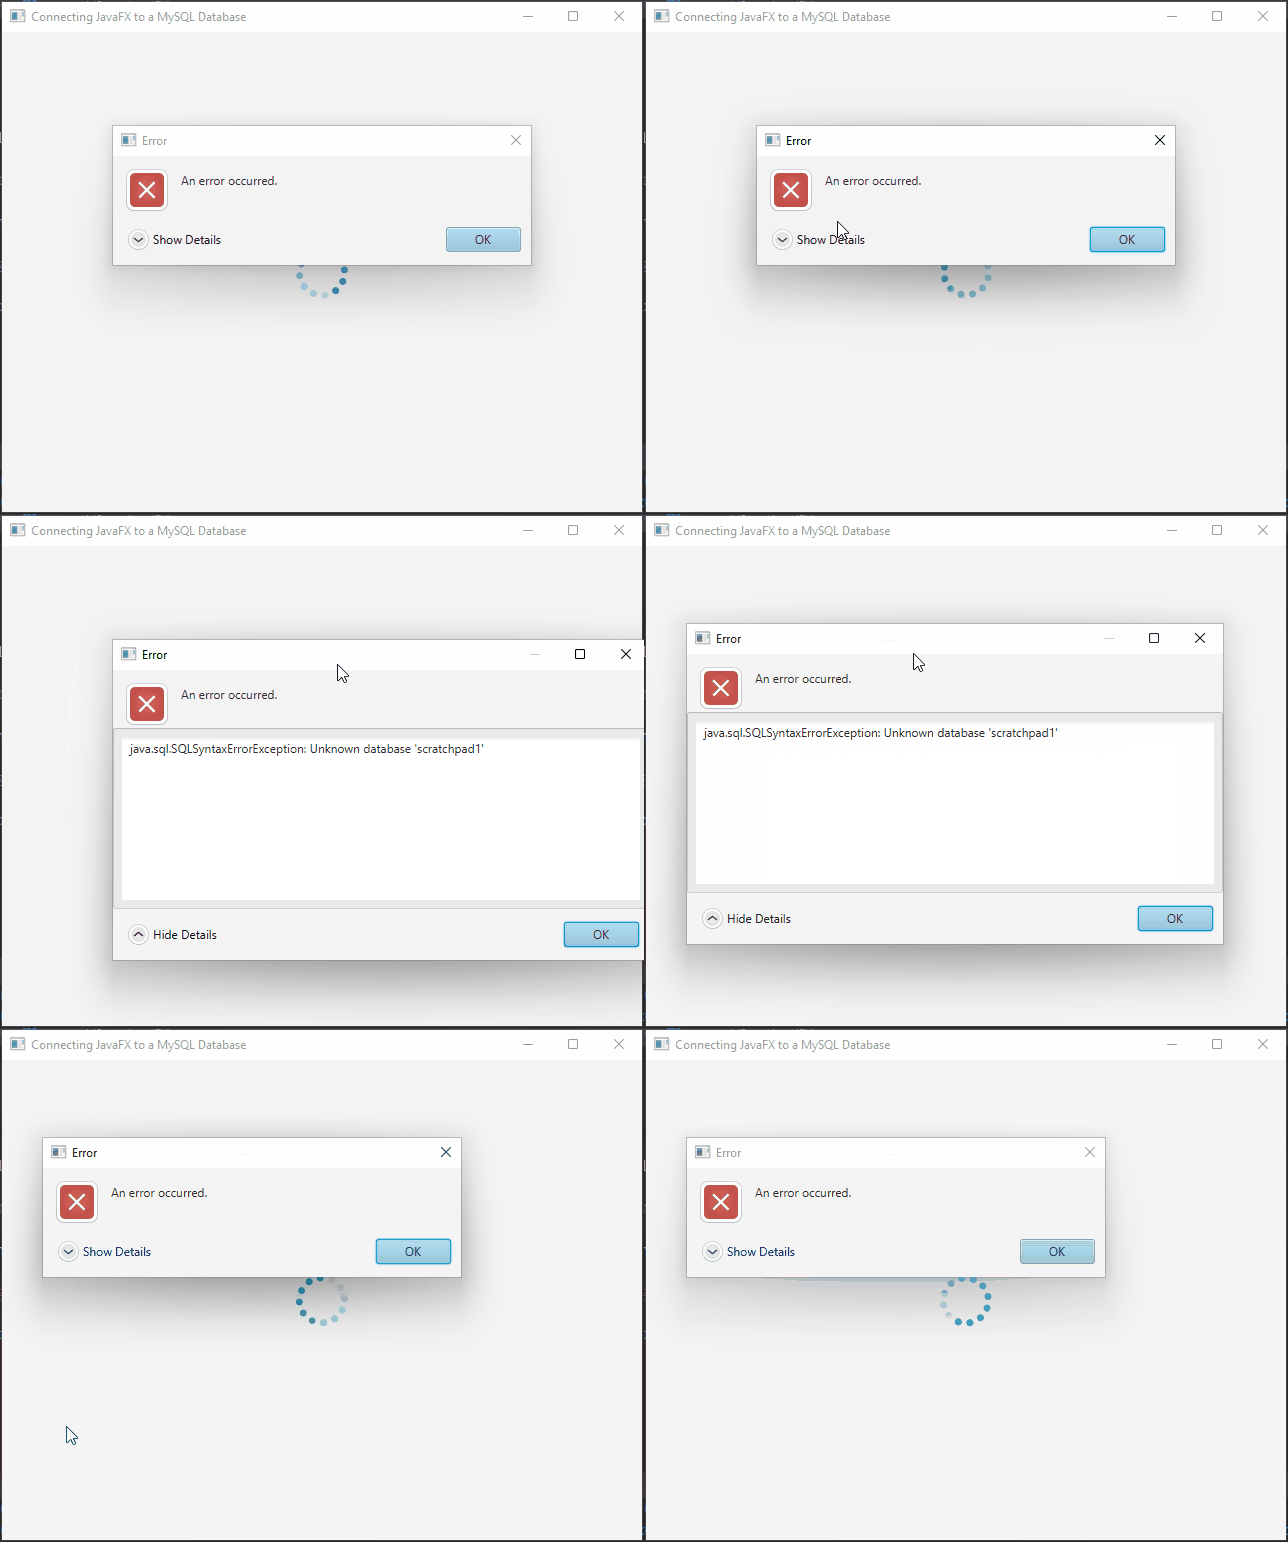
In today’s software development landscape, building applications that can efficiently store and retrieve data is crucial. To accomplish this task, developers often turn to databases as a means of data storage. MySQL is one of the most popular open-source relational database management systems, while JavaFX is a powerful framework for building graphical user interfaces (GUIs) in Java. In this article, we explore connecting JavaFX to a MySQL database, allowing you to build robust and data-driven desktop applications.

with hands-on learning.
get the skills and confidence to land your next move.
Adding MySQL Connector/J
To enable interaction between your JavaFX application and a MySQL database, you must incorporate the MySQL Connector/J library into your project. You have two primary options for acquiring this library: downloading the JAR file directly or utilizing a build automation tool to manage your project dependencies. You can access both the MySQL Connector/J JAR file and the relevant code snippets for automation tools via the Maven Repository.
Once you’ve added the dependency, your project will be able to use the MySQL Connector/J library to establish a connection to your MySQL database.
Creating the MySQL Database
To begin, create a MySQL database and table to work with. You can use the MySQL command-line client or a graphical tool like phpMyAdmin or MySQL Workbench. Here’s an example SQL script to create a simple “users” table:
CREATE DATABASE IF NOT EXISTS scratchpad;

USE scratchpad;

CREATE TABLE IF NOT EXISTS users (
    id INT AUTO_INCREMENT PRIMARY KEY,
    name VARCHAR(50),
    age INT,
    email VARCHAR(50),
    phone_number VARCHAR(50)
);
The CREATE DATABASE IF NOT EXISTS scratchpad; command creates a database called “scratchpad” if it doesn’t already exist, ensuring that the database is created only if it doesn’t exist.
The USE scratchpad; command selects the “scratchpad” database as the active database for subsequent SQL operations, allowing all subsequent SQL commands to be executed within this database.
The CREATE TABLE IF NOT EXISTS users (…) command creates a table named “users” inside the “scratchpad” database. The “users” table includes columns for user identification (id), name, age, email, and phone number. The table is created only if it doesn’t already exist, ensuring that it won’t overwrite an existing “users” table if one is present.
Establish a Database Connection
Now, let’s write the code to connect to a MySQL database. In your JavaFX application, create a Java class that handles the database connection. Here’s a simplified example of how to establish a connection:
import java.sql.Connection;
import java.sql.DriverManager;
import java.sql.SQLException;

public class DBConnection {

    private String username;
    private String password;
    private String url;

    // Constructor with only database name, using default username and empty password
    public DBConnection(String database) {
        this.init(database, "root", "", "localhost", "3306");
    }

    // Constructor with database name and custom username, using empty password
    public DBConnection(String database, String username) {
        this.init(database, username, "", "localhost", "3306");
    }

    // Constructor with database name, custom username, and custom password
    public DBConnection(String database, String username, String password) {
        this.init(database, username, password, "localhost", "3306");
    }

    // Constructor with database name, custom username, custom password, and custom host
    public DBConnection(String database, String username, String password, String host) {
        this.init(database, username, password, host, "3306");
    }

    // Constructor with database name, custom username, custom password, custom host, and custom port
    public DBConnection(String database, String username, String password, String host, String port) {
        this.init(database, username, password, host, port);
    }

    // Initialize the database connection parameters
    private void init(String database, String username, String password, String host, String port) {

        // Construct the JDBC URL for the MySQL database
        this.url = String.format("jdbc:mysql://%s:%s/%s", host, port, database);
        this.username = username;
        this.password = password;
    }

    // Get the underlying Connection object for database operations
    public Connection getConnection() throws SQLException {

        // Attempt to establish the database connection using DriverManager
        return DriverManager.getConnection(this.url, username, password);
    }
}
The DBConnection class encapsulates the functionality for establishing a connection to a MySQL database in Java. It offers a variety of constructors that allow users to specify different connection parameters such as the database name, username, password, host, and port. Internally, it constructs a JDBC URL based on these parameters. The getConnection method utilizes the DriverManager class to attempt a database connection using the constructed URL, username, and password, and it throws a SQLException if any connection-related issues occur. Overall, this class provides a convenient and flexible way to establish database connections in Java applications.
Building a JavaFX Application with MySQL Integration
Now that you have a database connection, you can integrate it into your JavaFX application. Let’s write a basic JavaFX application that connects to a MySQL database. We’ll create a simple example where we fetch data from a MySQL database and display it in a JavaFX TableView.
import javafx.application.Application;
import javafx.collections.FXCollections;
import javafx.collections.ObservableList;
import javafx.concurrent.Task;
import javafx.scene.Scene;
import javafx.scene.control.*;
import javafx.scene.control.cell.PropertyValueFactory;
import javafx.scene.layout.*;
import javafx.stage.Stage;

import java.sql.*;

public class Main extends Application {

    // Database connection details
    private static final String DATABASE = "scratchpad";

    // The parent layout manager
    private final BorderPane parent = new BorderPane();

    @Override
    public void init() throws Exception {
        super.init();
        buildUI();
    }

    private void buildUI() {

        // Create the TableView
        TableView<User> tableView = this.createTableView();

        // Create a DBConnection instance for the specified database
        DBConnection dbConnection = new DBConnection(DATABASE);

        // Populate the TableView with data from the database
        populateTableView(dbConnection, tableView);

        // Set the ProgressIndicator as the center content of the BorderPane
        parent.setCenter(new ProgressIndicator());
    }

    private TableView<User> createTableView() {

        // Create the TableView
        TableView<User> tableView = new TableView<>();

        // Create columns for the TableView
        TableColumn<User, Integer> idColumn = new TableColumn<>("ID");
        idColumn.setCellValueFactory(new PropertyValueFactory<>("id"));

        TableColumn<User, String> nameColumn = new TableColumn<>("Name");
        nameColumn.setCellValueFactory(new PropertyValueFactory<>("name"));

        TableColumn<User, Integer> ageColumn = new TableColumn<>("Age");
        ageColumn.setCellValueFactory(new PropertyValueFactory<>("age"));

        TableColumn<User, String> emailColumn = new TableColumn<>("Email");
        emailColumn.setCellValueFactory(new PropertyValueFactory<>("email"));

        TableColumn<User, String> phoneNumberColumn = new TableColumn<>("Phone Number");
        phoneNumberColumn.setCellValueFactory(new PropertyValueFactory<>("phoneNumber"));

        // Add columns to the TableView
        tableView.getColumns().addAll(idColumn, nameColumn, ageColumn, emailColumn, phoneNumberColumn);

        return tableView;
    }

    private void populateTableView(DBConnection dbConnection, TableView<User> tableView) {

        // Create a background Task for fetching data from the database
        Task<Void> fetchData = new Task<>() {

            @Override
            protected Void call() throws SQLException {

                try (Connection connection = dbConnection.getConnection()) {

                    // Create data
                    ObservableList<User> data = FXCollections.observableArrayList();

                    Statement statement = connection.createStatement();
                    ResultSet resultSet = statement.executeQuery("SELECT * FROM users");

                    while (resultSet.next()) {

                        User user = new User(
                                resultSet.getInt("id"),
                                resultSet.getString("name"),
                                resultSet.getInt("age"),
                                resultSet.getString("email"),
                                resultSet.getString("phone_number")
                        );

                        data.add(user);
                    }

                    // Add data to the TableView
                    tableView.setItems(data);

                }

                return null;

            }

        };

        // Set up event handlers for Task completion and failure
        fetchData.setOnSucceeded(workerStateEvent -> {

            // When data fetch is successful, display the TableView in the center of the BorderPane
            this.parent.setCenter(tableView);
        });

        fetchData.setOnFailed(workerStateEvent -> {

            // When an error occurs during data fetch, show an error alert
            showErrorAlert(workerStateEvent.getSource().getException());
        });

        // Start the background Task on a separate thread
        new Thread(fetchData).start();
    }

    private void showErrorAlert(Throwable exception) {

        // Create an error alert dialog
        Alert alert = new Alert(Alert.AlertType.ERROR);
        alert.setTitle("Error");
        alert.setHeaderText(null);
        alert.setContentText("An error occurred.");

        if (exception != null) {
            // Display the error details in an expandable content area
            TextArea textArea = new TextArea(exception.toString());
            alert.getDialogPane().setExpandableContent(textArea);
        }

        alert.showAndWait();
    }

    @Override
    public void start(Stage stage) throws Exception {

        // Create a scene with the BorderPane as the root
        Scene scene = new Scene(parent, 640, 480);

        // Set the stage title
        stage.setTitle("Connecting JavaFX to a MySQL Database");

        // Set the scene for the stage
        stage.setScene(scene);

        // Center the stage on the screen
        stage.centerOnScreen();

        // Display the stage
        stage.show();
    }

    public record User(int id, String name, int age, String email, String phoneNumber) {

        // Getter methods for User record properties
        public int getId() {
            return this.id;
        }

        public String getName() {
            return this.name;
        }

        public int getAge() {
            return this.age;
        }

        public String getEmail() {
            return this.email;
        }

        public String getPhoneNumber() {
            return this.phoneNumber;
        }
    }

}
In this JavaFX application, we’ve created a robust system for connecting to a MySQL database and presenting its data in an organized and user-friendly manner. The heart of the application lies in its ability to establish a connection to a MySQL database using the provided database details. These details, including the database URL, username, and password, are crucial for authentication and accessing the database.
The core element of our user interface is the TableView, which provides an organized and visually appealing way to display the retrieved data. To configure the TableView, we’ve defined several TableColumn instances, each representing a specific data column from the database. These columns are responsible for displaying data attributes like ID, name, age, email, and phone number.
To facilitate data retrieval and presentation, we’ve encapsulated the fetched data into instances of the User class. This approach not only organizes the data logically but also simplifies its integration into the TableView.
Furthermore, we’ve incorporated a background Task for fetching data from the database, which runs on a separate thread to prevent UI freezing. This ensures a responsive user interface, even when dealing with potentially time-consuming database operations. Additionally, we’ve provided error alerts to notify users of any issues that may arise during data retrieval, offering transparency and assistance in troubleshooting problems.


SQL Injection Prevention
SQL injection is a severe security vulnerability that can occur when user inputs are not properly sanitized before being included in SQL queries. To prevent SQL injection attacks, follow these best practices:
Use Prepared Statements
Use prepared statements with placeholders for user inputs. This ensures that user input is treated as data, not code, and is properly escaped and sanitized.
try (Connection connection = dbConnection.getConnection()) {

    // Create a prepared statement for executing a parameterized SQL query.
    // This query selects data from the 'users' table where 'name' and 'email' match the provided parameters.
    PreparedStatement preparedStatement = connection.prepareStatement("SELECT * FROM users WHERE name = ? AND email = ?");

    // Set the value for the first parameter in the prepared statement (? placeholder).
    // This corresponds to the 'name' column in the SQL query.
    preparedStatement.setString(1, userInputName);

    // Set the value for the second parameter in the prepared statement (? placeholder).
    // This corresponds to the 'email' column in the SQL query.
    preparedStatement.setString(2, userInputPassword);

    // Execute the SQL query by calling executeQuery on the prepared statement.
    // The result of the query will be stored in the 'resultSet'.
    ResultSet resultSet = preparedStatement.executeQuery();
}
Input Validation
Implement input validation to ensure that user inputs meet expected criteria before using them in database operations. This can help prevent malicious input.
if (isValidInput(userInput)) {

    // Proceed with the database operation

} else {

    // Reject invalid input

}
Avoid Dynamic SQL Queries
Minimize the use of dynamic SQL queries constructed by concatenating user inputs. If dynamic queries are necessary, carefully validate and sanitize user inputs.
Escape User Input
If you must include user input in SQL queries directly (not recommended), use SQL-specific escaping functions or libraries provided by your database system to escape special characters.
Least Privilege Principle
Ensure that database accounts used by your application have the least privilege necessary. Limit their access to only the required tables and operations.
Conclusion
Connecting a JavaFX application to a MySQL database allows you to build powerful desktop applications that can store and retrieve data efficiently. With the right setup and knowledge of JDBC (Java Database Connectivity), you can seamlessly integrate database functionality into your JavaFX projects. Remember to handle exceptions and resource management properly to ensure the reliability and robustness of your application.
I hope you found this article informative and useful. If you would like to receive more content, please consider subscribing to our newsletter.


