In the realm of modern user interface design, creating intuitive and interactive applications is paramount. JavaFX, a popular framework for building cross-platform desktop applications, provides developers with a versatile set of tools to achieve this goal. One such tool is the Drag and Drop functionality, which enables users to seamlessly move and manipulate elements within an application’s interface. In this article, we will explore the fundamentals of Drag and Drop in JavaFX, its implementation, and some best practices to create user-friendly interfaces.

with hands-on learning.
get the skills and confidence to land your next move.
Understanding Drag and Drop
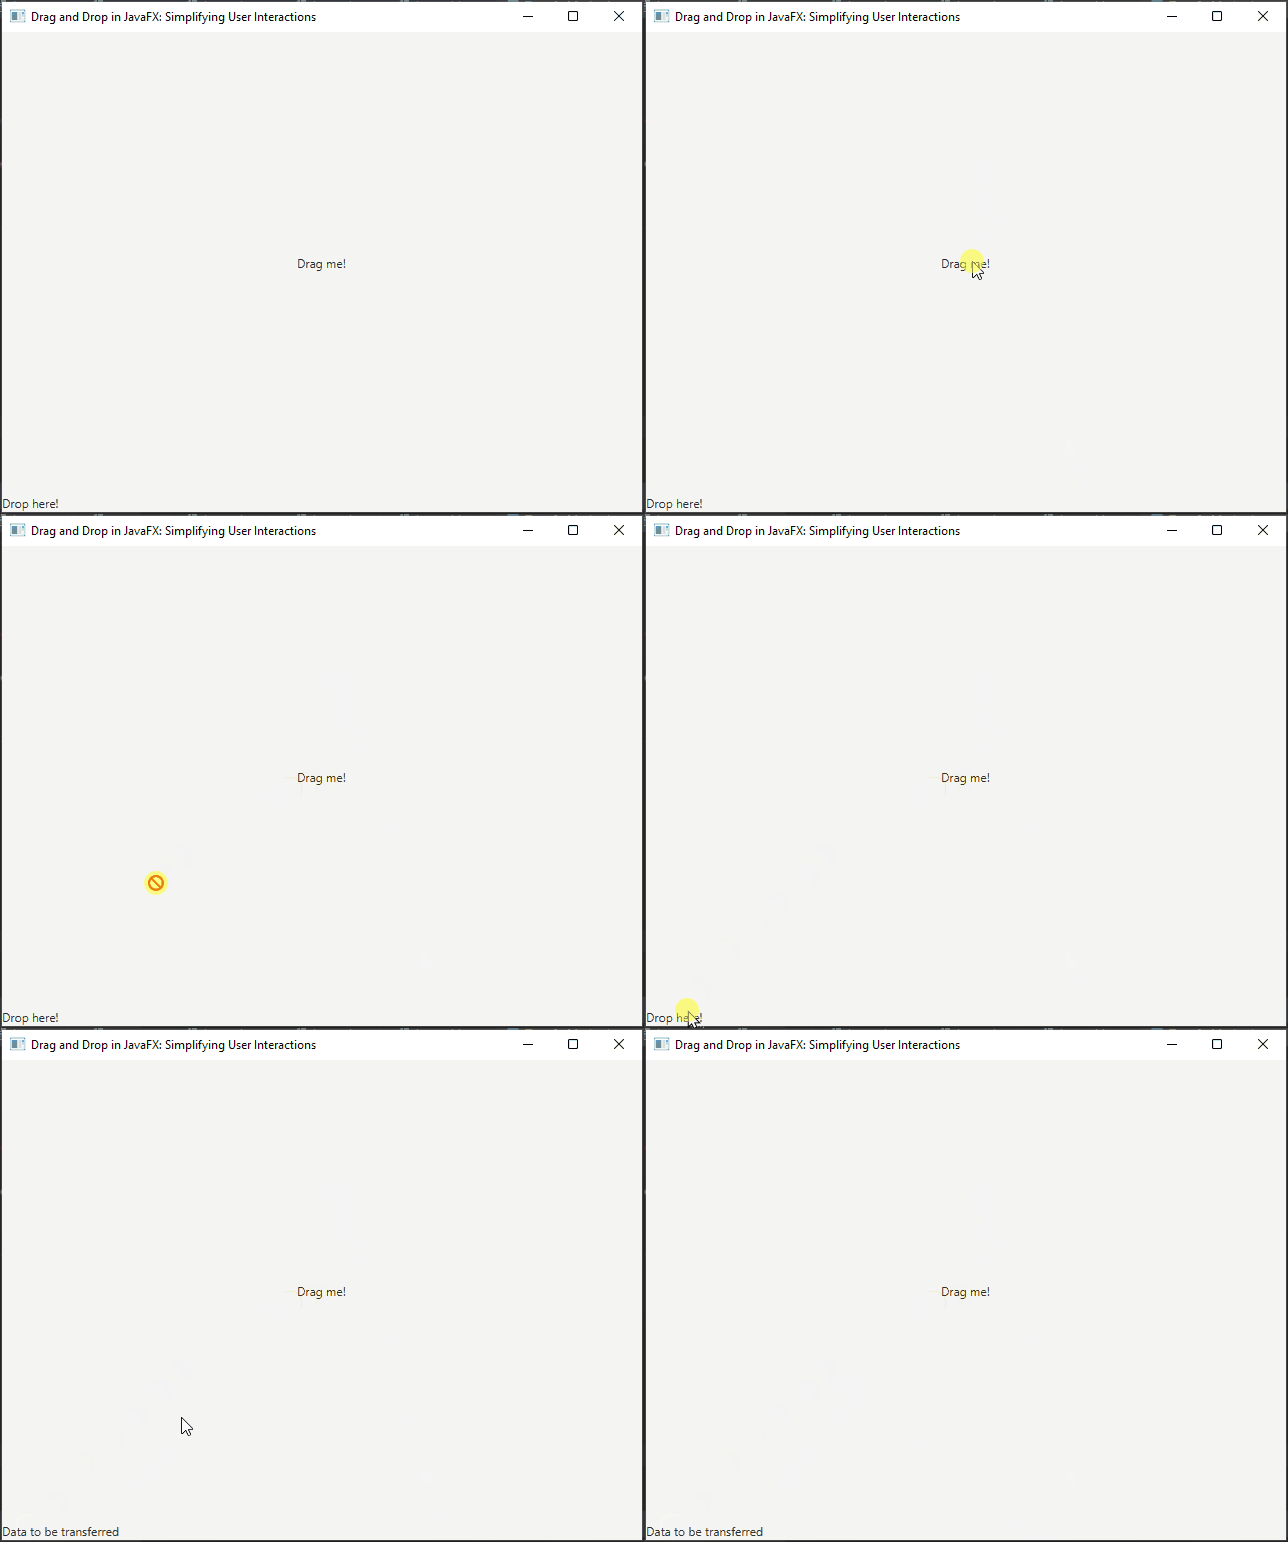
Drag and Drop, often abbreviated as DnD, is a user interface interaction method where users can select an object, drag it to a different location, and drop it there to perform an action. This interaction pattern is widely used in applications to simplify complex tasks and enhance user experience. In JavaFX, you can implement Drag and Drop effortlessly thanks to its built-in support for this feature.
Key Components of Drag and Drop
Before diving into the implementation details, it’s essential to understand the key components of drag and drop in JavaFX:
Drag Source
The drag source is the UI element from which the user initiates the drag operation. It can be a button, a list item, an image, or any other JavaFX Node.
Drag Target
The drag target is the UI element where the user intends to drop the dragged item. It can be another Node, a container, or any other suitable element.
Transfer Modes
Transfer modes define the types of drag-and-drop actions that are allowed. JavaFX supports four transfer modes: COPY, MOVE, LINK, and NONE. These modes determine how the source and target interact during the drag-and-drop operation.
Dragboard
The Dragboard is an essential part of the drag-and-drop process. It is a clipboard-like data storage object that holds the data being transferred between the source and target. The Dragboard is used to put data during the drag and retrieve data during the drop.
Implementing Drag and Drop in JavaFX
Now that we have a basic understanding of the key components, let’s walk through the steps to implement drag and drop functionality in a JavaFX application:
Create the Drag Source
To enable a Node as a drag source, you need to register it as such. This can be done by attaching event handlers to detect when the user starts dragging the Node. You’ll typically use the setOnDragDetected event handler to initiate the drag operation.
import javafx.application.Application;
import javafx.scene.Scene;
import javafx.scene.control.Label;
import javafx.scene.input.ClipboardContent;
import javafx.scene.input.Dragboard;
import javafx.scene.input.TransferMode;
import javafx.scene.layout.*;
import javafx.stage.Stage;

public class Main extends Application {

    // The parent layout manager
    private final BorderPane parent = new BorderPane();

    @Override
    public void init() throws Exception {
        super.init();

        // Build the user interface
        this.buildUI();
    }

    private void buildUI() {

        // 1. Create the Drag Source
        Label dragSource = new Label("Drag me!");

        // Set an action when the label is detected for dragging
        dragSource.setOnDragDetected(event -> {

            // Start a drag-and-drop operation with COPY transfer mode
            Dragboard db = dragSource.startDragAndDrop(TransferMode.COPY);

            // Define the content to be transferred
            ClipboardContent content = new ClipboardContent();
            content.putString("Data to be transferred");

            // Set the content for the dragboard
            db.setContent(content);

            // Consume the event to indicate that it's being handled
            event.consume();

        });

        // Add the drag source Label to the center of the BorderPane
        this.parent.setCenter(dragSource);
    }

    @Override
    public void start(Stage stage) throws Exception {

        // Setup and display the stage
        this.setupStage(stage);
    }

    private void setupStage(Stage stage) {

        // Create a scene with the BorderPane as the root
        Scene scene = new Scene(this.parent, 640, 480);

        // Set the stage title
        stage.setTitle("Drag and Drop in JavaFX: Simplifying User Interactions");

        // Set the scene for the stage
        stage.setScene(scene);

        // Center the stage on the screen
        stage.centerOnScreen();

        // Display the stage
        stage.show();
    }

}
Define the Drop Target
Likewise, to enable a Node as a drop target, you should attach event handlers to detect when the dragged item is over the target. You’ll typically use the setOnDragOver event handler to specify how the target Node responds to the drag operation.
import javafx.application.Application;
import javafx.scene.Scene;
import javafx.scene.control.Label;
import javafx.scene.input.ClipboardContent;
import javafx.scene.input.Dragboard;
import javafx.scene.input.TransferMode;
import javafx.scene.layout.*;
import javafx.stage.Stage;

public class Main extends Application {

    // The parent layout manager
    private final BorderPane parent = new BorderPane();

    @Override
    public void init() throws Exception {
        super.init();

        // Build the user interface
        this.buildUI();
    }

    private void buildUI() {

        // 1. Create the Drag Source
        Label dragSource = new Label("Drag me!");

        // Set an action when the label is detected for dragging
        dragSource.setOnDragDetected(event -> {

            // Start a drag-and-drop operation with COPY transfer mode
            Dragboard db = dragSource.startDragAndDrop(TransferMode.COPY);

            // Define the content to be transferred
            ClipboardContent content = new ClipboardContent();
            content.putString("Data to be transferred");

            // Set the content for the dragboard
            db.setContent(content);

            // Consume the event to indicate that it's being handled
            event.consume();

        });

        // 2. Define the Drop Target
        Label dropTarget = new Label("Drop here!");

        // Set an action when a drag enters the drop target area
        dropTarget.setOnDragOver(event -> {

            // Check if the dragged item is not the drop target itself and if it contains string data
            if (event.getGestureSource() != dropTarget && event.getDragboard().hasString()) {

                // Accept the transfer modes (COPY or MOVE in this case)
                event.acceptTransferModes(TransferMode.COPY_OR_MOVE);

            }

            // Consume the event to indicate that it's being handled
            event.consume();

        });

        // Add the drag source Label to the center of the BorderPane
        this.parent.setCenter(dragSource);

        // Add the drag target Label to the bottom of the BorderPane
        this.parent.setBottom(dropTarget);

    }

    @Override
    public void start(Stage stage) throws Exception {

        // Setup and display the stage
        this.setupStage(stage);
    }

    private void setupStage(Stage stage) {

        // Create a scene with the BorderPane as the root
        Scene scene = new Scene(this.parent, 640, 480);

        // Set the stage title
        stage.setTitle("Drag and Drop in JavaFX: Simplifying User Interactions");

        // Set the scene for the stage
        stage.setScene(scene);

        // Center the stage on the screen
        stage.centerOnScreen();

        // Display the stage
        stage.show();
    }

}
Handle Data Drop
Finally, you need to define what happens when the user drops the item onto the target. This is done by attaching an event handler to the target Node using the setOnDragDropped method. Implement the logic to handle the dropped data when it is released over the drop target.
import javafx.application.Application;
import javafx.scene.Scene;
import javafx.scene.control.Label;
import javafx.scene.input.ClipboardContent;
import javafx.scene.input.Dragboard;
import javafx.scene.input.TransferMode;
import javafx.scene.layout.*;
import javafx.stage.Stage;

public class Main extends Application {

    // The parent layout manager
    private final BorderPane parent = new BorderPane();

    @Override
    public void init() throws Exception {
        super.init();

        // Build the user interface
        this.buildUI();
    }

    private void buildUI() {

        // 1. Create the Drag Source
        Label dragSource = new Label("Drag me!");

        // Set an action when the label is detected for dragging
        dragSource.setOnDragDetected(event -> {

            // Start a drag-and-drop operation with COPY transfer mode
            Dragboard db = dragSource.startDragAndDrop(TransferMode.COPY);

            // Define the content to be transferred
            ClipboardContent content = new ClipboardContent();
            content.putString("Data to be transferred");

            // Set the content for the dragboard
            db.setContent(content);

            // Consume the event to indicate that it's being handled
            event.consume();

        });

        // 2. Define the Drop Target
        Label dropTarget = new Label("Drop here!");

        // Set an action when a drag enters the drop target area
        dropTarget.setOnDragOver(event -> {

            // Check if the dragged item is not the drop target itself and if it contains string data
            if (event.getGestureSource() != dropTarget && event.getDragboard().hasString()) {

                // Accept the transfer modes (COPY or MOVE in this case)
                event.acceptTransferModes(TransferMode.COPY_OR_MOVE);

            }

            // Consume the event to indicate that it's being handled
            event.consume();

        });

        // 3. Handle Data Drop
        dropTarget.setOnDragDropped(event -> {

            // Get the Dragboard containing the data
            Dragboard db = event.getDragboard();

            // Initialize a flag for the drop success
            boolean success = false;

            // Check if the Dragboard contains string data
            if (db.hasString()) {

                // Process the dropped data here
                String data = db.getString();

                // Perform necessary actions with the data
                // For example, you can update the drop target text with the dropped data
                dropTarget.setText(data);

                // Set the success flag to true, indicating a successful drop
                success = true;

            }

            // Indicate whether the drop was completed successfully
            event.setDropCompleted(success);

            // Consume the event to indicate that it's being handled
            event.consume();

        });

        // Add the drag source Label to the center of the BorderPane
        this.parent.setCenter(dragSource);

        // Add the drag target Label to the bottom of the BorderPane
        this.parent.setBottom(dropTarget);

    }

    @Override
    public void start(Stage stage) throws Exception {

        // Setup and display the stage
        this.setupStage(stage);
    }

    private void setupStage(Stage stage) {

        // Create a scene with the BorderPane as the root
        Scene scene = new Scene(this.parent, 640, 480);

        // Set the stage title
        stage.setTitle("Drag and Drop in JavaFX: Simplifying User Interactions");

        // Set the scene for the stage
        stage.setScene(scene);

        // Center the stage on the screen
        stage.centerOnScreen();

        // Display the stage
        stage.show();

    }

}
Simple Drag and Drop Applications
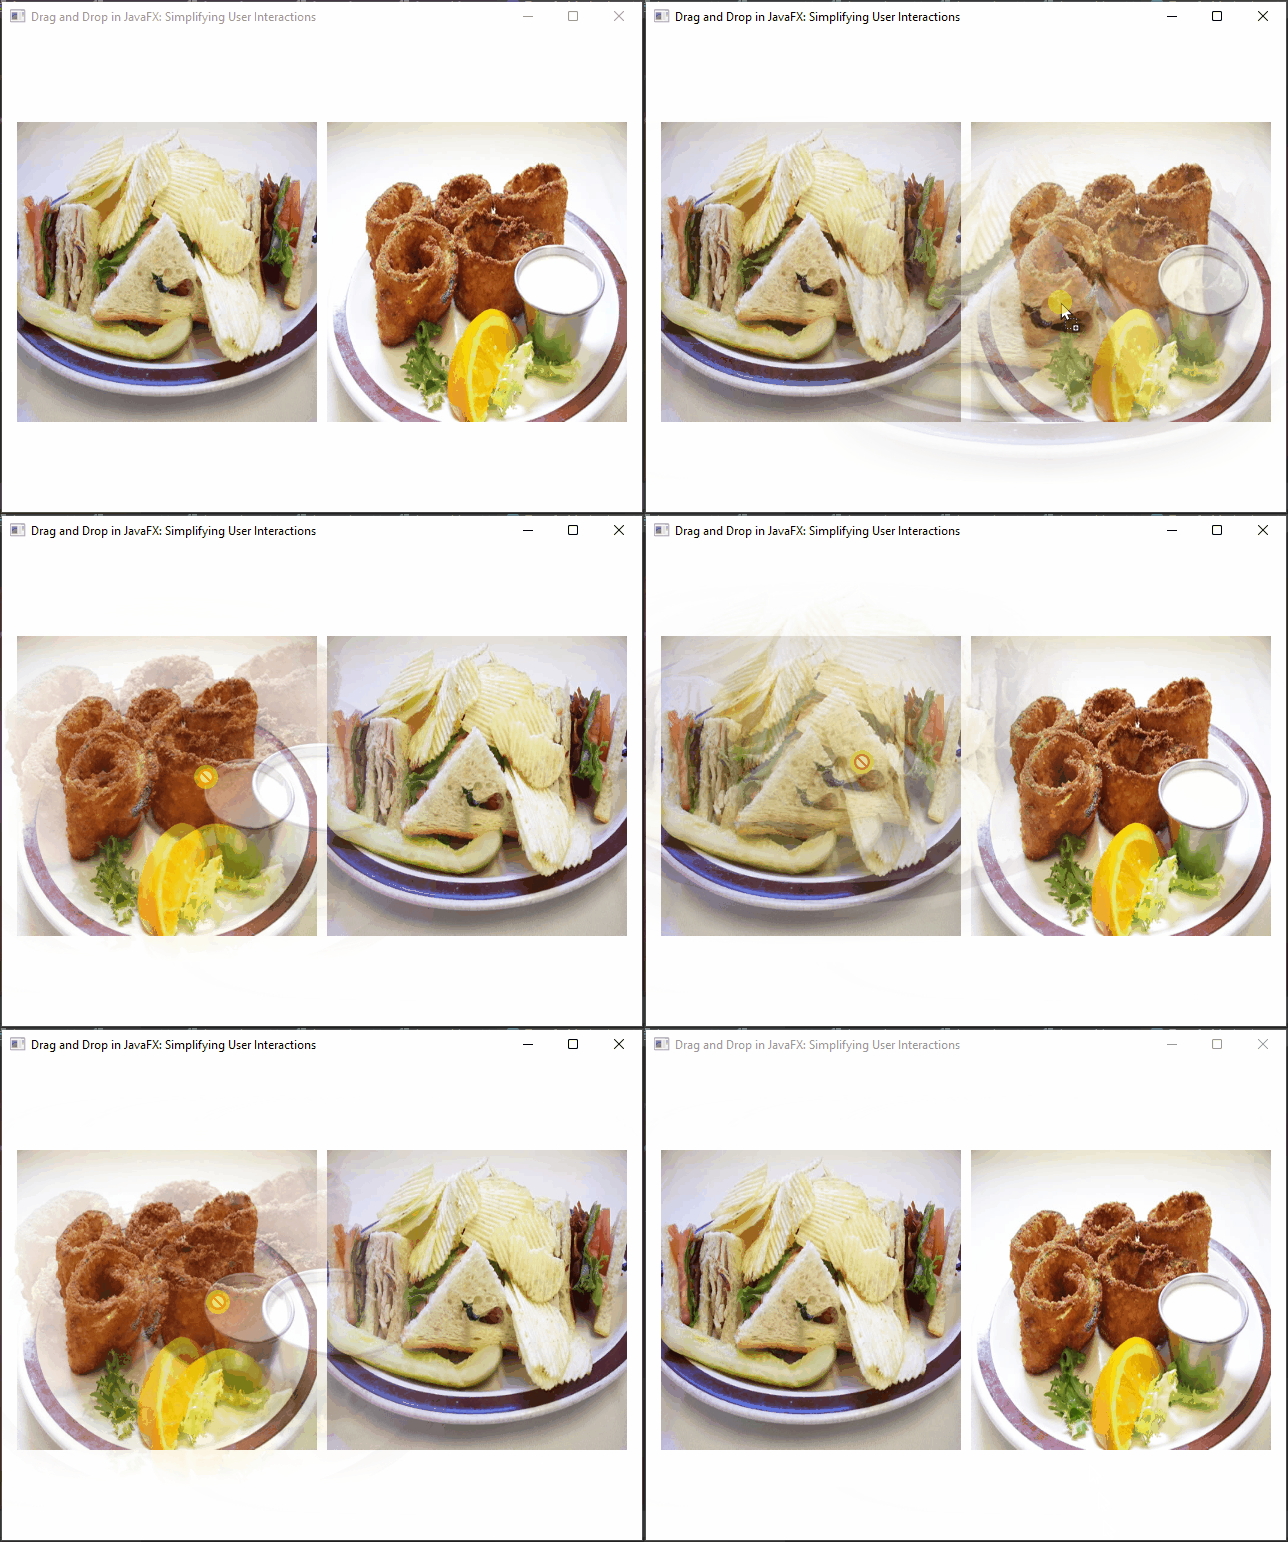
To illustrate these steps, let’s consider a simple JavaFX application where users can drag and drop images from one area to another.
import javafx.application.Application;
import javafx.geometry.Pos;
import javafx.scene.Scene;
import javafx.scene.image.Image;
import javafx.scene.image.ImageView;
import javafx.scene.input.ClipboardContent;
import javafx.scene.input.Dragboard;
import javafx.scene.input.TransferMode;
import javafx.scene.layout.*;
import javafx.stage.Stage;

public class Main extends Application {

    // The parent layout manager
    private final BorderPane parent = new BorderPane();

    @Override
    public void init() throws Exception {
        super.init();

        // Build the user interface
        this.buildUI();
    }

    private void buildUI() {

        // Create an ImageView as the drag source with an image
        ImageView dragSource = new ImageView(new Image("image1.jpg"));
        dragSource.setFitHeight(300);
        dragSource.setFitWidth(300);

        // Set an action when the image is detected for dragging
        dragSource.setOnDragDetected(event -> {

            // Start a drag-and-drop operation with COPY transfer mode
            Dragboard db = dragSource.startDragAndDrop(TransferMode.COPY);

            // Define the content to be transferred (an image in this case)
            ClipboardContent content = new ClipboardContent();
            content.putImage(dragSource.getImage());

            // Set the content for the dragboard
            db.setContent(content);

            // Consume the event to indicate that it's being handled
            event.consume();
        });

        // Create a drop target as an ImageView with an image
        ImageView dropTarget = new ImageView(new Image("image6.jpg"));
        dropTarget.setFitHeight(300);
        dropTarget.setFitWidth(300);

        // Set an action when a drag enters the drop target area
        dropTarget.setOnDragOver(event -> {

            // Check if the dragged item is not the drop target itself and if it contains an image
            if (event.getGestureSource() != dropTarget && event.getDragboard().hasImage()) {

                // Accept the transfer mode (COPY in this case)
                event.acceptTransferModes(TransferMode.COPY);
            }

            // Consume the event to indicate that it's being handled
            event.consume();
        });

        // Set an action to handle data drop
        dropTarget.setOnDragDropped(event -> {

            // Get the dragboard from the event
            Dragboard db = event.getDragboard();

            boolean success = false;

            if (db.hasImage()) {

                // Swap the images between drag source and drop target
                dragSource.setImage(dropTarget.getImage());

                // Set the dropped image on the drop target
                dropTarget.setImage(db.getImage());

                success = true;

            }

            // Set the drop completed status
            event.setDropCompleted(success);

            // Consume the event to indicate that it's being handled
            event.consume();
        });

        // Create an HBox container to hold the drag source and drop target
        HBox container = new HBox(10, dragSource, dropTarget);
        container.setAlignment(Pos.CENTER);

        // Add the HBox container to the center of the BorderPane
        this.parent.setCenter(container);

    }

    @Override
    public void start(Stage stage) throws Exception {
        // Setup and display the stage
        this.setupStage(stage);
    }

    private void setupStage(Stage stage) {

        // Create a scene with the BorderPane as the root
        Scene scene = new Scene(this.parent, 640, 480);

        // Set the stage title
        stage.setTitle("Drag and Drop in JavaFX: Simplifying User Interactions");

        // Set the scene for the stage
        stage.setScene(scene);

        // Center the stage on the screen
        stage.centerOnScreen();

        // Display the stage
        stage.show();
    }

}
In this example, we create a JavaFX application with a draggable ImageView and a drop target ImageView. Users can drag an image from the source ImageView to the target ImageView. The code demonstrates the key steps of setting up the drag source, defining the data to be dragged, implementing the drop target, and handling the drag-and-drop events.
In this example, we’ll create a JavaFX application that allows users to drag and drop text between two text areas.
import javafx.application.Application;
import javafx.geometry.Pos;
import javafx.scene.Scene;
import javafx.scene.control.TextArea;
import javafx.scene.input.ClipboardContent;
import javafx.scene.input.Dragboard;
import javafx.scene.input.TransferMode;
import javafx.scene.layout.*;
import javafx.stage.Stage;

public class Main extends Application {

    // The parent layout manager
    private final BorderPane parent = new BorderPane();

    @Override
    public void init() throws Exception {
        super.init();

        // Build the user interface
        this.buildUI();
    }

    private void buildUI() {

        // Create source and target TextAreas
        TextArea sourceTextArea = new TextArea();
        sourceTextArea.setWrapText(true);

        TextArea targetTextArea = new TextArea();
        targetTextArea.setWrapText(true);

        // Define behavior for the source TextArea
        sourceTextArea.setOnDragDetected(event -> {

            // Start a drag-and-drop operation with COPY_OR_MOVE transfer mode
            Dragboard db = sourceTextArea.startDragAndDrop(TransferMode.COPY_OR_MOVE);

            ClipboardContent content = new ClipboardContent();

            // Put the selected text into the clipboard
            content.putString(sourceTextArea.getSelectedText());

            db.setContent(content);

            event.consume();

        });

        // Define behavior for the target TextArea when a drag enters
        targetTextArea.setOnDragOver(event -> {

            // Check if the dragged item is not the target TextArea itself and if it contains text
            if (event.getGestureSource() != targetTextArea && event.getDragboard().hasString()) {
                // Accept the transfer mode (COPY_OR_MOVE in this case)
                event.acceptTransferModes(TransferMode.COPY_OR_MOVE);
            }

            event.consume();

        });

        // Define behavior for the target TextArea when a drop occurs
        targetTextArea.setOnDragDropped(event -> {

            Dragboard db = event.getDragboard();

            boolean success = false;

            if (db.hasString()) {
                // Append the dropped text to the target TextArea
                targetTextArea.appendText(db.getString());
                success = true;
            }

            // Set the drop completed status
            event.setDropCompleted(success);
            event.consume();

        });

        HBox container = new HBox(10, sourceTextArea, targetTextArea);
        container.setAlignment(Pos.CENTER);

        // Add the HBox container to the center of the BorderPane
        this.parent.setCenter(container);

    }

    @Override
    public void start(Stage stage) throws Exception {

        // Setup and display the stage
        this.setupStage(stage);
    }

    private void setupStage(Stage stage) {

        // Create a scene with the BorderPane as the root
        Scene scene = new Scene(this.parent, 640, 480);

        // Set the stage title
        stage.setTitle("Drag and Drop in JavaFX: Simplifying User Interactions");

        // Set the scene for the stage
        stage.setScene(scene);

        // Center the stage on the screen
        stage.centerOnScreen();

        // Display the stage
        stage.show();
    }

}
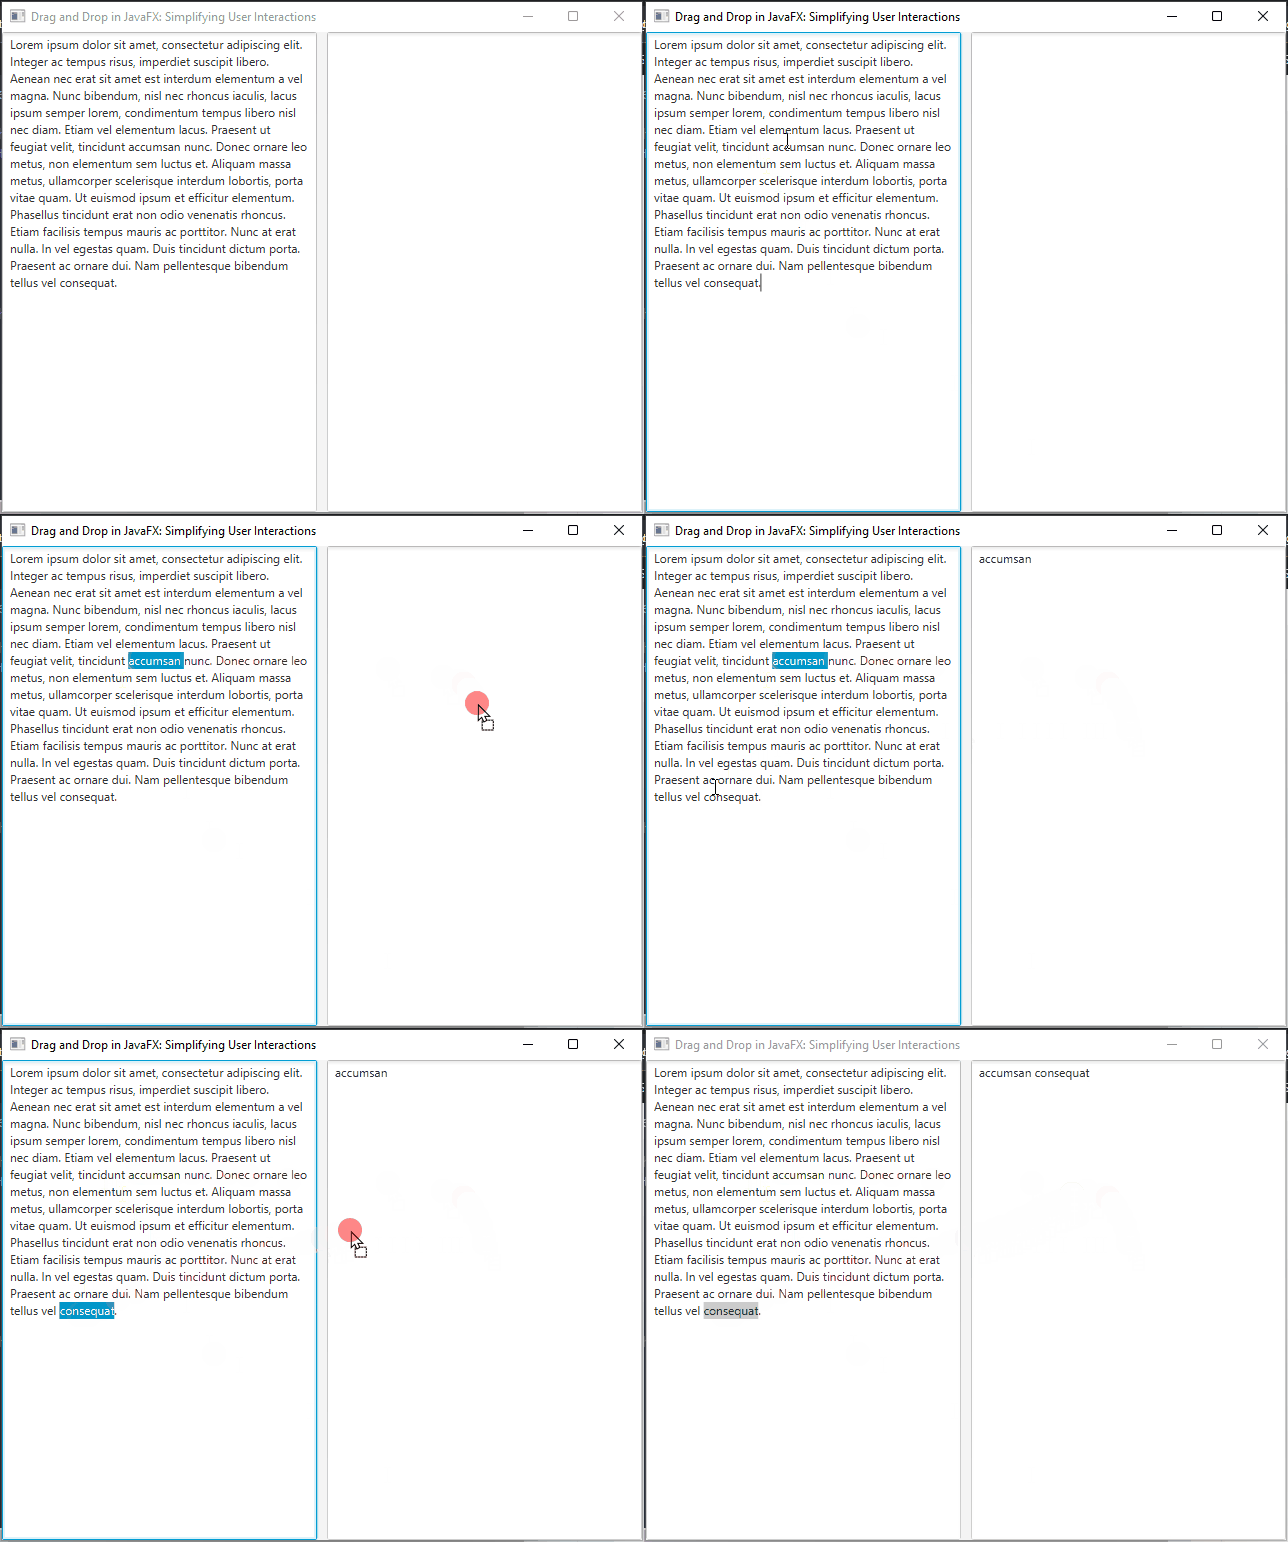
These examples demonstrate basic drag and drop functionality in JavaFX. You can run these applications to explore how drag and drop works in each scenario. Feel free to modify and expand upon them to suit your specific needs.
Advanced Drag and Drop Features
While the basic drag and drop functionality can serve many use cases, JavaFX offers several advanced features to enhance the user experience:
Adding Visual Feedback
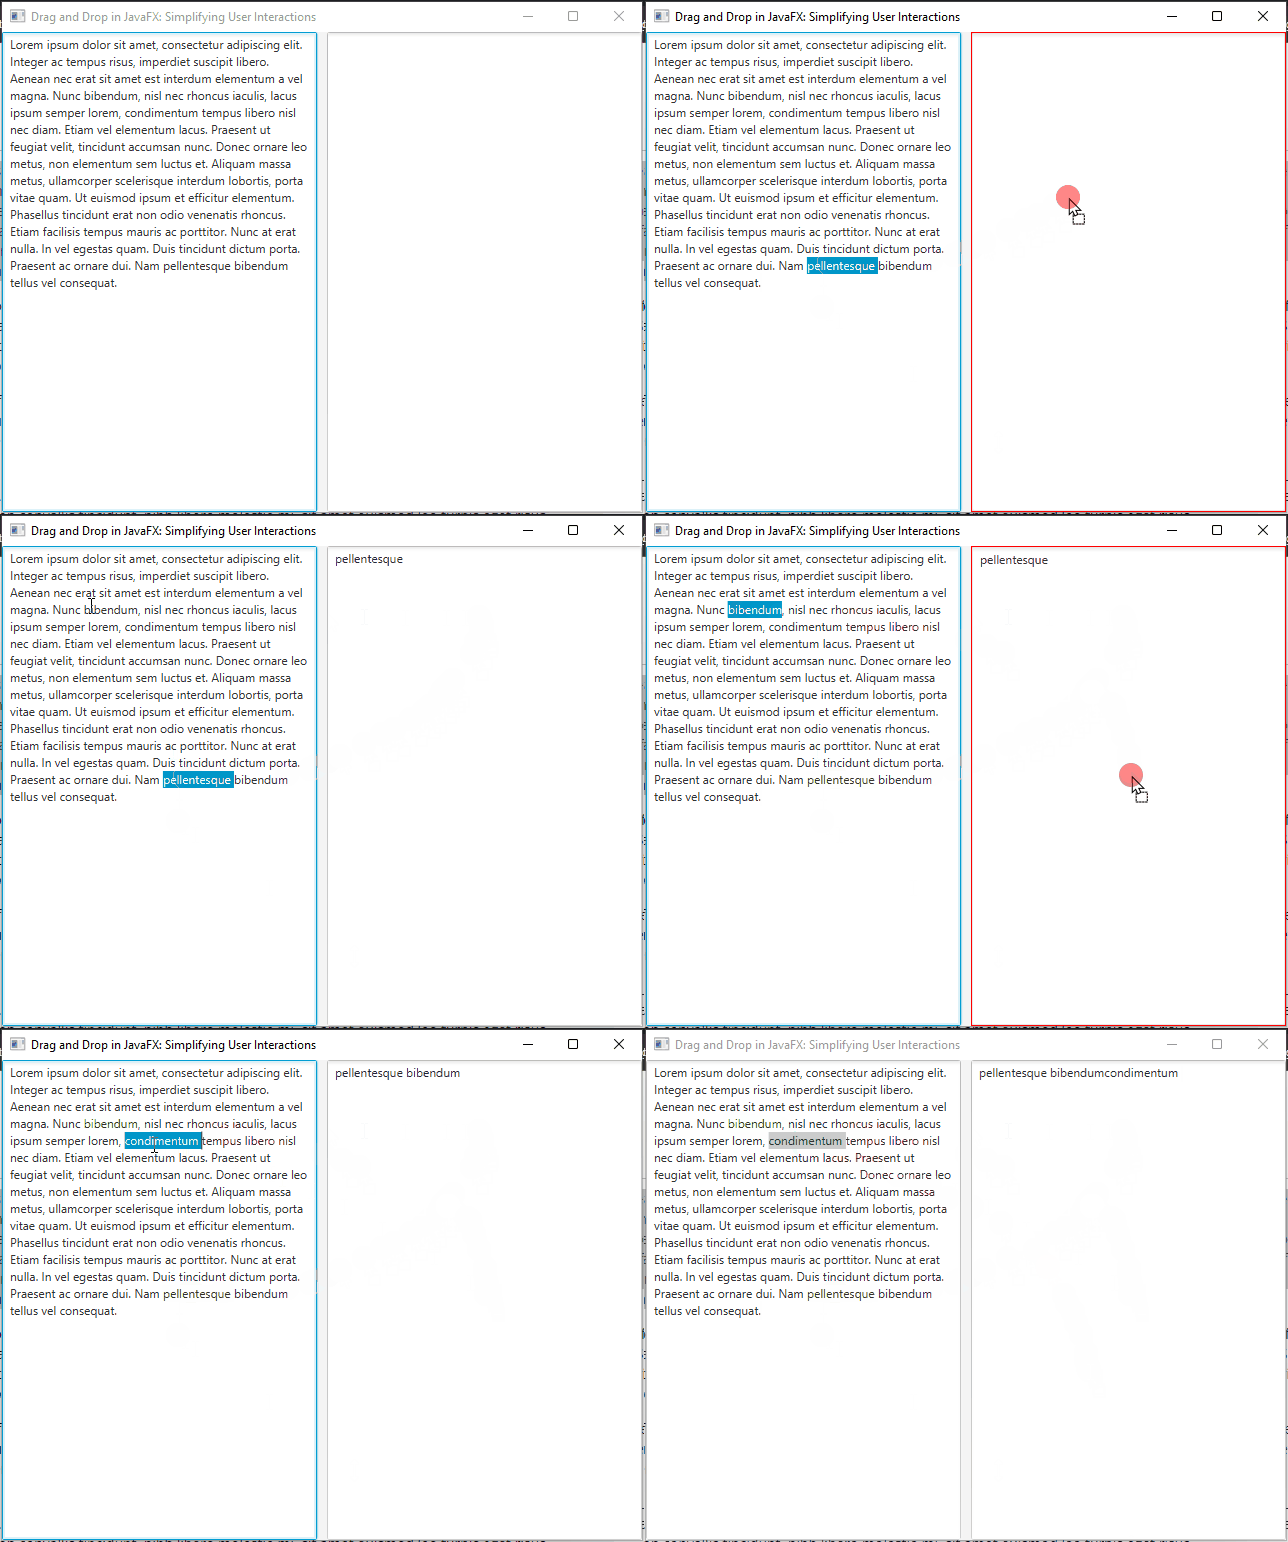
To enhance the user experience, you can provide visual feedback during the drag-and-drop operation. JavaFX offers several ways to achieve this, such as changing the cursor shape or highlighting the drop target when a draggable element is dragged over it.
import javafx.application.Application;
import javafx.geometry.Pos;
import javafx.scene.Scene;
import javafx.scene.control.TextArea;
import javafx.scene.input.ClipboardContent;
import javafx.scene.input.Dragboard;
import javafx.scene.input.TransferMode;
import javafx.scene.layout.*;
import javafx.stage.Stage;

public class Main extends Application {

    // The parent layout manager
    private final BorderPane parent = new BorderPane();

    @Override
    public void init() throws Exception {
        super.init();

        // Build the user interface
        this.buildUI();
    }

    private void buildUI() {

        // Create source and target TextAreas
        TextArea sourceTextArea = new TextArea();
        sourceTextArea.setWrapText(true);

        TextArea targetTextArea = new TextArea();
        targetTextArea.setWrapText(true);

        // Add visual feedback when a draggable element enters the target TextArea
        targetTextArea.setOnDragEntered(event -> {
            targetTextArea.setStyle("-fx-border-color: red;");
        });

        // Remove visual feedback when the draggable element exits the target TextArea
        targetTextArea.setOnDragExited(event -> {
            targetTextArea.setStyle("");
        });

        // Define behavior for the source TextArea
        sourceTextArea.setOnDragDetected(event -> {

            // Start a drag-and-drop operation with COPY_OR_MOVE transfer mode
            Dragboard db = sourceTextArea.startDragAndDrop(TransferMode.COPY_OR_MOVE);

            ClipboardContent content = new ClipboardContent();

            // Put the selected text into the clipboard
            content.putString(sourceTextArea.getSelectedText());

            db.setContent(content);

            event.consume();

        });

        // Define behavior for the target TextArea when a drag enters
        targetTextArea.setOnDragOver(event -> {

            // Check if the dragged item is not the target TextArea itself and if it contains text
            if (event.getGestureSource() != targetTextArea && event.getDragboard().hasString()) {
                // Accept the transfer mode (COPY_OR_MOVE in this case)
                event.acceptTransferModes(TransferMode.COPY_OR_MOVE);
            }

            event.consume();

        });

        // Define behavior for the target TextArea when a drop occurs
        targetTextArea.setOnDragDropped(event -> {

            Dragboard db = event.getDragboard();

            boolean success = false;

            if (db.hasString()) {
                // Append the dropped text to the target TextArea
                targetTextArea.appendText(db.getString());
                success = true;
            }

            // Set the drop completed status
            event.setDropCompleted(success);
            event.consume();

        });

        HBox container = new HBox(10, sourceTextArea, targetTextArea);
        container.setAlignment(Pos.CENTER);

        // Add the HBox container to the center of the BorderPane
        this.parent.setCenter(container);

    }

    @Override
    public void start(Stage stage) throws Exception {

        // Setup and display the stage
        this.setupStage(stage);
    }

    private void setupStage(Stage stage) {

        // Create a scene with the BorderPane as the root
        Scene scene = new Scene(this.parent, 640, 480);

        // Set the stage title
        stage.setTitle("Drag and Drop in JavaFX: Simplifying User Interactions");

        // Set the scene for the stage
        stage.setScene(scene);

        // Center the stage on the screen
        stage.centerOnScreen();

        // Display the stage
        stage.show();
    }

}
In the code above, we use the setOnDragEntered and setOnDragExited event handlers to add and remove visual feedback to the source and drop targets. You can customize the feedback according to your application’s requirements.
Custom Drag Images
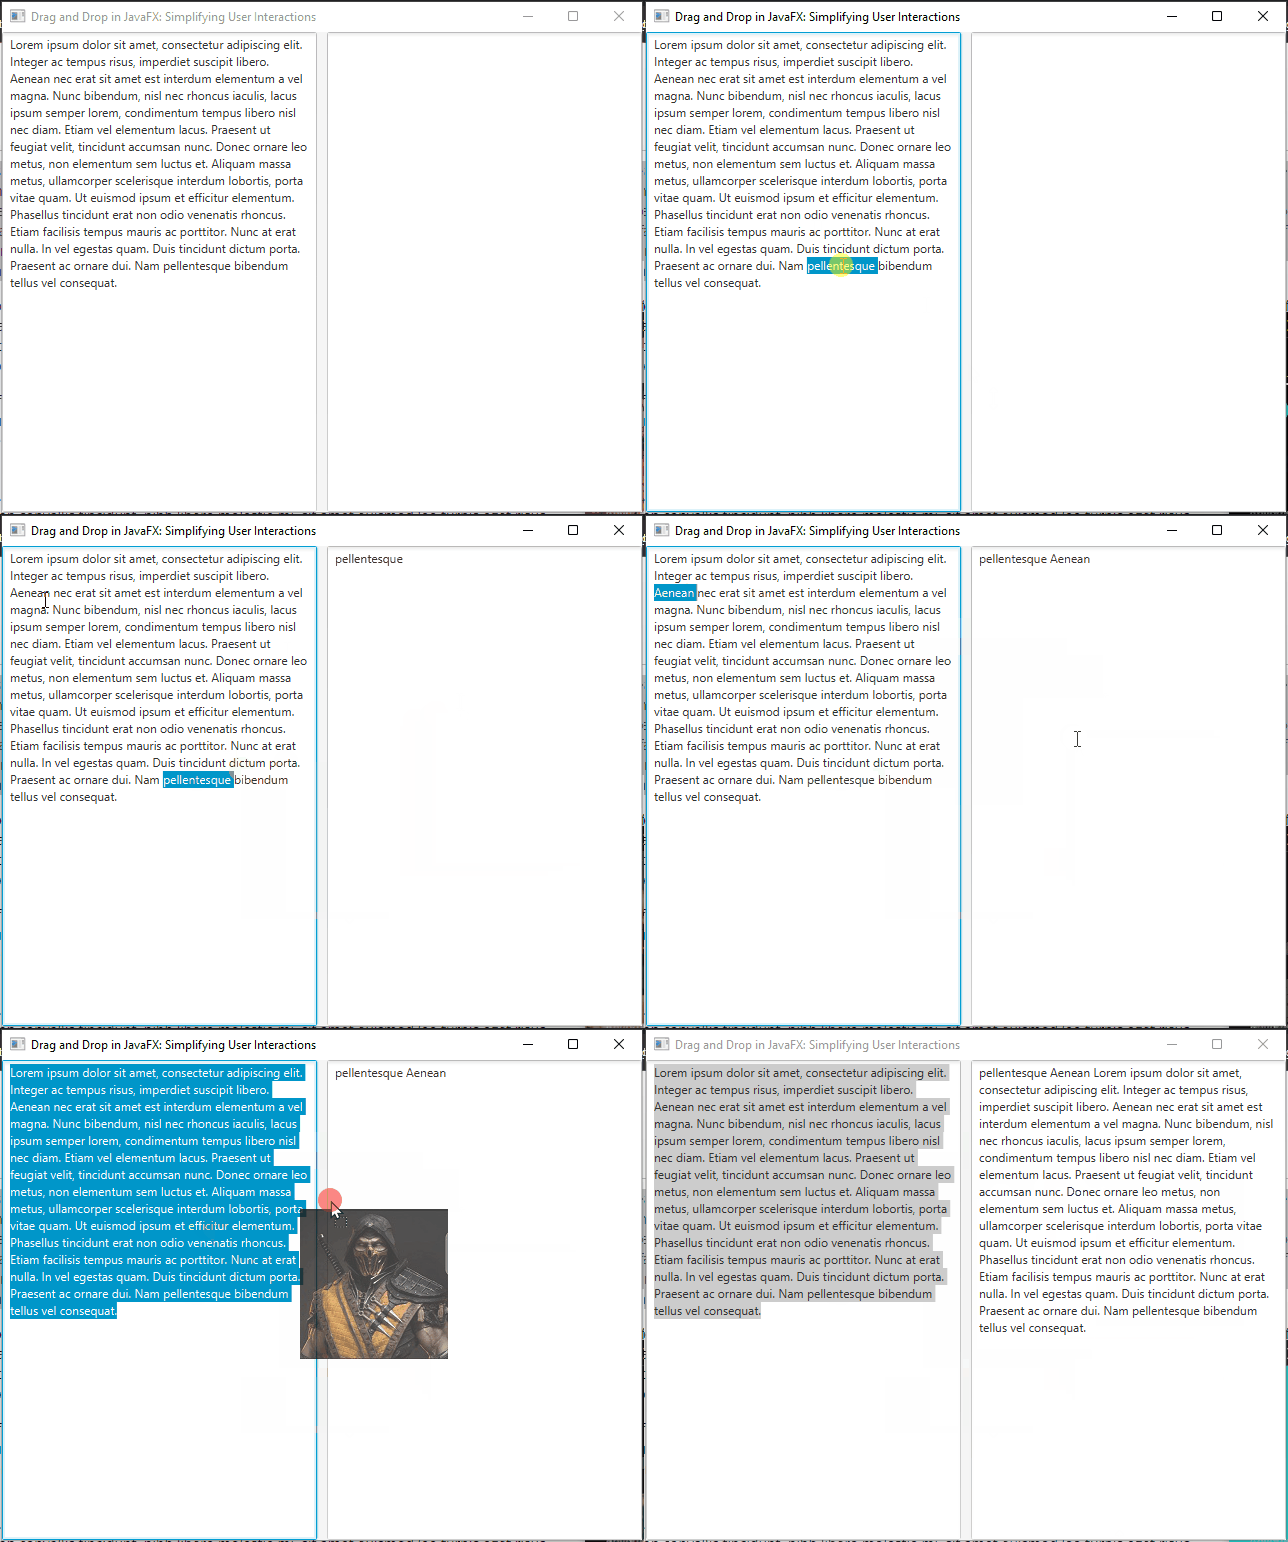
You can customize the appearance of the drag image that follows the cursor during the drag operation by setting a custom Image:
import javafx.application.Application;
import javafx.geometry.Pos;
import javafx.scene.Scene;
import javafx.scene.control.TextArea;
import javafx.scene.image.Image;
import javafx.scene.input.ClipboardContent;
import javafx.scene.input.Dragboard;
import javafx.scene.input.TransferMode;
import javafx.scene.layout.*;
import javafx.stage.Stage;

public class Main extends Application {

    // The parent layout manager
    private final BorderPane parent = new BorderPane();

    @Override
    public void init() throws Exception {
        super.init();

        // Build the user interface
        this.buildUI();
    }

    private void buildUI() {

        // Create source and target TextAreas
        TextArea sourceTextArea = new TextArea();
        sourceTextArea.setWrapText(true);

        TextArea targetTextArea = new TextArea();
        targetTextArea.setWrapText(true);

        // Add visual feedback when a draggable element enters the target TextArea
        targetTextArea.setOnDragEntered(event -> {
            targetTextArea.setStyle("-fx-border-color: red;");
        });

        // Remove visual feedback when the draggable element exits the target TextArea
        targetTextArea.setOnDragExited(event -> {
            targetTextArea.setStyle("");
        });

        // Define behavior for the source TextArea
        sourceTextArea.setOnDragDetected(event -> {

            // Start a drag-and-drop operation with COPY_OR_MOVE transfer mode
            Dragboard db = sourceTextArea.startDragAndDrop(TransferMode.COPY_OR_MOVE);

            /* Set a custom drag image */
            Image dragImage = new Image("image.jpeg");
            db.setDragView(dragImage);

            ClipboardContent content = new ClipboardContent();

            // Put the selected text into the clipboard
            content.putString(sourceTextArea.getSelectedText());

            db.setContent(content);

            event.consume();

        });

        // Define behavior for the target TextArea when a drag enters
        targetTextArea.setOnDragOver(event -> {

            // Check if the dragged item is not the target TextArea itself and if it contains text
            if (event.getGestureSource() != targetTextArea && event.getDragboard().hasString()) {
                // Accept the transfer mode (COPY_OR_MOVE in this case)
                event.acceptTransferModes(TransferMode.COPY_OR_MOVE);
            }

            event.consume();

        });

        // Define behavior for the target TextArea when a drop occurs
        targetTextArea.setOnDragDropped(event -> {

            Dragboard db = event.getDragboard();

            boolean success = false;

            if (db.hasString()) {
                // Append the dropped text to the target TextArea
                targetTextArea.appendText(db.getString());
                success = true;
            }

            // Set the drop completed status
            event.setDropCompleted(success);
            event.consume();

        });

        HBox container = new HBox(10, sourceTextArea, targetTextArea);
        container.setAlignment(Pos.CENTER);

        // Add the HBox container to the center of the BorderPane
        this.parent.setCenter(container);

    }

    @Override
    public void start(Stage stage) throws Exception {

        // Setup and display the stage
        this.setupStage(stage);
    }

    private void setupStage(Stage stage) {

        // Create a scene with the BorderPane as the root
        Scene scene = new Scene(this.parent, 640, 480);

        // Set the stage title
        stage.setTitle("Drag and Drop in JavaFX: Simplifying User Interactions");

        // Set the scene for the stage
        stage.setScene(scene);

        // Center the stage on the screen
        stage.centerOnScreen();

        // Display the stage
        stage.show();
    }

}
Complex Data Transfer
JavaFX allows you to transfer more complex data than just plain text. You can transfer objects of custom classes by serializing them into a ByteArrayInputStream and placing them on the dragboard.
Serialize Custom Objects
First, ensure that the objects you want to transfer are serializable. This means your custom class should implement the Serializable interface. For example:
import javafx.scene.input.DataFormat;
import java.io.Serializable;

// CustomData class that implements Serializable for custom data transfer
public class CustomData implements Serializable {

    private final String name;
    private final int value;

    // Define a custom DataFormat for serializing objects
    public static final DataFormat SERIALIZED_OBJECT = new DataFormat("application/x-java-serialized-object");

    // Constructor to initialize CustomData with a name and value
    public CustomData(String name, int value) {
        this.name = name;
        this.value = value;
    }

    // Getter method to retrieve the value
    public int getValue() {
        return this.value;
    }

    // Getter method to retrieve the name
    public String getName() {
        return this.name;
    }

}
Serialize and Set the Data on the Dragboard
In your drag source code, serialize the custom object and set it as the content of the dragboard:
sourceNode.setOnDragDetected(event -> {

    // Start a drag-and-drop operation with any transfer mode
    Dragboard db = sourceNode.startDragAndDrop(TransferMode.ANY);

    // Create your custom object
    CustomData customObject = new CustomData("Coderscratchpad v1", 42);

    try {
        // Serialize the custom object
        ByteArrayOutputStream byteStream = new ByteArrayOutputStream();
        ObjectOutputStream objectStream = new ObjectOutputStream(byteStream);

        objectStream.writeObject(customObject);

        ClipboardContent content = new ClipboardContent();

        // Put the serialized object into the clipboard with the custom DataFormat
        content.put(CustomData.SERIALIZED_OBJECT, byteStream.toByteArray());

        db.setContent(content);

    } catch (IOException e) {
        e.printStackTrace();
    }

    event.consume();

});
Here, CustomData.SERIALIZED_OBJECT is a custom format identifier, which you can define as a unique string constant in your application to recognize the data format during the drop operation.
Deserialize Data on Drop
On the drop target side, you can check for the custom data format and deserialize the data back into your custom object:
targetNode.setOnDragOver(event -> {

    // Check if the dragged item is not the targetNode itself and if it contains serialized CustomData
    if (event.getGestureSource() != targetNode && event.getDragboard().hasContent(CustomData.SERIALIZED_OBJECT)) {
        // Accept the transfer mode (COPY_OR_MOVE in this case)
        event.acceptTransferModes(TransferMode.COPY_OR_MOVE);
    }

    event.consume();
});

targetNode.setOnDragDropped(event -> {

    Dragboard db = event.getDragboard();

    boolean success = false;

    if (db.hasContent(CustomData.SERIALIZED_OBJECT)) {

        // Retrieve the serialized data
        byte[] bytes = (byte[]) db.getContent(CustomData.SERIALIZED_OBJECT);

        try {

            // Deserialize the data
            ByteArrayInputStream byteStream = new ByteArrayInputStream(bytes);
            ObjectInputStream objectStream = new ObjectInputStream(byteStream);
            CustomData customObject = (CustomData) objectStream.readObject();

            // Now, you have your custom object ready for use
            System.out.println("Received custom object: " + customObject.getName() + ", " + customObject.getValue());

            success = true;

        } catch (IOException | ClassNotFoundException e) {
            e.printStackTrace();
        }
    }

    // Set the drop completed status
    event.setDropCompleted(success);
    event.consume();

});
You can pass and manipulate complex, custom objects during drag and drop operations in your JavaFX application. This technique greatly expands the possibilities for data interchange, making your application more versatile and user-friendly.
External Drags
You can also implement drag and drop operations between your JavaFX application and external applications or the operating system’s file system. This involves handling files and URLs as draggable items.
Define the Drop Target
To enable external drags, you’ll first need to set up a drop target within your JavaFX application. This is where users can drop files or other external data. For example:
Dragging Files
In this example, we’ll create a JavaFX application that allows you to drag and drop files from your computer onto a JavaFX window to display their names.
import javafx.application.Application;
import javafx.collections.FXCollections;
import javafx.collections.ObservableList;
import javafx.scene.Scene;
import javafx.scene.control.ListView;
import javafx.scene.input.Dragboard;
import javafx.scene.input.TransferMode;
import javafx.scene.layout.*;
import javafx.stage.Stage;
import java.io.File;

public class Main extends Application {

    // The parent layout manager
    private final BorderPane parent = new BorderPane();

    @Override
    public void init() throws Exception {
        super.init();

        // Build the user interface
        this.buildUI();
    }

    private void buildUI() {

        // Create an ObservableList to hold file paths
        ObservableList<String> fileList = FXCollections.observableArrayList();
        ListView<String> fileListView = new ListView<>(fileList);

        // Define behavior for the ListView when a drag enters
        fileListView.setOnDragOver(event -> {

            // Check if the dragged item is not the ListView itself and if it contains files
            if (event.getGestureSource() != fileListView && event.getDragboard().hasFiles()) {
                // Allow the drop
                event.acceptTransferModes(TransferMode.COPY_OR_MOVE);
            }
            event.consume();
        });

        // Define behavior for the ListView when a drop occurs
        fileListView.setOnDragDropped(event -> {

            Dragboard db = event.getDragboard();
            boolean success = false;

            if (db.hasFiles()) {
                // Add the absolute paths of dropped files to the ObservableList
                fileList.addAll(db.getFiles().stream().map(File::getAbsolutePath).toList());
                success = true;
            }

            // Set the drop completed status
            event.setDropCompleted(success);
            event.consume();
        });

        // Add the ListView to the center of the BorderPane
        this.parent.setCenter(fileListView);
    }

    @Override
    public void start(Stage stage) throws Exception {

        // Setup and display the stage
        this.setupStage(stage);
    }

    private void setupStage(Stage stage) {

        // Create a scene with the BorderPane as the root
        Scene scene = new Scene(this.parent, 640, 480);

        // Set the stage title
        stage.setTitle("Drag and Drop in JavaFX: Simplifying User Interactions");

        // Set the scene for the stage
        stage.setScene(scene);

        // Center the stage on the screen
        stage.centerOnScreen();

        // Display the stage
        stage.show();
    }

}
In this code, we retrieve the list of dropped files from the dragboard and then process them as needed. You can implement custom logic to handle these files, such as opening, saving, or processing them within your application.
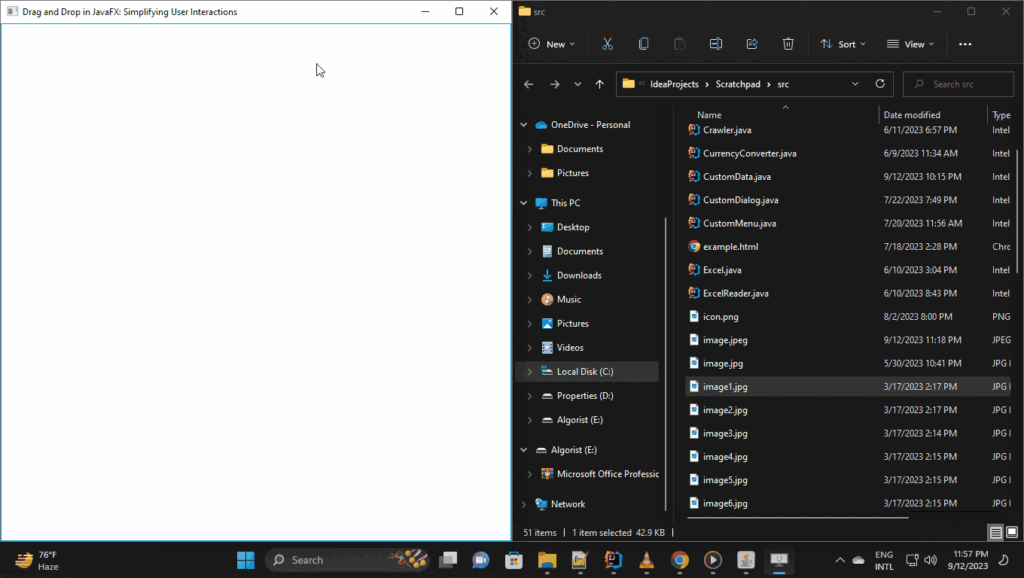
Image Drag and Drop
This example demonstrates how to create a JavaFX application that allows users to drag and drop images onto an ImageView component.
import javafx.application.Application;
import javafx.scene.Scene;
import javafx.scene.image.Image;
import javafx.scene.image.ImageView;
import javafx.scene.input.Dragboard;
import javafx.scene.input.TransferMode;
import javafx.scene.layout.*;
import javafx.stage.Stage;

import java.io.File;

public class Main extends Application {

    // The parent layout manager
    private final BorderPane parent = new BorderPane();

    @Override
    public void init() throws Exception {
        super.init();

        // Build the user interface
        this.buildUI();
    }

    private void buildUI() {

        // Create an ImageView with a placeholder image
        ImageView imageView = new ImageView(new Image("placeholder.jpg"));
        imageView.setFitWidth(400);
        imageView.setFitHeight(400);

        // Define behavior for the ImageView when a drag enters
        imageView.setOnDragOver(event -> {
            if (event.getDragboard().hasFiles()) {
                event.acceptTransferModes(TransferMode.COPY);
            }
            event.consume();
        });

        // Define behavior for the ImageView when a drop occurs
        imageView.setOnDragDropped(event -> {

            Dragboard dragboard = event.getDragboard();
            boolean success = false;

            if (dragboard.hasFiles()) {

                // Get the first file
                File file = dragboard.getFiles().get(0);

                // Create an Image from the dropped file and set it in the ImageView
                Image image = new Image(file.getAbsolutePath());
                imageView.setImage(image);

                success = true;

            }

            // Set the drop completed status
            event.setDropCompleted(success);
            event.consume();
        });

        // Add the ImageView to the center of the BorderPane
        this.parent.setCenter(imageView);
    }

    @Override
    public void start(Stage stage) throws Exception {

        // Setup and display the stage
        this.setupStage(stage);
    }

    private void setupStage(Stage stage) {

        // Create a scene with the BorderPane as the root
        Scene scene = new Scene(this.parent, 640, 480);

        // Set the stage title
        stage.setTitle("Drag and Drop in JavaFX: Simplifying User Interactions");

        // Set the scene for the stage
        stage.setScene(scene);

        // Center the stage on the screen
        stage.centerOnScreen();

        // Display the stage
        stage.show();
    }

}
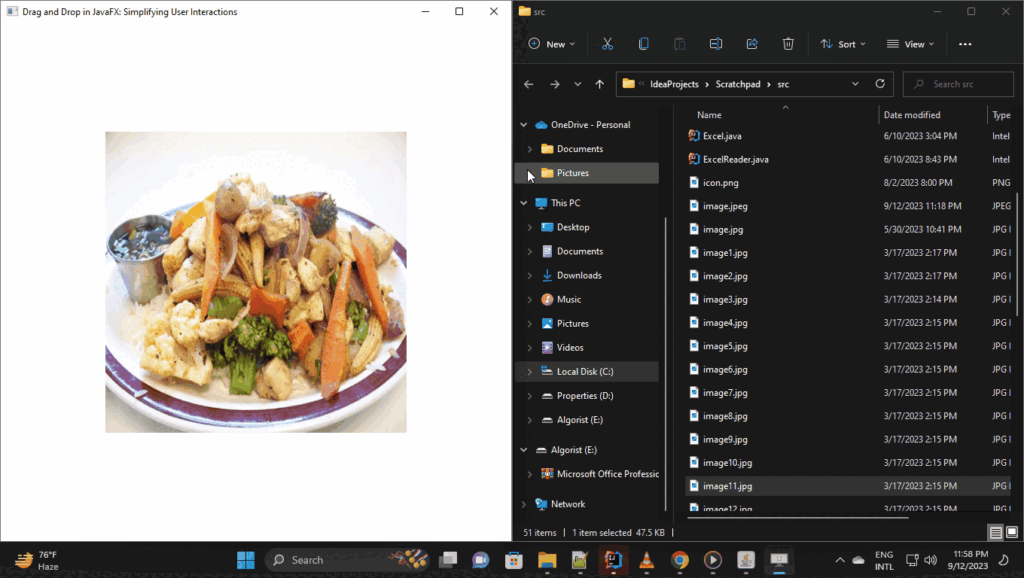
Allowing URL Drops
If you want to allow users to drop URLs onto your application, you can check for URL data on the dragboard:
import javafx.application.Application;
import javafx.scene.Scene;
import javafx.scene.control.Label;
import javafx.scene.input.Dragboard;
import javafx.scene.input.TransferMode;
import javafx.scene.layout.*;
import javafx.stage.Stage;

public class Main extends Application {

    // The parent layout manager
    private final BorderPane parent = new BorderPane();

    @Override
    public void init() throws Exception {
        super.init();

        // Build the user interface
        this.buildUI();
    }

    private void buildUI() {

        // Create a Label as the drop target
        Label targetNode = new Label("Drop here!");

        // Define behavior for the Label when a drag enters
        targetNode.setOnDragOver(event -> {

            if (event.getGestureSource() != targetNode && event.getDragboard().hasString()) {
                event.acceptTransferModes(TransferMode.COPY_OR_MOVE);
            }

            event.consume();
        });

        // Define behavior for the Label when a drop occurs
        targetNode.setOnDragDropped(event -> {

            Dragboard db = event.getDragboard();
            boolean success = false;

            if (db.hasUrl()) {

                // Process the dropped data here (in this case, it's a URL)
                String data = db.getUrl();

                // Perform necessary actions with the data
                // Update the drop target text with the URL
                targetNode.setText(data);

                success = true;

            }

            // Set the drop completed status
            event.setDropCompleted(success);
            event.consume();
        });

        // Add the Label to the center of the BorderPane
        this.parent.setCenter(targetNode);
    }

    @Override
    public void start(Stage stage) throws Exception {

        // Setup and display the stage
        this.setupStage(stage);
    }

    private void setupStage(Stage stage) {

        // Create a scene with the BorderPane as the root
        Scene scene = new Scene(this.parent, 640, 480);

        // Set the stage title
        stage.setTitle("Drag and Drop in JavaFX: Simplifying User Interactions");

        // Set the scene for the stage
        stage.setScene(scene);

        // Center the stage on the screen
        stage.centerOnScreen();

        // Display the stage
        stage.show();

    }

}
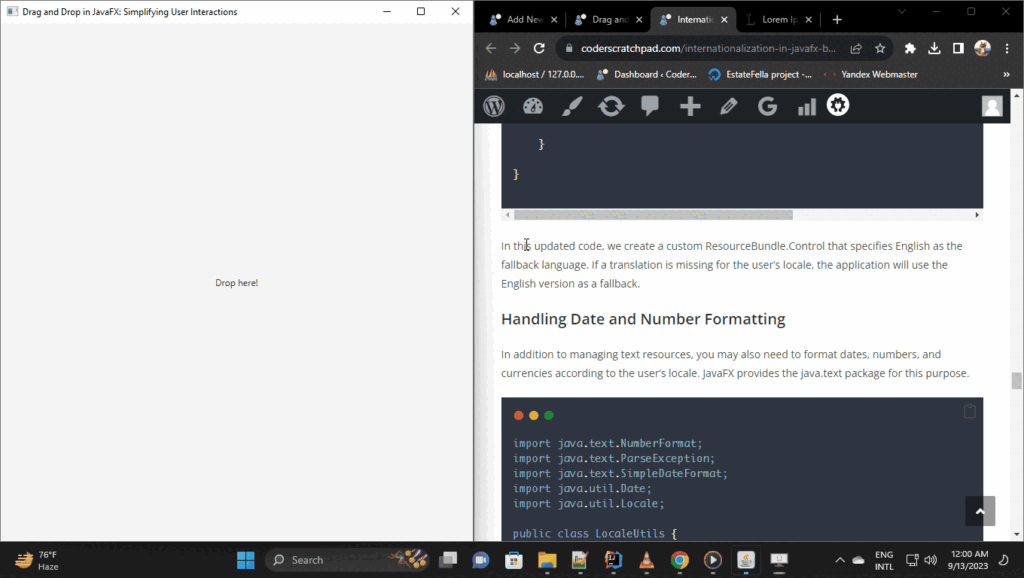
Then, you can handle URLs along with files in the drop operation code.
By implementing external drags in your JavaFX application, you enhance the user experience by allowing users to interact with your application seamlessly, whether they’re dragging files from their file system or URLs from their web browser, making your application more versatile and user-friendly.
Best Practices for Drag and Drop in JavaFX
To create a seamless and user-friendly Drag and Drop experience in your JavaFX application, consider these best practices:
Visual Feedback
Provide visual cues to indicate the drag-and-drop state. For example, change the cursor shape or highlight the target area when it’s a valid drop target.
Proper Data Transfer
Ensure that the data transfer between the source and target is well-defined and handles various data types appropriately. Use the ClipboardContent class to encapsulate the data being transferred.
Error Handling
Implement error handling to gracefully handle cases where the drop operation fails or encounters issues. Provide informative feedback to users if a drop is unsuccessful.
Accessibility
Make sure your drag-and-drop functionality is accessible to users with disabilities. Provide keyboard-based alternatives and ensure compatibility with screen readers.
Testing and User Feedback
Thoroughly test your drag-and-drop implementation to identify and fix any issues. Consider seeking user feedback to make improvements and refine the user experience.
Conclusion
Drag and drop functionality is a valuable addition to JavaFX applications, enhancing user interaction and usability. With JavaFX’s built-in support for drag and drop, you can easily implement this feature in your applications, from simple draggable buttons to more complex scenarios. Understanding the key components and event handling is crucial to successfully implementing drag and drop in JavaFX. As you become more proficient with these techniques, you can create dynamic and user-friendly applications that improve the overall user experience.
I hope you found this article informative and useful. If you would like to receive more content, please consider subscribing to our newsletter.
