In the world of mobile apps, images are everywhere. But have you ever heard of SVG images? Unlike regular image formats like PNG or JPEG, SVG (Scalable Vector Graphics) images are special because they can be resized without losing quality. Think of them like drawings that can stretch big or shrink small, but always look sharp. In this article, we will learn how to display SVG images in Flutter.
What is an SVG Image?
An SVG image is a type of image made using vectors, not pixels. This means you can make the image as big or as small as you want, and it will always stay crisp and clear, no matter the size. It’s perfect for things like logos, icons, and other images that need to look good on different screen sizes.
In Flutter, we can easily display SVG images using a special tool. Let’s dive into how to use it!
Setting Up Your Flutter Project to Use SVG Images
Before we start displaying SVG images, we need to add some tools to our project. Don’t worry; it’s super easy!
Step 1: Install the flutter_svg package
First, we need to add the flutter_svg package, which helps Flutter understand how to work with SVG images. You can think of it like a translator for SVG images.
Open your pubspec.yaml file (this is like your app’s shopping list for packages), and add the following line:
dependencies:
  flutter_svg: ^2.0.17
Once you’ve added it, run this command in your terminal to install the package:
flutter pub getNow Flutter knows how to handle SVG images!
Displaying a Simple SVG Image
With flutter_svg installed, let’s start using it. The easiest way to display an SVG image is to store it in your app’s assets.
Step 1: Add the SVG to your project’s assets
Place your SVG image in the assets folder of your Flutter project. For example, let’s say you have an SVG image called logo.svg.
In your pubspec.yaml file, add the following under flutter:
flutter:
  assets:
    - assets/images/logo.svg
Step 2: Use the SvgPicture.asset() method
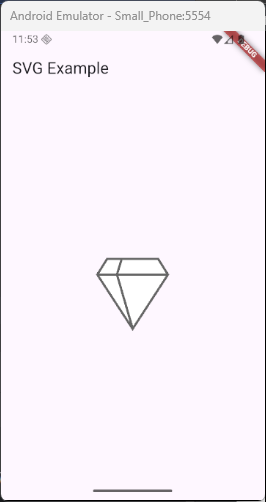
Now that we’ve added the image to our assets, we can display it like this:
import 'package:flutter/material.dart';
import 'package:flutter_svg/flutter_svg.dart';

void main() {
  runApp(const MyApp());
}

class MyApp extends StatelessWidget {
  const MyApp({super.key});

  @override
  Widget build(BuildContext context) {
    return MaterialApp(
      home: Scaffold(
        appBar: AppBar(title: Text('SVG Example')),
        body: Center(
          child: SvgPicture.asset(
            'assets/images/logo.svg',
            width: 150,
            height: 150,
          ),
        ),
      ),
    );
  }
}
And just like that, your SVG image will appear on the screen! It’s that simple.

Customizing SVG Display
Now that we know how to display an SVG image, let’s make it fit nicely on the screen.
Resizing the Image
You can change the size of the SVG by adjusting the width and height properties. Here’s how:
import 'package:flutter/material.dart';
import 'package:flutter_svg/flutter_svg.dart';

void main() {
  runApp(const MyApp());
}

class MyApp extends StatelessWidget {
  const MyApp({super.key});

  @override
  Widget build(BuildContext context) {
    return MaterialApp(
      home: Scaffold(
        appBar: AppBar(title: Text('SVG Example')),
        body: Center(
          child: SvgPicture.asset(
            'assets/images/logo.svg',
            width: 200, // Set the width
            height: 100, // Set the height
          ),
        ),
      ),
    );
  }
}
Adjusting the Fit
You can also control how the SVG image fits in its container using the fit property. For example, if you want it to fill the container, you can set it to BoxFit.fill:
import 'package:flutter/material.dart';
import 'package:flutter_svg/flutter_svg.dart';

void main() {
  runApp(const MyApp());
}

class MyApp extends StatelessWidget {
  const MyApp({super.key});

  @override
  Widget build(BuildContext context) {
    return MaterialApp(
      home: Scaffold(
        appBar: AppBar(title: Text('SVG Example')),
        body: Center(
          child: SvgPicture.asset(
            'assets/images/logo.svg',
            fit: BoxFit.fill, // Makes the SVG fill the container
          ),
        ),
      ),
    );
  }
}
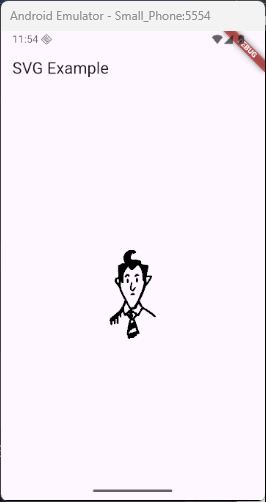
Displaying SVG Images from Network URLs
What if your SVG image isn’t saved in your project but is instead on the internet? You can still use flutter_svg to load it directly from a URL!
Here’s how you can load an SVG image from a web address:
import 'package:flutter/material.dart';
import 'package:flutter_svg/flutter_svg.dart';

void main() {
  runApp(const MyApp());
}

class MyApp extends StatelessWidget {
  const MyApp({super.key});

  @override
  Widget build(BuildContext context) {
    return MaterialApp(
      home: Scaffold(
        appBar: AppBar(title: Text('SVG Example')),
        body: Center(
          child: SvgPicture.network(
            'https://www.svgrepo.com/show/428280/character01.svg',
          ),
        ),
      ),
    );
  }
}
This is great if you want to show SVG images that might change or need to be updated from time to time.
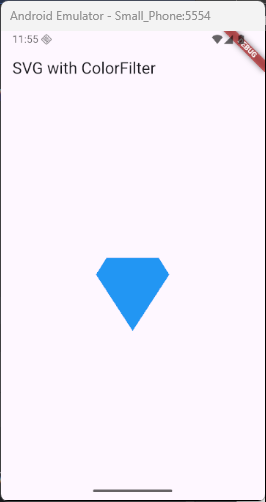
Handling SVG Image Colors
One of the coolest things about SVG images is that you can easily change their colors. Let’s say you have an SVG icon and want to make it match the color of your app’s theme.
You can do this by using the colorFilter property:
import 'package:flutter/material.dart';
import 'package:flutter_svg/flutter_svg.dart';

void main() {
  runApp(const MyApp());
}

class MyApp extends StatelessWidget {
  const MyApp({super.key});

  @override
  Widget build(BuildContext context) {
    return MaterialApp(
      home: Scaffold(
        appBar: AppBar(title: Text('SVG with ColorFilter')),
        body: Center(
          child: SvgPicture.asset(
            'assets/images/logo.svg',
            colorFilter: ColorFilter.mode(Colors.blue, BlendMode.srcATop),
            width: 100,
            height: 100,
          ),
        ),
      ),
    );
  }
}
This way, you can make sure the SVG icon fits perfectly with your app’s look.
Handling Errors and Placeholders
Sometimes, things don’t go as planned, and it’s important to handle errors gracefully. You can use errorBuilder and placeholderBuilder to manage errors and provide a placeholder image while the SVG is loading. Here’s how you can use these features:
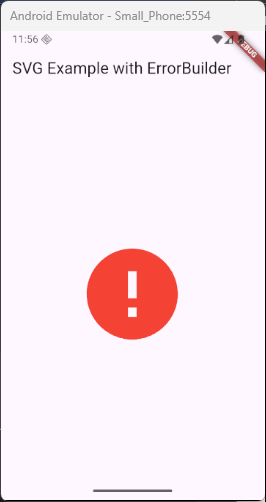
Using errorBuilder
The errorBuilder allows you to handle any errors that occur when loading the SVG. For example, if the SVG file is missing or corrupted, you can show a fallback image or message.
Here’s how to use errorBuilder:
import 'package:flutter/material.dart';
import 'package:flutter_svg/flutter_svg.dart';

void main() {
  runApp(const MyApp());
}

class MyApp extends StatelessWidget {
  const MyApp({super.key});

  @override
  Widget build(BuildContext context) {
    return MaterialApp(
      home: Scaffold(
        appBar: AppBar(title: Text('SVG Example with ErrorBuilder')),
        body: Center(
          child: SvgPicture.asset(
            'assets/images/missing_logo.svg',
            width: 150,
            height: 150,
            // Handling errors with errorBuilder
            errorBuilder: (context, error, stackTrace) {
              return Icon(
                Icons.error,
                color: Colors.red,
                size: 150,
              ); // Fallback icon
            },
          ),
        ),
      ),
    );
  }
}
In this example, if missing_logo.svg is not found or fails to load, an error icon will be displayed instead of a blank space.
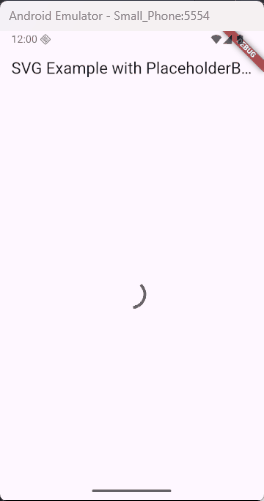
Using placeholderBuilder
Sometimes, you may want to show a placeholder while the SVG image is still loading, especially if the image is hosted online or might take some time to load. The placeholderBuilder allows you to show a widget while the SVG is being loaded.
Here’s how to use placeholderBuilder:
import 'package:flutter/material.dart';
import 'package:flutter_svg/flutter_svg.dart';

void main() {
  runApp(const MyApp());
}

class MyApp extends StatelessWidget {
  const MyApp({super.key});

  @override
  Widget build(BuildContext context) {
    return MaterialApp(
      home: Scaffold(
        appBar: AppBar(title: Text('SVG Example with PlaceholderBuilder')),
        body: Center(
          child: SvgPicture.network(
            'https://www.svgrepo.com/show/428280/character01.svg',
            // Show a CircularProgressIndicator while the SVG is loading
            placeholderBuilder:
                (context) => Center(
                  child: CircularProgressIndicator(), // Placeholder widget
                ),
          ),
        ),
      ),
    );
  }
}
In this case, while the SVG image is loading, a CircularProgressIndicator will be displayed. Once the image has finished loading, it will replace the placeholder.
Combining errorBuilder and placeholderBuilder
You can combine both errorBuilder and placeholderBuilder to improve user experience. This ensures that if there’s an error loading the image, a fallback option will be shown, and while the image is still loading, a placeholder will be displayed.
Here’s an example:
import 'package:flutter/material.dart';
import 'package:flutter_svg/flutter_svg.dart';

void main() {
  runApp(const MyApp());
}

class MyApp extends StatelessWidget {
  const MyApp({super.key});

  @override
  Widget build(BuildContext context) {
    return MaterialApp(
      home: Scaffold(
        appBar: AppBar(title: Text('SVG Example with Error and Placeholder')),
        body: Center(
          child: SvgPicture.network(
            'https://www.svgrepo.com/show/428280/character01.svg',
            // Show a placeholder while loading
            placeholderBuilder:
                (context) => Center(child: CircularProgressIndicator()),
            // Show an error icon if the image fails to load
            errorBuilder: (context, error, stackTrace) {
              return Icon(Icons.error, color: Colors.red, size: 150);
            },
          ),
        ),
      ),
    );
  }
}
In this example:
placeholderBuildershows aCircularProgressIndicatorwhile the SVG is loading.- If there is an issue with loading the SVG (e.g., file not found or broken SVG),
errorBuilderwill show an error icon.
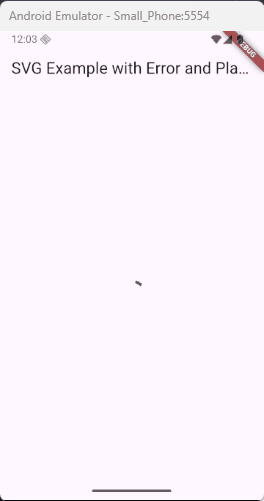
By using errorBuilder and placeholderBuilder, you can ensure that your app provides a smooth user experience, even when things don’t go as planned.
Conclusion
Using SVG images in Flutter is easy and offers a lot of benefits. Whether you want a simple logo, a custom icon, or a scalable image, SVGs are perfect because they always look sharp, no matter the screen size. Now you know how to add SVG images to your Flutter app, resize them, change their colors, and even load them from the web.
Try using SVG images in your next Flutter project and see how they make your app look amazing!