Python Tkinter is a powerful and popular GUI (Graphical User Interface) library that allows developers to create interactive applications with ease. When it comes to designing complex GUI layouts, Tkinter provides several geometry managers, and one of the most commonly used ones is the grid method. The grid geometry manager allows you to organize widgets in a table-like structure, making it straightforward to create responsive and aesthetically pleasing interfaces. In this article, we will walk you through the basics of using the grid geometry manager in Python Tkinter.

with hands-on learning.
get the skills and confidence to land your next move.
Getting Started with Tkinter Grid
Before diving into the code examples, ensure you have Python and Tkinter installed on your system. Tkinter is part of the Python standard library, so you usually don’t need to install anything separately.
Let’s start by creating a basic Tkinter window and placing some widgets using the grid method.
import tkinter as tk


class PyFrame(tk.Tk):

    def __init__(self, width, height):
        super().__init__()

        self.width = width
        self.height = height

        self.geometry(f"{self.width}x{self.height}")

    def center_on_screen(self):
        left = (self.winfo_screenwidth() - self.width) // 2
        top = (self.winfo_screenheight() - self.height) // 2

        self.geometry(f"{self.width}x{self.height}+{left}+{top}")


if __name__ == '__main__':
    # Create the main application window
    root = PyFrame(640, 480)
    root.title("How to Grid Widgets in Python Tkinter")

    # center window on the screen
    root.center_on_screen()

    # Create and place widgets using grid
    label1 = tk.Label(root, text="Label 1")
    label1.grid(row=0, column=0)

    label2 = tk.Label(root, text="Label 2")
    label2.grid(row=1, column=1)

    button1 = tk.Button(root, text="Button 1")
    button1.grid(row=2, column=0, columnspan=2, pady=10)

    # Run the main event loop
    root.mainloop()
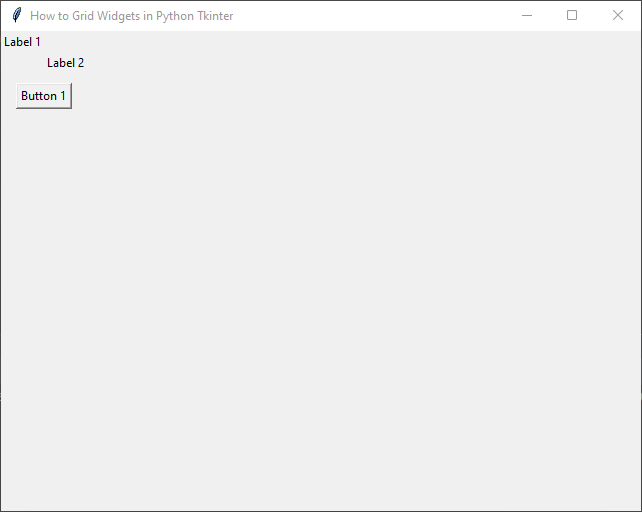
In this example, we first import the tkinter module and create the main application window (root). Then, we create three widgets: two labels (label1 and label2) and a button (button1). We use the grid method to place these widgets on the window.
The row and column arguments of the grid method specify the cell where the widget should be placed. The grid layout starts with row and column indices starting from 0. You can use rowspan and columnspan to make a widget span multiple rows or columns, respectively. The pady argument adds vertical padding (empty space) between the button and the widgets above it.

Organizing Widgets in a Form-Like Layout
The grid geometry manager is particularly useful for creating form-like layouts, where labels and input fields are aligned in rows and columns.
import tkinter as tk


class PyFrame(tk.Tk):

    def __init__(self, width, height):
        super().__init__()

        self.width = width
        self.height = height

        self.geometry(f"{self.width}x{self.height}")

    def center_on_screen(self):
        left = (self.winfo_screenwidth() - self.width) // 2
        top = (self.winfo_screenheight() - self.height) // 2

        self.geometry(f"{self.width}x{self.height}+{left}+{top}")


def submit_form():
    # Retrieve user input from entry widgets
    name = name_entry.get()
    email = email_entry.get()
    password = password_entry.get()

    # Process the data (you can add your own logic here)
    print("Name:", name)
    print("Email:", email)
    print("Password:", password)

    # Clear the entry fields
    name_entry.delete(0, tk.END)
    email_entry.delete(0, tk.END)
    password_entry.delete(0, tk.END)


if __name__ == '__main__':
    # Create the main application window
    root = PyFrame(640, 480)
    root.title("How to Grid Widgets in Python Tkinter")

    # center window on the screen
    root.center_on_screen()

    # Create labels and entry widgets
    name_label = tk.Label(root, text="Name:")
    name_label.grid(row=0, column=0, sticky=tk.E)

    name_entry = tk.Entry(root)
    name_entry.grid(row=0, column=1)

    email_label = tk.Label(root, text="Email:")
    email_label.grid(row=1, column=0, sticky=tk.E)

    email_entry = tk.Entry(root)
    email_entry.grid(row=1, column=1)

    password_label = tk.Label(root, text="Password:")
    password_label.grid(row=2, column=0, sticky=tk.E)

    password_entry = tk.Entry(root, show="*")  # Show * to hide the password
    password_entry.grid(row=2, column=1)

    submit_button = tk.Button(root, text="Submit", command=submit_form)
    submit_button.grid(row=3, column=0, columnspan=2)

    # Run the main event loop
    root.mainloop()
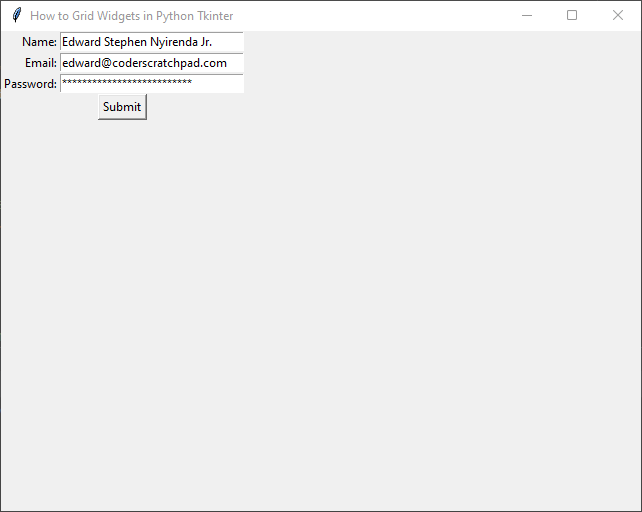
In this example, we create a form-like layout where each row consists of a label followed by an entry widget. The sticky argument is used to define the anchor point within the cell. By default, widgets are centered in their cells, but using sticky=tk.E, we align the labels to the east (right) of their cells, creating a more appealing form layout.

Responsive Grid Layouts
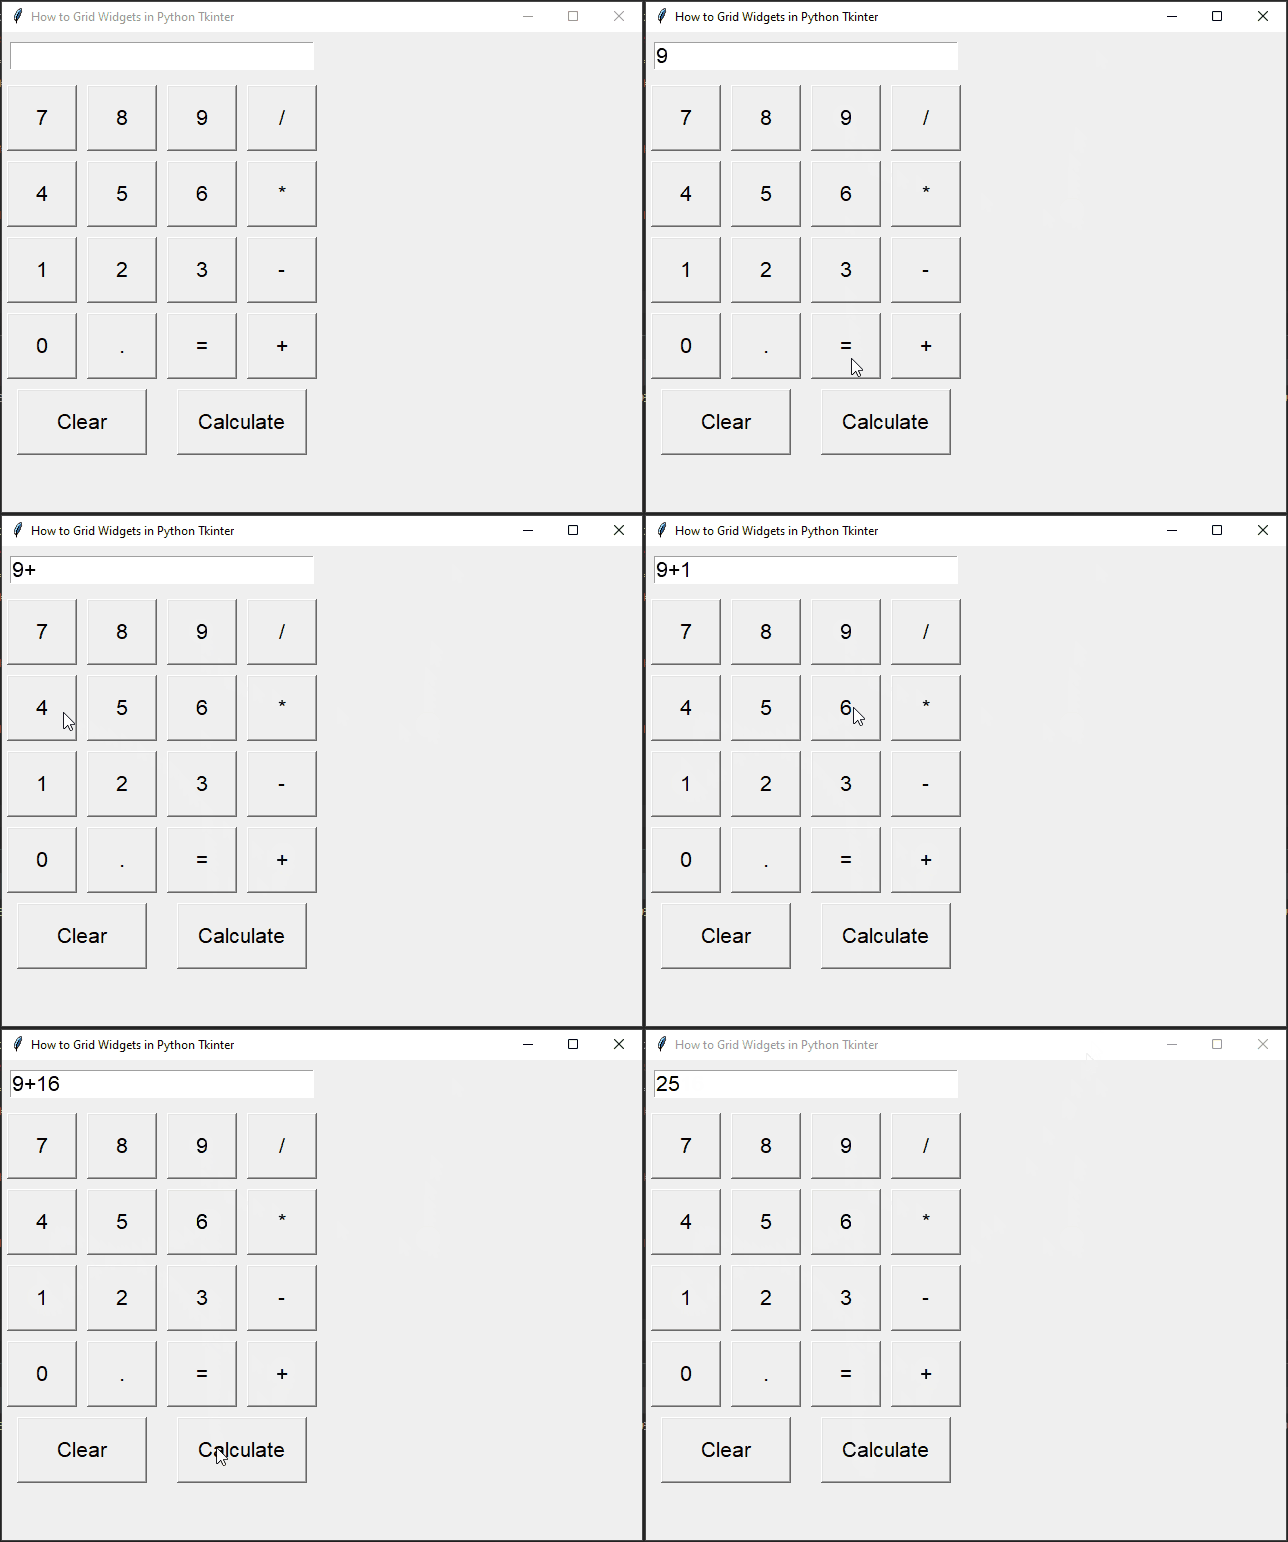
The grid geometry manager allows you to create responsive layouts that adjust according to the window size. To demonstrate this, we’ll create a simple calculator-like interface.
import tkinter as tk


class PyFrame(tk.Tk):

    def __init__(self, width, height):
        super().__init__()

        self.width = width
        self.height = height

        self.geometry(f"{self.width}x{self.height}")

    def center_on_screen(self):
        left = (self.winfo_screenwidth() - self.width) // 2
        top = (self.winfo_screenheight() - self.height) // 2

        self.geometry(f"{self.width}x{self.height}+{left}+{top}")


def on_button_click(number):
    current = entry.get()

    # Perform calculation when the equals button is pressed
    if number == "=":
        calculate()
    else:
        entry.delete(0, tk.END)
        entry.insert(0, current + str(number))


def clear_entry():
    entry.delete(0, tk.END)


def calculate():
    expression = entry.get()
    try:
        result = eval(expression)
        entry.delete(0, tk.END)
        entry.insert(0, result)
    except Exception:
        entry.delete(0, tk.END)
        entry.insert(0, "Error")


if __name__ == '__main__':
    # Create the main application window
    root = PyFrame(640, 480)
    root.title("How to Grid Widgets in Python Tkinter")

    # center window on the screen
    root.center_on_screen()

    # Entry widget to display the input and output
    entry = tk.Entry(root, width=25, font=("Arial", 16))
    entry.grid(row=0, column=0, columnspan=4, pady=10)

    # Buttons for numbers and operations
    button_values = [
        ("7", 1, 0), ("8", 1, 1), ("9", 1, 2), ("/", 1, 3),
        ("4", 2, 0), ("5", 2, 1), ("6", 2, 2), ("*", 2, 3),
        ("1", 3, 0), ("2", 3, 1), ("3", 3, 2), ("-", 3, 3),
        ("0", 4, 0), (".", 4, 1), ("=", 4, 2), ("+", 4, 3)
    ]

    for (value, row, column) in button_values:
        button = tk.Button(root, text=value, width=5, height=2, font=("Arial", 16),
                           command=lambda v=value: on_button_click(v))
        button.grid(row=row, column=column, padx=5, pady=5)

    clear_button = tk.Button(root, text="Clear", width=10, height=2, font=("Arial", 16), command=clear_entry)
    clear_button.grid(row=5, column=0, columnspan=2, padx=5, pady=5)

    equals_button = tk.Button(root, text="Calculate", width=10, height=2, font=("Arial", 16), command=calculate)
    equals_button.grid(row=5, column=2, columnspan=2, padx=5, pady=5)

    # Run the main event loop
    root.mainloop()
In this example, we create a simple calculator interface using grid to arrange the buttons. The calculator layout automatically adjusts its size based on the window dimensions, making it responsive to different screen sizes.

Conclusion
The grid geometry manager in Python Tkinter is a powerful tool for arranging widgets in a flexible and aesthetically pleasing manner. Its table-like layout makes it ideal for creating form-like interfaces, calculators, and other responsive applications.
In this article, we covered the basics of using the grid method, demonstrated how to create a form layout and a responsive calculator interface, and provided full code examples for each case.
Now you have a solid foundation to start creating your own complex GUIs using Tkinter’s grid geometry manager. Feel free to experiment with different configurations and designs to build custom interfaces tailored to your specific needs.
I hope you found this code informative and useful. If you would like to receive more content, please consider subscribing to our newsletter!


