Lighting can significantly enhance the visual appeal of user interfaces and graphics in JavaFX applications. One of the powerful lighting effects available in JavaFX is the Light.Point. In this article, we will explore how to use the Light.Point effect to add depth, shading, and realism to your JavaFX application’s graphical elements. You will learn how to create a simple example application and manipulate various properties of the Light.Point effect to achieve stunning visual effects.

with hands-on learning.
get the skills and confidence to land your next move.
Understanding the Light.Point Effect
The Light.Point effect is a type of light source in JavaFX that simulates light originating from a single point in space. This light source can be positioned anywhere in the 3D scene and can be used to illuminate graphical objects, creating realistic lighting and shading effects. By changing the position, color, and intensity of the Light.Point, you can create dramatic visual effects that make your JavaFX applications more engaging.
Key characteristics of the Light.Point effect include:
- Position: You can specify the exact position of the light source in the 3D space using three coordinates: X, Y, and Z. These coordinates determine the direction and intensity of the light.
- Color: You can set the color of the light source to any desired hue, creating a spectrum of lighting effects. The color affects the appearance of objects when illuminated by the point light.
- Intensity: The intensity of the Light.Point controls how strong the light source shines. A higher intensity results in brighter illumination, while a lower intensity creates a softer, subtler effect.
Creating a JavaFX Application with Light.Point
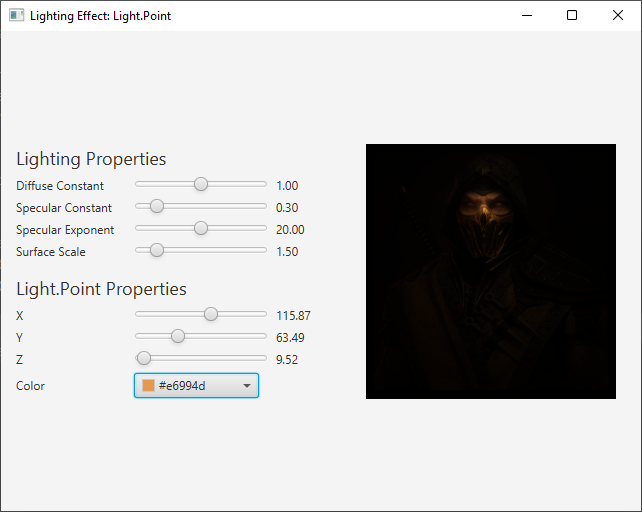
To understand how the Light.Point effect works, let’s create a simple JavaFX application that utilizes this lighting effect. The example application will load an image and apply the Light.Point effect to it, allowing you to manipulate the lighting properties in real-time.
Here is the code for the sample JavaFX application:
import javafx.application.Application;
import javafx.scene.Scene;
import javafx.scene.effect.Light;
import javafx.scene.effect.Lighting;
import javafx.scene.image.Image;
import javafx.scene.image.ImageView;
import javafx.scene.layout.BorderPane;
import javafx.stage.Stage;

public class PointLightApp extends Application {

    private static final double WIDTH = 640;
    private static final double HEIGHT = 480;

    // The parent layout manager for the application's UI
    private final BorderPane parent = new BorderPane();

    @Override
    public void start(Stage stage) throws Exception {

        Scene scene = new Scene(this.parent, WIDTH, HEIGHT);

        // Set the stage title
        stage.setTitle("Lighting Effect: Light.Point");

        // Set the stage scene
        stage.setScene(scene);

        // Center the stage on the screen
        stage.centerOnScreen();

        // Show the stage on the screen
        stage.show();
    }

    @Override
    public void init() throws Exception {
        super.init();

        // Load an image from a file
        Image image = new Image("scorpion.jpg");

        // Create an ImageView for the loaded image
        ImageView imageView = new ImageView(image);
        imageView.setPreserveRatio(true);
        imageView.setFitWidth(250);

        // Create a Point Light source
        Light.Point pointLight = new Light.Point();

        // Create a Lighting effect and set the light source
        Lighting lighting = new Lighting();
        lighting.setLight(pointLight);

        // Apply the Lighting effect to the ImageView
        imageView.setEffect(lighting);

        // Add the ImageView to the BorderPane's center region
        this.parent.setCenter(imageView);

        // Create a control panel for configuring the Lighting and Point Light properties
        LightingControlPanel lightingControlPanel = new LightingControlPanel(lighting, pointLight);
        this.parent.setLeft(lightingControlPanel);
    }

}
In this JavaFX application, we start by creating a Light.Point object called pointLight and a Lighting effect called lighting. We then apply the Lighting effect to an ImageView displaying an image. The Light.Point object acts as the light source, and its properties can be modified through a control panel.
Customizing Light.Point Properties
To make your lighting effect more interesting and adaptable, you can customize the properties of the Light.Point source. JavaFX provides several properties that you can tweak to control the behavior of the light source. These properties include:
- xProperty(): Determines the x-coordinate of the light source.
- yProperty(): Determines the y-coordinate of the light source.
- zProperty(): Determines the z-coordinate of the light source. This property allows you to control the depth of the light source in a 3D space.
- colorProperty(): Specifies the color of the light source.
To demonstrate how to customize these properties, we can create a control panel that allows users to adjust the Light.Point properties in real-time. Let’s create such a control panel in JavaFX:
import javafx.beans.property.DoubleProperty;
import javafx.geometry.Insets;
import javafx.geometry.Pos;
import javafx.scene.Node;
import javafx.scene.control.ColorPicker;
import javafx.scene.control.Label;
import javafx.scene.control.Slider;
import javafx.scene.effect.Light;
import javafx.scene.effect.Lighting;
import javafx.scene.layout.HBox;
import javafx.scene.layout.VBox;
import javafx.scene.paint.Color;
import javafx.scene.text.Font;

public class LightingControlPanel extends VBox {

    /**
     * Constructor for the LightingControlPanel.
     *
     * @param lighting The Lighting object to configure.
     * @param pointLight The Point Light object to configure.
     */
    public LightingControlPanel(Lighting lighting, Light.Point pointLight) {
        super(15);

        // Create a label for lighting properties
        Label lightingPropertiesHeader = new Label("Lighting Properties");
        lightingPropertiesHeader.setFont(new Font(18.0));

        // Create a VBox for lighting properties with sliders
        VBox lightingProperties = new VBox(
                5,
                lightingPropertiesHeader,
                createLabeledBoundSlider(lighting.diffuseConstantProperty(), "Diffuse Constant", 2.0, 1.0),
                createLabeledBoundSlider(lighting.specularConstantProperty(), "Specular Constant", 2.0, 0.3),
                createLabeledBoundSlider(lighting.specularExponentProperty(), "Specular Exponent", 40.0, 20.0),
                createLabeledBoundSlider(lighting.surfaceScaleProperty(), "Surface Scale", 10.0, 1.5)
        );

        // Create a label for point light properties
        Label pointLightPropertiesHeader = new Label("Light.Point Properties");
        pointLightPropertiesHeader.setFont(new Font(18.0));

        // Create the ColorPicker, and set DARKGREY as the default color
        ColorPicker colorPicker = new ColorPicker(Color.DARKGREY);

        // Bind the Light.Point colorProperty to the ColorPicker valueProperty
        pointLight.colorProperty().bind(colorPicker.valueProperty());

        // Create the HBox to arrange the Label, and the ColorPicker
        HBox colorContainer = this.createLabeledNode( 40, colorPicker, "Color" );

        // Create a VBox for point light properties with sliders
        VBox pointLightProperties = new VBox(
                5,
                pointLightPropertiesHeader,
                createLabeledBoundSlider(pointLight.xProperty(), "X", 200.0, 0.0),
                createLabeledBoundSlider(pointLight.yProperty(), "Y", 200.0, 0.0),
                createLabeledBoundSlider(pointLight.zProperty(), "Z", 200.0, 0.0),
                colorContainer
        );

        // Add lighting and point light property sections to the main VBox
        getChildren().addAll(
                lightingProperties,
                pointLightProperties
        );

        // Set alignment and padding for the control panel
        setAlignment(Pos.CENTER_LEFT);
        setPadding(new Insets(15));
    }

    /**
     * Create an HBox with a labeled bound slider for a property.
     *
     * @param property The DoubleProperty to bind to the slider.
     * @param label The label for the slider.
     * @param max The maximum value for the slider.
     * @param defaultValue The default value for the slider.
     * @return An HBox containing the labeled slider and its value label.
     */
    private HBox createLabeledBoundSlider(DoubleProperty property, String label, double max, double defaultValue) {
        Slider slider = new Slider(0.0, max, defaultValue);
        property.bind(slider.valueProperty());

        Label value = new Label();
        value.setMinWidth(50);
        value.textProperty().bind(slider.valueProperty().asString("%.2f"));

        Label lblLabel = new Label(String.format("%-20s", label));
        lblLabel.setMinWidth(110);
        lblLabel.setAlignment(Pos.CENTER_LEFT);

        return new HBox(5, lblLabel, slider, value);
    }

    private HBox createLabeledNode(double spacing, Node node, String label) {

        HBox container = new HBox(
                spacing,
                new Label(String.format("%-20s", label)),
                node
        );

        container.setAlignment(Pos.CENTER_LEFT);

        return container;

    }

}
This LightingControlPanel class provides a user interface for adjusting the properties of the Light.Point and Lighting effect in real-time. Users can change the color of the light source, its position in the 3D space, and various lighting properties such as diffuseConstant, specularConstant, specularExponent, and surfaceScale.

Conclusion
In this article, we created a simple JavaFX application that demonstrates the use of the Light.Point effect. We explored how to create a point light source, apply it to an image, and manipulate its properties using a control panel. By running the application and adjusting the lighting parameters, you can gain valuable insights into how the Light.Point effect can transform the visual experience of your JavaFX applications.
I hope you found this article informative and useful. If you would like to receive more content, please consider subscribing to our newsletter.


