JavaFX is a powerful framework for creating graphical user interfaces in Java. It offers a wide range of features and effects to enhance the visual appeal of your Java applications. One such effect is the PerspectiveTransform, which allows you to apply a 3D-like perspective distortion to your JavaFX elements. In this article, we will explore the PerspectiveTransform effect, providing a practical example and demonstrating how to control it using sliders.

with hands-on learning.
get the skills and confidence to land your next move.
What is PerspectiveTransform?
The PerspectiveTransform is a JavaFX effect that allows you to apply a perspective transformation to a graphical node. This transformation distorts the node, making it look like it’s viewed from a certain perspective. It’s a handy tool for creating visual effects like skewed images, simulated 3D views, and more.
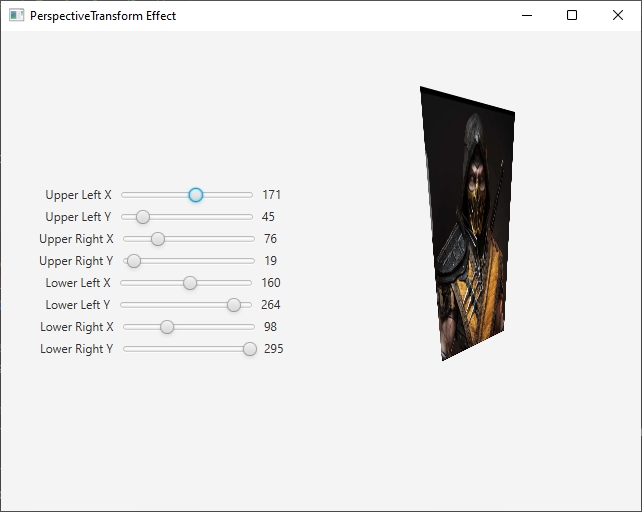
In this article, we’ll create a simple example that demonstrates the PerspectiveTransform effect using JavaFX. We’ll create a user interface that enables us to adjust the perspective of an image in real-time.
Building a PerspectiveTransform Example
To demonstrate the power of the PerspectiveTransform effect, we will create a JavaFX application that allows you to manipulate an image’s perspective in real-time using sliders. This application consists of two main components: the image itself and a control panel with sliders for adjusting the PerspectiveTransform properties.
import javafx.application.Application;
import javafx.geometry.Insets;
import javafx.geometry.Pos;
import javafx.scene.Scene;
import javafx.scene.effect.PerspectiveTransform;
import javafx.scene.image.Image;
import javafx.scene.image.ImageView;
import javafx.scene.layout.BorderPane;
import javafx.stage.Stage;

public class PerspectiveTransformEffectExampleApp extends Application {

    private static final double WIDTH = 640;
    private static final double HEIGHT = 480;

    /* The parent layout manager */
    private final BorderPane parent = new BorderPane();

    @Override
    public void start(Stage stage) throws Exception {

        Scene scene = new Scene(this.parent, WIDTH, HEIGHT);

        // Sets the stage title
        stage.setTitle("PerspectiveTransform Effect");

        // Set the stage scene
        stage.setScene(scene);

        // Center stage on screen
        stage.centerOnScreen();

        // Show stage on screen
        stage.show();

    }

    @Override
    public void init() throws Exception {
        super.init();

        Image image = new Image("scorpion.jpg");

        ImageView imageView = new ImageView(image);
        imageView.setPreserveRatio(true);
        imageView.setFitWidth(400);

        // Create the PerspectiveTransform
        PerspectiveTransform perspectiveTransform = new PerspectiveTransform();

        // Create the Control Panel for the PerspectiveTransform
        PerspectiveTransformControlPanel controlPanel = new PerspectiveTransformControlPanel(perspectiveTransform);

        // Apply the PerspectiveTransform Effect to the ImageView
        imageView.setEffect(perspectiveTransform);

        /* Add the ImageView to the BorderPane right region */
        this.parent.setRight(imageView);
        BorderPane.setAlignment(imageView, Pos.CENTER);
        BorderPane.setMargin(imageView, new Insets(15));

        /* Add the PerspectiveTransformControlPanel to the BorderPane left region */
        this.parent.setLeft(controlPanel);

    }

}
In this application, we use an image (in this case, “scorpion.jpg”) and apply the PerspectiveTransform effect to it. The PerspectiveTransformControlPanel class helps control the effect by providing sliders to adjust the perspective properties.
Creating the PerspectiveTransform Control Panel
The PerspectiveTransformControlPanel class is responsible for providing the user interface to control the perspective transformation. It includes sliders to adjust various properties of the transformation:
import javafx.geometry.Insets;
import javafx.geometry.Pos;
import javafx.scene.control.Label;
import javafx.scene.control.Slider;
import javafx.scene.effect.PerspectiveTransform;
import javafx.scene.layout.HBox;
import javafx.scene.layout.VBox;

public class PerspectiveTransformControlPanel extends VBox {

    public PerspectiveTransformControlPanel(PerspectiveTransform transform) {
        super(5);

        // Create sliders for adjusting PerspectiveTransform properties
        Slider upperLeftX = new Slider(0, 300, 171);
        Slider upperLeftY = new Slider(0, 300, 45);
        Slider upperRightX = new Slider(0, 300, 76);
        Slider upperRightY = new Slider(0, 300, 19);

        Slider lowerLeftX = new Slider(0, 300, 160);
        Slider lowerLeftY = new Slider(0, 300, 264);
        Slider lowerRightX = new Slider(0, 300, 98);
        Slider lowerRightY = new Slider(0, 300, 295);

        // Bind the sliders to PerspectiveTransform properties
        transform.ulxProperty().bind(upperLeftX.valueProperty());
        transform.ulyProperty().bind(upperLeftY.valueProperty());
        transform.urxProperty().bind(upperRightX.valueProperty());
        transform.uryProperty().bind(upperRightY.valueProperty());

        transform.llxProperty().bind(lowerLeftX.valueProperty());
        transform.llyProperty().bind(lowerLeftY.valueProperty());
        transform.lrxProperty().bind(lowerRightX.valueProperty());
        transform.lryProperty().bind(lowerRightY.valueProperty());

        // Create a VBox to arrange Sliders
        this.getChildren().addAll(
                this.createLabeledSlider(upperLeftX, "Upper Left X"),
                this.createLabeledSlider(upperLeftY, "Upper Left Y"),
                this.createLabeledSlider(upperRightX, "Upper Right X"),
                this.createLabeledSlider(upperRightY, "Upper Right Y"),
                this.createLabeledSlider(lowerLeftX, "Lower Left X"),
                this.createLabeledSlider(lowerLeftY, "Lower Left Y"),
                this.createLabeledSlider(lowerRightX, "Lower Right X"),
                this.createLabeledSlider(lowerRightY, "Lower Right Y")
        );

        this.setAlignment(Pos.CENTER_LEFT);
        this.setPadding(new Insets(15));

    }

    private HBox createLabeledSlider(Slider slider, String label) {

        Label value = new Label();
        value.setMinWidth(50);

        // Format the slider value with two decimal places
        value.textProperty().bind(slider.valueProperty().asString("%.0f"));

        Label lblLabel = new Label(String.format("%20s", label));
        lblLabel.setMinWidth(80);
        lblLabel.setAlignment(Pos.CENTER_RIGHT);

        // Create the HBox to arrange UI components
        HBox container = new HBox(5, lblLabel, slider, value);
        container.setAlignment(Pos.CENTER);

        return container;

    }

}
In the PerspectiveTransformControlPanel class, we create sliders for each of the PerspectiveTransform properties, such as ulxProperty() for the upper-left X-coordinate. We bind the sliders to these properties to enable real-time adjustments. These adjustments will dynamically affect the perspective of the image, creating a visually engaging effect. This control panel provides an intuitive way for users to experiment with the PerspectiveTransform effect, adjusting the four corners of the image and observing the resulting transformations in real-time.
Conclusion
The PerspectiveTransform effect in JavaFX provides a powerful way to add depth and dimension to your user interface elements, making your applications more engaging and visually appealing. Whether you want to simulate page flipping, create 3D card rotations, or explore other creative possibilities, PerspectiveTransform opens the door to a world of visual effects.
I hope you found this article informative and useful. If you would like to receive more content, please consider subscribing to our newsletter.
