
PyQt is a set of Python bindings for the Qt application framework, enabling developers to create cross-platform applications with ease. QSlider is one of the many widgets available in PyQt, which allows users to select a value from a range by moving a slider thumb. It is a versatile and essential component for building interactive GUI applications.
In this article, we will explore the PyQt QSlider, discussing its features, properties, signals, and how to use it in various scenarios. We will provide full code examples to demonstrate the concepts discussed.
What is QSlider?
The QSlider is a widget in PyQt that allows users to choose a numeric value within a predefined range by dragging a slider handle. It is often used to control settings such as volume, brightness, or any other numeric parameter that can be adjusted within a range.
QSlider can be used in both vertical and horizontal orientations, and you can customize its appearance and behavior according to your application’s needs. You can set the minimum and maximum values, control the step size, and connect signals to track changes in the slider’s position.
Creating a Basic QSlider
Before we dive into QSlider, make sure you have PyQt installed. If not, you can install it using pip:
pip install pyqt6Let’s start by creating a basic PyQt application with a QSlider and a QLabel to display the current slider value.
import sys
from PyQt6.QtCore import Qt
from PyQt6.QtWidgets import *
# Create a QMainWindow subclass
class AppWindow(QMainWindow):
def __init__(self, title, width, height, left=100, top=100):
super().__init__()
# Set the window title
self.setWindowTitle(title)
# Set the window location and size
self.setGeometry(left, top, width, height)
# Create a central widget to hold the layout
self.central_widget = QWidget()
self.setCentralWidget(self.central_widget)
# Initialize the user interface
self.initUI()
def initUI(self):
# Create a QVBoxLayout for the central widget
layout = QVBoxLayout(self.central_widget)
# Set spacing between widgets
layout.setSpacing(10)
# Set the alignment of the layout (optional)
layout.setAlignment(Qt.AlignmentFlag.AlignCenter)
# Create a QSlider widget
slider = QSlider()
slider.setMinimum(0)
slider.setValue(35)
slider.setMaximum(100)
# Connect the slider's valueChanged signal to the slot method
slider.valueChanged.connect(self.on_slider_value_changed)
# Create a QLabel widget to display the slider value
self.label = QLabel(f'{slider.value()}')
# Add the QSlider to the QVBoxLayout
layout.addWidget(slider)
# Add the QLabel to the QVBoxLayout
layout.addWidget(self.label)
def on_slider_value_changed(self, value):
self.label.setText(f'{value}')
def center(self):
# Get the geometry of the screen
screen = QApplication.primaryScreen().size()
# Calculate the center point of the screen
x = (screen.width() - self.width()) // 2
y = (screen.height() - self.height()) // 2
# Move the window to the center
self.move(x, y)
if __name__ == "__main__":
app = QApplication(sys.argv)
# Create a new app window with title and dimensions
window = AppWindow("PyQt QSlider", 640, 480)
# Center the app window on the screen
window.center()
# Show the app window on the screen
window.show()
# Run the application event loop
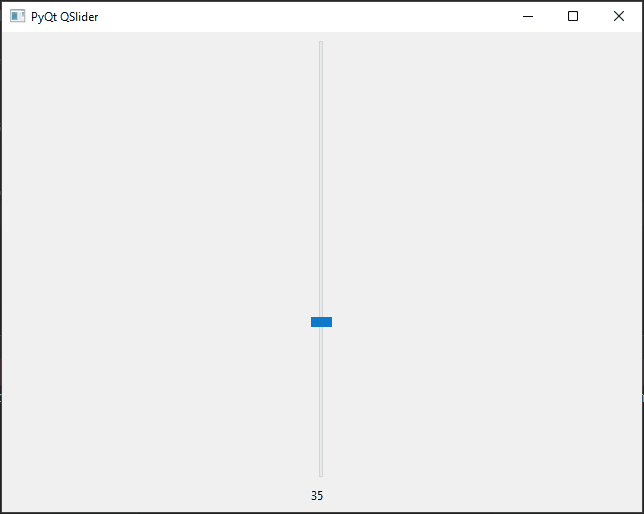
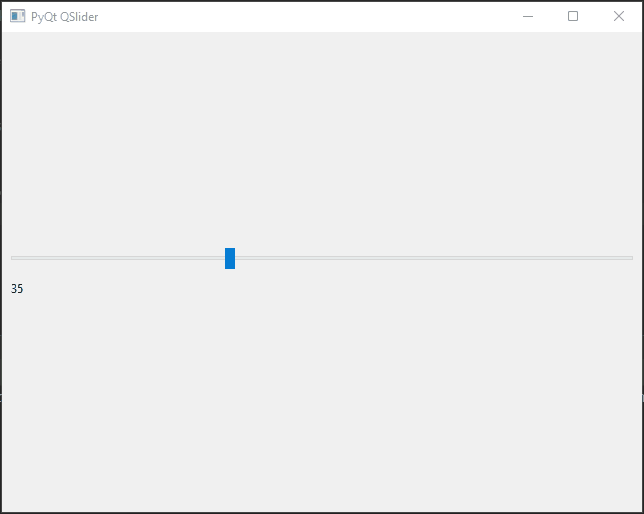
sys.exit(app.exec())In this example, we create a basic PyQt application with a QSlider that has a range from 0 to 100. We also add a QLabel to display the current value of the slider. The valueChanged signal of the QSlider is connected to the on_slider_value_changed slot, which updates the QLabel with the new value whenever the slider value changes.
QSlider Properties
QSlider provides various properties that allow you to customize its behavior and appearance. Here are some of the most commonly used properties:
- minimum: Sets the minimum value of the slider.
- maximum: Sets the maximum value of the slider.
- value: Gets or sets the current value of the slider.
- orientation: Sets the orientation of the slider. It can be either Qt.Orientation.Horizontal or Qt.Orientation.Vertical.
- singleStep: Sets the amount by which the slider value changes when the user presses an arrow key.
- pageStep: Sets the amount by which the slider value changes when the user clicks on the slider track.
- tickInterval: Sets the interval between tick marks on the slider.
- tickPosition: Sets the position of the tick marks. It can be QSlider.TickPosition.NoTicks, QSlider.TickPosition.TicksAbove, QSlider.TickPosition.TicksBelow, QSlider.TickPosition.TicksLeft, QSlider.TickPosition.TicksRight, or QSlider.TickPosition.TicksBothSides.
Handling QSlider Signals
PyQt provides signals that allow you to respond to user interactions with the QSlider. For instance, you can handle the sliderPressed, sliderMoved, and sliderReleased signals to perform actions when the user clicks, drags, or releases the slider handle. Let’s see how this works in an example:
import sys
from PyQt6.QtCore import Qt
from PyQt6.QtWidgets import *
# Create a QMainWindow subclass
class AppWindow(QMainWindow):
def __init__(self, title, width, height, left=100, top=100):
super().__init__()
# Set the window title
self.setWindowTitle(title)
# Set the window location and size
self.setGeometry(left, top, width, height)
# Create a central widget to hold the layout
self.central_widget = QWidget()
self.setCentralWidget(self.central_widget)
# Initialize the user interface
self.initUI()
def initUI(self):
# Create a QVBoxLayout for the central widget
layout = QVBoxLayout(self.central_widget)
# Set spacing between widgets
layout.setSpacing(10)
# Set the alignment of the layout (optional)
layout.setAlignment(Qt.AlignmentFlag.AlignCenter)
# Create a QSlider widget
slider = QSlider()
slider.setMinimum(0)
slider.setValue(35)
slider.setMaximum(100)
# Connect the slider's signals to corresponding functions
slider.sliderPressed.connect(self.slider_pressed)
slider.sliderMoved.connect(self.slider_moved)
slider.sliderReleased.connect(self.slider_released)
# Create a QLabel widget to display the slider value
self.label = QLabel(f'Slider Released')
# Add the QSlider to the QVBoxLayout
layout.addWidget(slider)
# Add the QLabel to the QVBoxLayout
layout.addWidget(self.label)
def slider_pressed(self):
self.label.setText('Slider Pressed')
def slider_moved(self, value):
self.label.setText(f'Slider Moved: {value}')
def slider_released(self):
self.label.setText('Slider Released')
def center(self):
# Get the geometry of the screen
screen = QApplication.primaryScreen().size()
# Calculate the center point of the screen
x = (screen.width() - self.width()) // 2
y = (screen.height() - self.height()) // 2
# Move the window to the center
self.move(x, y)
if __name__ == "__main__":
app = QApplication(sys.argv)
# Create a new app window with title and dimensions
window = AppWindow("PyQt QSlider", 640, 480)
# Center the app window on the screen
window.center()
# Show the app window on the screen
window.show()
# Run the application event loop
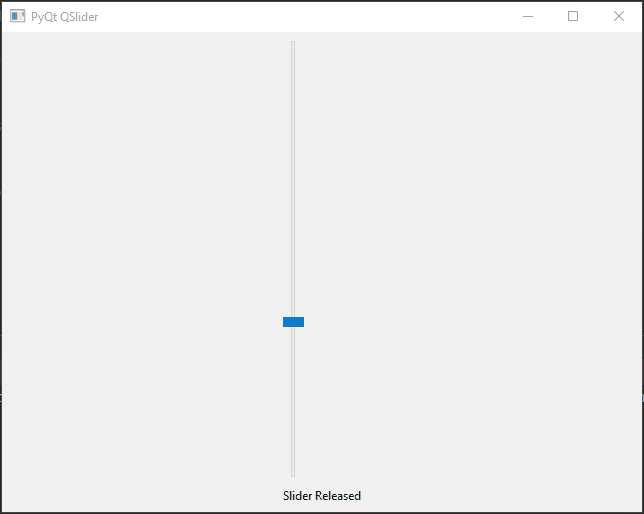
sys.exit(app.exec())In this example, we handle the sliderPressed, sliderMoved, and sliderReleased signals. When the slider is pressed, moved, or released, corresponding functions are called, updating the QLabel to display the current signal.
Customizing QSlider Appearance
QSlider allows you to customize its appearance to match your application’s design. You can modify its size, colors, and shape. Let’s explore an example where we customize the QSlider with a custom slider handle and a different color for the groove.
import sys
from PyQt6.QtCore import Qt
from PyQt6.QtWidgets import *
# Create a QMainWindow subclass
class AppWindow(QMainWindow):
def __init__(self, title, width, height, left=100, top=100):
super().__init__()
# Set the window title
self.setWindowTitle(title)
# Set the window location and size
self.setGeometry(left, top, width, height)
# Create a central widget to hold the layout
self.central_widget = QWidget()
self.setCentralWidget(self.central_widget)
# Initialize the user interface
self.initUI()
def initUI(self):
# Create a QVBoxLayout for the central widget
layout = QVBoxLayout(self.central_widget)
# Set spacing between widgets
layout.setSpacing(10)
# Set the alignment of the layout (optional)
layout.setAlignment(Qt.AlignmentFlag.AlignCenter)
# Create a QSlider widget
slider = QSlider()
slider.setMinimum(0)
slider.setValue(35)
slider.setMaximum(100)
slider.setStyleSheet(
"""
QSlider::groove:vertical {
background: #DDDDDD;
border: 1px solid #999999;
border-radius: 5px;
}
QSlider::handle:vertical {
background: #f00;
border: 1px solid #f00;
width: 20px;
height: 50px;
border-radius: 10px;
}
"""
)
# Connect the slider's valueChanged signal to the slot method
slider.valueChanged.connect(self.on_slider_value_changed)
# Create a QLabel widget to display the slider value
self.label = QLabel(f'{slider.value()}')
# Add the QSlider to the QVBoxLayout
layout.addWidget(slider)
# Add the QLabel to the QVBoxLayout
layout.addWidget(self.label)
def on_slider_value_changed(self, value):
self.label.setText(f'{value}')
def center(self):
# Get the geometry of the screen
screen = QApplication.primaryScreen().size()
# Calculate the center point of the screen
x = (screen.width() - self.width()) // 2
y = (screen.height() - self.height()) // 2
# Move the window to the center
self.move(x, y)
if __name__ == "__main__":
app = QApplication(sys.argv)
# Create a new app window with title and dimensions
window = AppWindow("PyQt QSlider", 640, 480)
# Center the app window on the screen
window.center()
# Show the app window on the screen
window.show()
# Run the application event loop
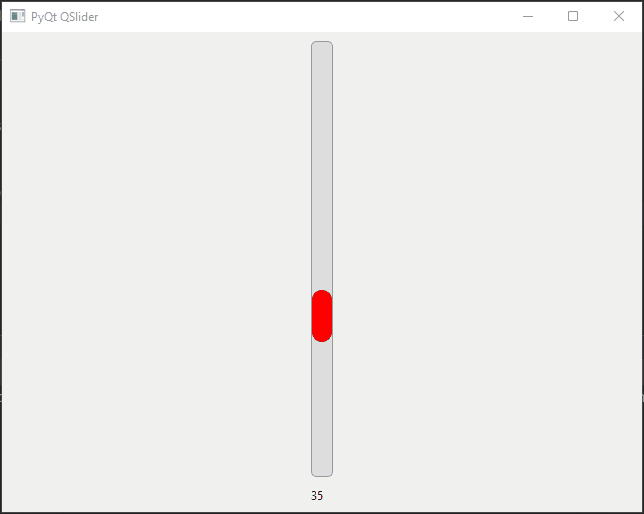
sys.exit(app.exec())In this example, we use a custom stylesheet for the QSlider to change its appearance. We set a different background color for the groove and customize the handle’s appearance. This customization can be extended to match the specific needs of your PyQt application.
QSlider with Tick Marks
Tick marks provide a visual representation of discrete values on the QSlider. Let’s create an example with custom tick marks to display multiple intervals.
import sys
from PyQt6.QtCore import Qt
from PyQt6.QtWidgets import *
# Create a QMainWindow subclass
class AppWindow(QMainWindow):
def __init__(self, title, width, height, left=100, top=100):
super().__init__()
# Set the window title
self.setWindowTitle(title)
# Set the window location and size
self.setGeometry(left, top, width, height)
# Create a central widget to hold the layout
self.central_widget = QWidget()
self.setCentralWidget(self.central_widget)
# Initialize the user interface
self.initUI()
def initUI(self):
# Create a QVBoxLayout for the central widget
layout = QVBoxLayout(self.central_widget)
# Set spacing between widgets
layout.setSpacing(10)
# Set the alignment of the layout (optional)
layout.setAlignment(Qt.AlignmentFlag.AlignCenter)
# Create a QSlider widget
slider = QSlider(Qt.Orientation.Horizontal)
slider.setMinimum(0)
slider.setValue(35)
slider.setMaximum(100)
slider.setTickInterval(10)
slider.setTickPosition(QSlider.TickPosition.TicksBelow)
# Connect the slider's valueChanged signal to the slot method
slider.valueChanged.connect(self.on_slider_value_changed)
# Create a QLabel widget to display the slider value
self.label = QLabel(f'{slider.value()}')
# Add the QSlider to the QVBoxLayout
layout.addWidget(slider)
# Add the QLabel to the QVBoxLayout
layout.addWidget(self.label)
def on_slider_value_changed(self, value):
self.label.setText(f'{value}')
def center(self):
# Get the geometry of the screen
screen = QApplication.primaryScreen().size()
# Calculate the center point of the screen
x = (screen.width() - self.width()) // 2
y = (screen.height() - self.height()) // 2
# Move the window to the center
self.move(x, y)
if __name__ == "__main__":
app = QApplication(sys.argv)
# Create a new app window with title and dimensions
window = AppWindow("PyQt QSlider", 640, 480)
# Center the app window on the screen
window.center()
# Show the app window on the screen
window.show()
# Run the application event loop
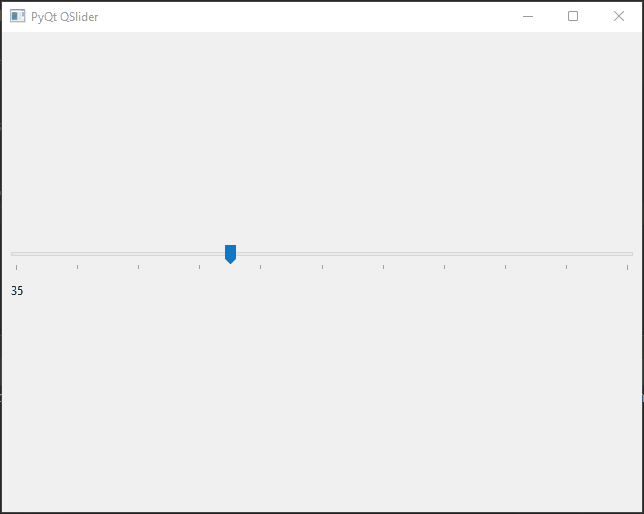
sys.exit(app.exec())In this example, we set the TickInterval to 10, which means tick marks will be shown at intervals of 10 on the slider. The TicksBelow tick position places the tick marks below the slider. This allows users to easily identify discrete values on the slider.
QSlider with Tooltip
Tooltips provide additional information when the user hovers over the QSlider handle. It can be useful for indicating the current value when the slider handle position is challenging to see. Let’s demonstrate this with an example.
import sys
from PyQt6.QtCore import Qt
from PyQt6.QtWidgets import *


# Create a QMainWindow subclass
class AppWindow(QMainWindow):

    def __init__(self, title, width, height, left=100, top=100):
        super().__init__()

        # Set the window title
        self.setWindowTitle(title)

        # Set the window location and size
        self.setGeometry(left, top, width, height)

        # Create a central widget to hold the layout
        self.central_widget = QWidget()
        self.setCentralWidget(self.central_widget)

        # Initialize the user interface
        self.initUI()

    def initUI(self):
        # Create a QVBoxLayout for the central widget
        layout = QVBoxLayout(self.central_widget)

        # Set spacing between widgets
        layout.setSpacing(10)

        # Set the alignment of the layout (optional)
        layout.setAlignment(Qt.AlignmentFlag.AlignCenter)

        # Create a QSlider widget
        self.slider = QSlider(Qt.Orientation.Horizontal)
        self.slider.setMinimum(0)
        self.slider.setValue(35)
        self.slider.setMaximum(100)

        # Connect the slider's valueChanged signal to the slot method
        self.slider.valueChanged.connect(self.on_slider_value_changed)

        # Create a QLabel widget to display the slider value
        self.label = QLabel(f'{self.slider.value()}')

        # Add the QSlider to the QVBoxLayout
        layout.addWidget(self.slider)

        # Add the QLabel to the QVBoxLayout
        layout.addWidget(self.label)

    def on_slider_value_changed(self, value):
        self.label.setText(f'{value}')
        self.slider.setToolTip(f'Current Value: {value}')

    def center(self):
        # Get the geometry of the screen
        screen = QApplication.primaryScreen().size()

        # Calculate the center point of the screen
        x = (screen.width() - self.width()) // 2
        y = (screen.height() - self.height()) // 2

        # Move the window to the center
        self.move(x, y)


if __name__ == "__main__":
    app = QApplication(sys.argv)

    # Create a new app window with title and dimensions
    window = AppWindow("PyQt QSlider", 640, 480)

    # Center the app window on the screen
    window.center()

    # Show the app window on the screen
    window.show()

    # Run the application event loop
    sys.exit(app.exec())
In this example, we set the tooltip to display the current value of the QSlider handle. When the user hovers over the handle, a tooltip will appear, showing the corresponding value.
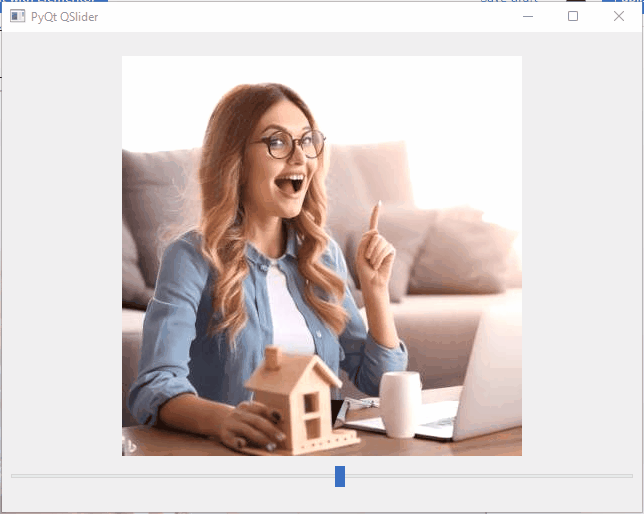
Using QSlider in Real-World Applications
Now that you understand the basics of using QSlider in PyQt applications, let’s explore a real-world example. Suppose we want to create a simple image brightness adjustment tool using a horizontal QSlider. We’ll use the Pillow library to load and manipulate images. Before running the example, install Pillow:
pip install PillowNow, let’s proceed with the code:
import sys
from PyQt6.QtCore import Qt
from PyQt6.QtGui import QPixmap, QImage
from PyQt6.QtWidgets import QMainWindow, QApplication, QWidget, QVBoxLayout, QSlider, QLabel
from PIL import Image


# Create a QMainWindow subclass
class AppWindow(QMainWindow):

    def __init__(self, title, width, height, left=100, top=100):
        super().__init__()

        # Set the window title
        self.setWindowTitle(title)

        # Set the window location and size
        self.setGeometry(left, top, width, height)

        # Create a central widget to hold the layout
        self.central_widget = QWidget()
        self.setCentralWidget(self.central_widget)

        # Initialize the user interface
        self.initUI()

    def initUI(self):
        # Create a QVBoxLayout for the central widget
        layout = QVBoxLayout(self.central_widget)

        # Set spacing between widgets
        layout.setSpacing(10)

        # Set the alignment of the layout (optional)
        layout.setAlignment(Qt.AlignmentFlag.AlignCenter)

        # Create a QSlider widget
        slider = QSlider(Qt.Orientation.Horizontal)
        slider.setMinimum(0)
        slider.setValue(50)
        slider.setMaximum(100)

        # Connect the slider's valueChanged signal to the update_image function
        slider.valueChanged.connect(self.update_image)

        # Load the sample image
        self.image = Image.open("image.jpeg")

        # Create a QLabel to display the image
        self.image_label = QLabel()
        self.image_label.setAlignment(Qt.AlignmentFlag.AlignCenter)
        self.update_image(slider.value())  # Initial brightness value

        # Add the QLabel to the QVBoxLayout
        layout.addWidget(self.image_label)

        # Add the QSlider to the QVBoxLayout
        layout.addWidget(slider)

    def update_image(self, value):
        # Adjust image brightness based on the slider value
        brightness_factor = value / 50.0
        adjusted_image = self.image.point(lambda p: p * brightness_factor)

        # Convert the PIL Image to a QImage for display in QLabel
        q_image = QImage(
            adjusted_image.tobytes(),
            adjusted_image.width,
            adjusted_image.height,
            adjusted_image.width * 3,
            QImage.Format.Format_RGB888
        )

        # Convert the QImage to QPixmap for display in QLabel
        pixmap = QPixmap.fromImage(q_image)

        # Update the image label with the adjusted QPixmap
        self.image_label.setPixmap(pixmap)

    def center(self):
        # Get the geometry of the screen
        screen = QApplication.primaryScreen().size()

        # Calculate the center point of the screen
        x = (screen.width() - self.width()) // 2
        y = (screen.height() - self.height()) // 2

        # Move the window to the center
        self.move(x, y)


if __name__ == "__main__":
    app = QApplication(sys.argv)

    # Create a new app window with title and dimensions
    window = AppWindow("PyQt QSlider", 640, 480)

    # Center the app window on the screen
    window.center()

    # Show the app window on the screen
    window.show()

    # Run the application event loop
    sys.exit(app.exec())
In this real-world example, we create an image brightness adjustment tool using QSlider. The user can adjust the brightness by moving the slider left or right. The Pillow library is used to load and manipulate the sample image. As the slider value changes, the update_image function is called to adjust the image brightness and display it in the QLabel.
Conclusion
The PyQt QSlider widget is a versatile tool for creating user-friendly interfaces that allow users to select values within a specified range. You can use it to control various parameters and settings in your application. By customizing its appearance and utilizing its properties, you can tailor the QSlider to suit your specific needs. PyQt’s flexibility and simplicity make it an excellent choice for building interactive GUI applications in Python.
PyQt provides a wide range of powerful widgets, and QSlider is just one of them. By leveraging the flexibility and versatility of PyQt, you can create sophisticated and interactive desktop applications with ease.
I hope you found this article informative and useful. If you would like to receive more content, please consider subscribing to our newsletter.