Graphical User Interfaces (GUIs) play a crucial role in modern software development, allowing developers to create interactive and user-friendly applications. One of the fundamental building blocks of GUIs is the QPushButton widget. PyQt, a set of Python bindings for the Qt application framework, provides developers with the flexibility and power to create feature-rich GUI applications. In this article, we will explore the PyQt QPushButton widget, understand its functionalities, and demonstrate its usage through a practical code example.

with hands-on learning.
get the skills and confidence to land your next move.
An Introduction to QPushButton
The QPushButton is a GUI widget in PyQt that represents a clickable button. It is used to trigger actions, events, or functions when clicked by the user. These buttons can be customized with various properties like text, icons, tooltips, and signals to perform specific tasks or indicate actions to the user.
Key Features of QPushButton
- Clickable Behavior: The primary purpose of the QPushButton is to be clickable. When a user clicks on the button, it emits a signal that can be connected to functions or methods for executing desired actions.
- Customizable Appearance: QPushButton can be easily customized to match the application’s look and feel. You can change its text, font, icon, color, and style using various properties and methods.
- Text and Icons: A QPushButton can have both text and an icon displayed on it. This flexibility allows developers to provide a clear visual indication of the button’s purpose.
- ToolTips: You can set a tooltip on a QPushButton to display a brief description when the user hovers the mouse cursor over the button.
- Keyboard Shortcuts: QPushButton supports keyboard shortcuts, allowing users to trigger the button’s functionality without using the mouse.
- States: Buttons can have different states, such as enabled, disabled, or hidden, based on the application’s logic.
Creating a Simple PyQt Application with QPushButton
In this code example, we will create a basic PyQt application with a QPushButton that changes the button’s text when clicked.
import sys

from PyQt6.QtCore import Qt
from PyQt6.QtWidgets import QApplication, QMainWindow, QPushButton, QVBoxLayout, QWidget

class AppWindow(QMainWindow):

    def __init__(self, title, width, height, left=100, top=100):
        super().__init__()

        self.setWindowTitle(title)

        # Set the window location and size
        self.setGeometry(left, top, width, height)

        self.initUI()

    def initUI(self):

        # Create a central widget and set it as the main window's central widget
        central_widget = QWidget(self)
        self.setCentralWidget(central_widget)

        # Create a QVBoxLayout for the central widget
        layout = QVBoxLayout()

        # Add a QPushButton to the layout
        self.button = QPushButton('Click me', central_widget)
        layout.addWidget(self.button)

        # Connect the button's clicked signal to the on_button_click method
        self.button.clicked.connect(self.on_button_click)

        # Center QVBoxLayout content
        layout.setAlignment(Qt.AlignmentFlag.AlignCenter)

        # Set the layout for the central widget
        central_widget.setLayout(layout)

    def on_button_click(self):

        # Change the button's text when clicked
        if self.button.text() == 'Click me':
            self.button.setText('Clicked!')
        else:
            self.button.setText('Click me')

    def center(self):

        # Get the geometry of the screen
        screen = QApplication.primaryScreen().size()

        # Calculate the center point of the screen
        x = (screen.width() - self.width()) // 2
        y = (screen.height() - self.height()) // 2

        # Move the window to the center
        self.move(x, y)


if __name__ == "__main__":
    app = QApplication(sys.argv)

    # Create new app window with title, and dimensions
    window = AppWindow("The PyQt QPushButton Widget: Interactive GUIs", 640, 480)

    # Center app window on screen
    window.center()

    # show app window on screen
    window.show()

    sys.exit(app.exec())
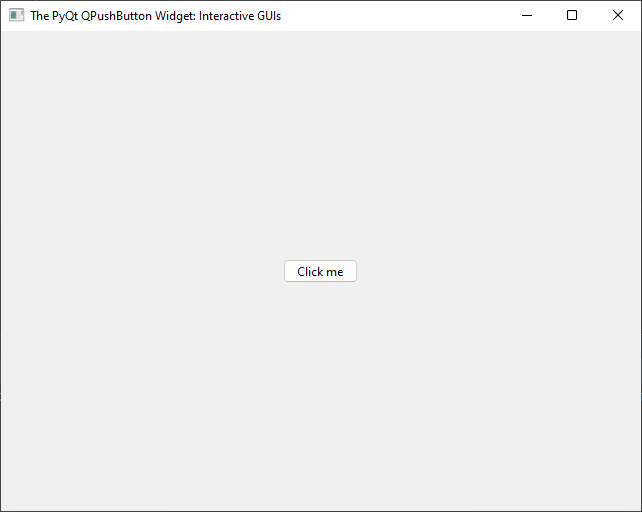
In this code, we first import the necessary modules from PyQt6. We then define a custom class AppWindow, which inherits from QMainWindow. Inside the class, we create a QPushButton instance with the text “Click me” and connect its clicked signal to the on_button_click method. The on_button_click method handles the button’s behavior when it is clicked. In this case, it toggles the button’s text between “Click me” and “Clicked!”.
Adding Icons
To add icons to buttons or other widgets, you can use the QIcon class. PyQt provides a way to load and display various types of icons, including images in different formats (e.g., PNG, SVG) or system-specific icons.
Here’s how you can add an icon to a QPushButton:
import sys

from PyQt6.QtCore import Qt
from PyQt6.QtGui import QIcon
from PyQt6.QtWidgets import QApplication, QMainWindow, QPushButton, QVBoxLayout, QWidget


class AppWindow(QMainWindow):

    def __init__(self, title, width, height, left=100, top=100):
        super().__init__()

        self.setWindowTitle(title)

        # Set the window location and size
        self.setGeometry(left, top, width, height)

        self.initUI()

    def initUI(self):

        # Create a central widget and set it as the main window's central widget
        central_widget = QWidget(self)
        self.setCentralWidget(central_widget)

        # Create a QVBoxLayout for the central widget
        layout = QVBoxLayout()

        # Add a QPushButton to the layout
        self.button = QPushButton('Click me', central_widget)
        layout.addWidget(self.button)

        # Create an QIcon instance and set it as the button's icon
        # Replace 'icon.png' with the actual path to your icon image
        icon = QIcon('icon.png')
        self.button.setIcon(icon)

        # Connect the button's clicked signal to the on_button_click method
        self.button.clicked.connect(self.on_button_click)

        # Center QVBoxLayout content
        layout.setAlignment(Qt.AlignmentFlag.AlignCenter)

        # Set the layout for the central widget
        central_widget.setLayout(layout)

    def on_button_click(self):

        # Change the button's text when clicked
        if self.button.text() == 'Click me':
            self.button.setText('Clicked!')
        else:
            self.button.setText('Click me')

    def center(self):

        # Get the geometry of the screen
        screen = QApplication.primaryScreen().size()

        # Calculate the center point of the screen
        x = (screen.width() - self.width()) // 2
        y = (screen.height() - self.height()) // 2

        # Move the window to the center
        self.move(x, y)


if __name__ == "__main__":
    app = QApplication(sys.argv)

    # Create new app window with title, and dimensions
    window = AppWindow("The PyQt QPushButton Widget: Interactive GUIs", 640, 480)

    # Center app window on screen
    window.center()

    # show app window on screen
    window.show()

    sys.exit(app.exec())
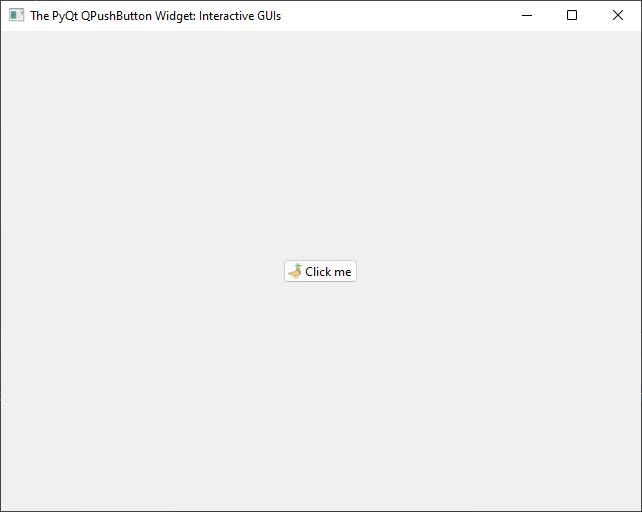
In this example, we create a QIcon instance and assign it to a QPushButton as its icon using the button.setIcon() method. To make it work for your specific case, replace ‘icon.png’ with the actual file path to your icon image, ensuring that the image is in a commonly supported format like PNG or SVG. While this code illustrates adding an icon to a QPushButton, you can apply a similar approach to incorporate icons into various other PyQt6 widgets to enhance your application’s visual appeal and functionality.
Adding ToolTips
Tooltips provide helpful hints or additional information that is displayed when the user hovers their mouse pointer over a widget. You can easily add tooltips to PyQt6 widgets using the setToolTip() method. Here’s an example of how to add tooltips to a QPushButton:
import sys

from PyQt6.QtCore import Qt
from PyQt6.QtWidgets import QApplication, QMainWindow, QPushButton, QVBoxLayout, QWidget


class AppWindow(QMainWindow):

    def __init__(self, title, width, height, left=100, top=100):
        super().__init__()

        self.setWindowTitle(title)

        # Set the window location and size
        self.setGeometry(left, top, width, height)

        self.initUI()

    def initUI(self):

        # Create a central widget and set it as the main window's central widget
        central_widget = QWidget(self)
        self.setCentralWidget(central_widget)

        # Create a QVBoxLayout for the central widget
        layout = QVBoxLayout()

        # Add a QPushButton to the layout
        self.button = QPushButton('Click me', central_widget)
        layout.addWidget(self.button)

        # Set a tooltip for the button
        self.button.setToolTip('Click this button to perform an action.')

        # Connect the button's clicked signal to the on_button_click method
        self.button.clicked.connect(self.on_button_click)

        # Center QVBoxLayout content
        layout.setAlignment(Qt.AlignmentFlag.AlignCenter)

        # Set the layout for the central widget
        central_widget.setLayout(layout)

    def on_button_click(self):

        # Change the button's text when clicked
        if self.button.text() == 'Click me':
            self.button.setText('Clicked!')
        else:
            self.button.setText('Click me')

    def center(self):

        # Get the geometry of the screen
        screen = QApplication.primaryScreen().size()

        # Calculate the center point of the screen
        x = (screen.width() - self.width()) // 2
        y = (screen.height() - self.height()) // 2

        # Move the window to the center
        self.move(x, y)


if __name__ == "__main__":
    app = QApplication(sys.argv)

    # Create new app window with title, and dimensions
    window = AppWindow("The PyQt QPushButton Widget: Interactive GUIs", 640, 480)

    # Center app window on screen
    window.center()

    # show app window on screen
    window.show()

    sys.exit(app.exec())
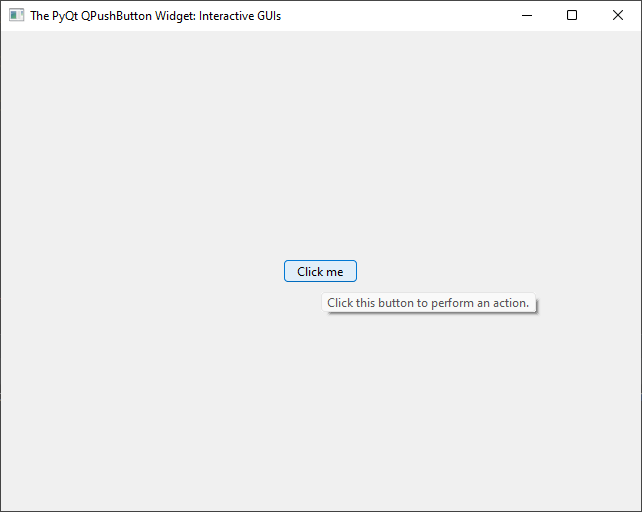
In this example, a QPushButton is created and equipped with a useful tooltip using the button.setToolTip() method. When users hover their mouse pointer over the button, a descriptive tooltip with the text “Click this button to perform an action.” appears, offering valuable guidance. You can apply the setToolTip() method similarly to various other PyQt6 widgets throughout your application, enhancing the user experience by providing context and helpful hints within the user interface.
Customizing QPushButton Appearance
To change the font, color, and style of a QPushButton in PyQt6, you can use various properties and methods provided by the QPushButton and QFont classes. Here’s an example of how to do this:
import sys

from PyQt6.QtCore import Qt
from PyQt6.QtGui import QFont
from PyQt6.QtWidgets import QApplication, QMainWindow, QPushButton, QVBoxLayout, QWidget


class AppWindow(QMainWindow):

    def __init__(self, title, width, height, left=100, top=100):
        super().__init__()

        self.setWindowTitle(title)

        # Set the window location and size
        self.setGeometry(left, top, width, height)

        self.initUI()

    def initUI(self):

        # Create a central widget and set it as the main window's central widget
        central_widget = QWidget(self)
        self.setCentralWidget(central_widget)

        # Create a QVBoxLayout for the central widget
        layout = QVBoxLayout()

        # Add a QPushButton to the layout
        self.button = QPushButton('Click me', central_widget)
        layout.addWidget(self.button)

        # Change the font of the button text
        button_font = QFont('Arial', 14)
        self.button.setFont(button_font)

        # Change the text color, and add a 15px padding
        self.button.setStyleSheet("color: #FF0000; padding: 15px;")

        # Connect the button's clicked signal to the on_button_click method
        self.button.clicked.connect(self.on_button_click)

        # Center QVBoxLayout content
        layout.setAlignment(Qt.AlignmentFlag.AlignCenter)

        # Set the layout for the central widget
        central_widget.setLayout(layout)

    def on_button_click(self):

        # Change the button's text when clicked
        if self.button.text() == 'Click me':
            self.button.setText('Clicked!')
        else:
            self.button.setText('Click me')

    def center(self):

        # Get the geometry of the screen
        screen = QApplication.primaryScreen().size()

        # Calculate the center point of the screen
        x = (screen.width() - self.width()) // 2
        y = (screen.height() - self.height()) // 2

        # Move the window to the center
        self.move(x, y)


if __name__ == "__main__":
    app = QApplication(sys.argv)

    # Create new app window with title, and dimensions
    window = AppWindow("The PyQt QPushButton Widget: Interactive GUIs", 640, 480)

    # Center app window on screen
    window.center()

    # show app window on screen
    window.show()

    sys.exit(app.exec())
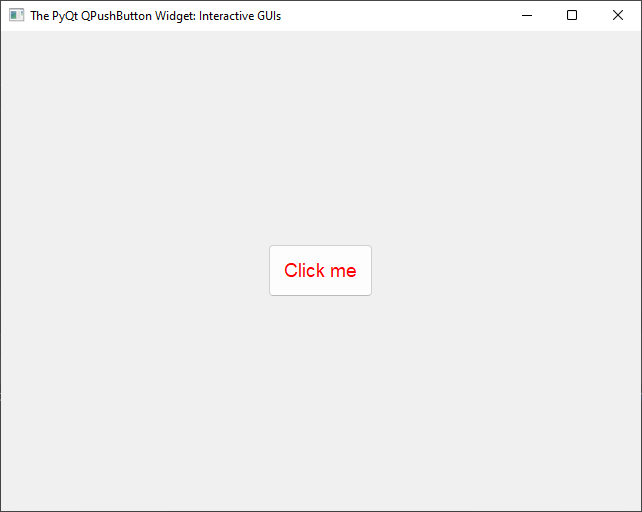
In this example, several customizations are made to a QPushButton. Initially, a QFont object called button_font is created, specifying the “Arial” font with a font size of 14. This font is then applied to the QPushButton’s text using self.button.setFont(button_font), effectively altering the button text’s font. Subsequently, the text color of the button is set to red (#FF0000) using self.button.setStyleSheet(“color: #FF0000;”). Additionally, a 15-pixel padding is introduced around the button text via self.button.setStyleSheet(“padding: 15px;”). These combined adjustments allow you to achieve a tailored appearance for the QPushButton, encompassing text styling and spacing, all in accordance with your specific design preferences.
Conclusion
The PyQt QButton widget, or QPushButton, is an essential component for creating interactive GUI applications in Python. It allows developers to create buttons with customized appearance and behavior, making it easy to trigger actions and provide user-friendly interfaces. In this article, we explored the key features of the QPushButton and demonstrated its usage through a simple code example. With PyQt, developers have a powerful toolkit to build versatile and dynamic applications with ease.
I hope you found this article informative and useful. If you would like to receive more content, please consider subscribing to our newsletter!

