JavaFX is a versatile and powerful Java library for building rich desktop applications with user-friendly interfaces. One of the key features that contribute to the visual appeal of JavaFX applications is the ability to apply various graphical effects to your components. In this article, we will explore the Bloom Effect, a captivating way to make your images shine and glow. We’ll delve into what the Bloom Effect is, how to use it, and provide an example application to showcase its capabilities.
Introduction to Bloom Effect.

with hands-on learning.
get the skills and confidence to land your next move.
Understanding the Bloom Effect
The Bloom Effect is a graphical effect that creates a glowing or blooming appearance around bright parts of an image. It simulates the way light appears to scatter or bleed outwards from intense light sources. This effect is especially useful when you want to highlight certain areas of your image, creating a visually striking and attention-grabbing result.
In JavaFX, the Bloom class is responsible for applying the Bloom Effect to a Node. The most important property of the Bloom effect is the threshold, which controls the minimum luminosity value of the pixels that will be made to glow. Essentially, pixels with brightness levels surpassing this threshold will start to exhibit the bloom effect, radiating light and creating a luminous aura around them. Conversely, pixels with brightness levels below the threshold remain unaffected and maintain their original appearance.
Creating a Bloom Effect Application
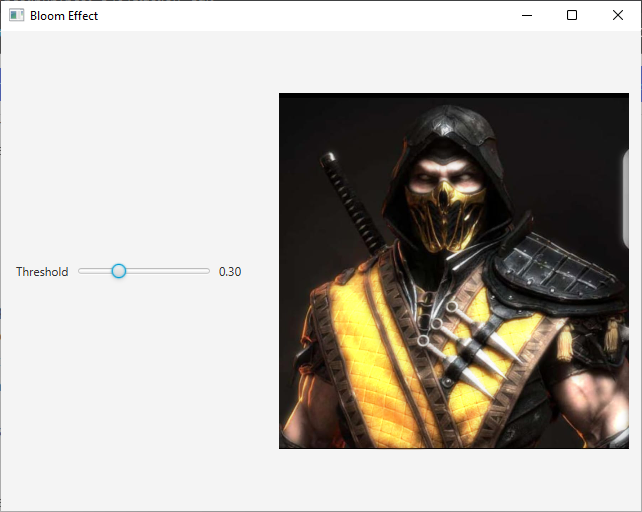
To demonstrate the Bloom Effect, we’ll create a simple JavaFX application that allows you to adjust the bloom threshold for an image. The user can interact with a slider to control the threshold of the effect. Here’s the code for our example application:
import javafx.application.Application;
import javafx.geometry.Insets;
import javafx.geometry.Pos;
import javafx.scene.Scene;
import javafx.scene.control.Label;
import javafx.scene.control.Slider;
import javafx.scene.effect.Bloom;
import javafx.scene.image.Image;
import javafx.scene.image.ImageView;
import javafx.scene.layout.BorderPane;
import javafx.scene.layout.HBox;
import javafx.stage.Stage;

public class BloomEffectExampleApp extends Application {

    private static final double WIDTH = 640;
    private static final double HEIGHT = 480;

    /* The parent layout manager */
    private final BorderPane parent = new BorderPane();

    @Override
    public void start(Stage stage) throws Exception {

        Scene scene = new Scene(this.parent, WIDTH, HEIGHT);

        // Sets the stage title
        stage.setTitle("Bloom Effect");

        // Set the stage scene
        stage.setScene(scene);

        // Center stage on screen
        stage.centerOnScreen();

        // Show stage on screen
        stage.show();

    }

    @Override
    public void init() throws Exception {
        super.init();

        Image image = new Image("scorpion.jpg");

        ImageView imageView = new ImageView(image);
        imageView.setPreserveRatio(true);
        imageView.setFitWidth(350);

        // Create the Slider to adjust the Bloom threshold
        Slider sliderThreshold = new Slider(0, 1, 0.3);

        // Create the Bloom Effect, and bind its threshold property to the slider value property
        Bloom bloom = new Bloom();
        bloom.thresholdProperty().bind(sliderThreshold.valueProperty());

        // Apply the Bloom Effect to the ImageView
        imageView.setEffect(bloom);

        /* Add the ImageView to the BorderPane right region */
        this.parent.setRight(imageView);
        BorderPane.setAlignment(imageView, Pos.CENTER);
        BorderPane.setMargin(imageView, new Insets(15));

        /* Create, and add the Threshold Panel to the BorderPane left region */
        HBox thresholdPanel = this.createLabeledSlider(sliderThreshold, "Threshold");
        thresholdPanel.setPadding(new Insets(15.0));

        this.parent.setLeft(thresholdPanel);

    }

    private HBox createLabeledSlider(Slider slider, String label) {

        Label value = new Label();
        value.setMinWidth(30);

        // Format the slider value with two decimal places
        value.textProperty().bind(slider.valueProperty().asString("%.2f"));

        Label lblLabel = new Label(label);

        // Create the HBox to arrange UI components
        HBox container = new HBox(5, lblLabel, slider, value);
        container.setAlignment(Pos.CENTER);

        return container;

    }

}
We created a JavaFX application that loads an image (in this case, “scorpion.jpg”) and applies the Bloom Effect to it. We provide a slider to adjust the bloom threshold in real-time, making it interactive for users. To make the user interface more user-friendly, we’ve created a method to create a labeled slider with a formatted value display. This method is used to create the Threshold Panel, as shown in the code above.
Conclusion
The JavaFX Bloom Effect is a simple yet powerful tool for adding radiance and luminosity to your images and UI components. With just a few lines of code, you can create visually captivating applications that engage users and make a lasting impression. Whether you’re building a game, a multimedia application, or just want to add some magic to your user interface, the Bloom Effect is a valuable addition to your JavaFX toolkit.
Experiment with different images, threshold values, and UI arrangements to discover the full potential of the Bloom Effect in your JavaFX applications. It’s a fantastic way to take your visual design to the next level and create applications that truly shine.
I hope you found this article informative and useful. If you would like to receive more content, please consider subscribing to our newsletter.
