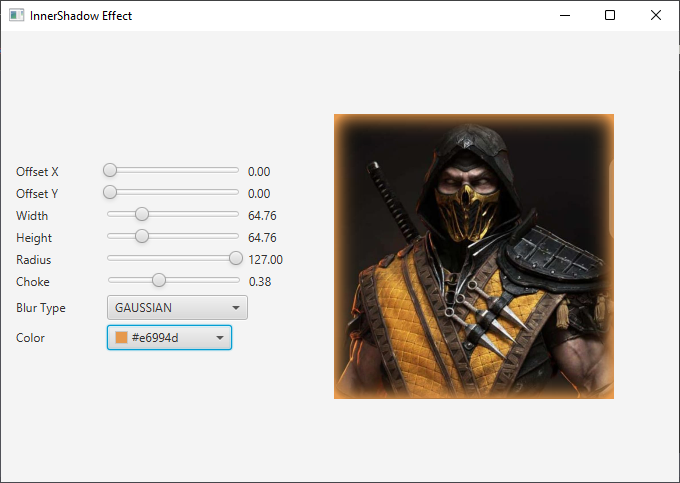
JavaFX is a versatile and robust framework for building modern, interactive, and visually appealing user interfaces for desktop applications. One of its standout features is the ability to apply various visual effects to enhance the user experience. In this article, we will explore the InnerShadow effect in JavaFX, which allows you to create depth and dimension in your graphical user interfaces.

with hands-on learning.
get the skills and confidence to land your next move.
The InnerShadow effect is a simple yet powerful tool that can make your UI elements pop. By casting a shadow inside the bounds of an object, it gives the impression of depth and adds a touch of realism to your application. In this article, we’ll delve into the InnerShadow effect in JavaFX, exploring its properties and creating a practical example.
Understanding the InnerShadow Effect
The InnerShadow effect is part of JavaFX’s javafx.scene.effect package and is used to create a shadow inside the bounds of a graphical object. It simulates the effect of a light source casting a shadow on the inside of the object, giving it a three-dimensional appearance. This can be particularly useful for creating buttons, cards, or any other UI elements that you want to make visually appealing and interactive.
The key properties of the InnerShadow effect include:
- Offset X and Y: These properties control the displacement of the shadow along the horizontal and vertical axes, respectively. You can position the shadow precisely where you want it.
- Width and Height: These properties determine the dimensions of the shadow. They define how far the shadow spreads within the object’s boundaries.
- Radius: The radius property specifies the softness or sharpness of the shadow’s edges. A larger radius value creates a softer shadow, while a smaller value results in a sharper, more defined shadow.
- Choke: Choke controls how much the shadow blends into the object. A value of 0.0 makes the shadow sharply defined, while a value of 1.0 makes it completely blend with the object.
- Blur Type: The blur type property allows you to choose the type of blur applied to the shadow. You can select from various options, including ONE_PASS_BOX, TWO_PASS_BOX, THREE_PASS_BOX, and GAUSSIAN.
- Color: The color property specifies the shadow’s color, allowing you to create different effects by choosing the appropriate color.
With these properties, you have full control over how the InnerShadow effect appears on your UI elements, allowing you to create the exact visual style you desire.
Hands-On Example: InnerShadow Effect
In this example, we will create a simple JavaFX application that demonstrates the InnerShadow effect. We’ll load an image and apply an InnerShadow effect to it, allowing us to manipulate various properties to see the immediate impact on the image.
import javafx.application.Application;
import javafx.geometry.Insets;
import javafx.geometry.Pos;
import javafx.scene.Scene;
import javafx.scene.effect.InnerShadow;
import javafx.scene.image.Image;
import javafx.scene.image.ImageView;
import javafx.scene.layout.BorderPane;
import javafx.stage.Stage;

public class InnerShadowEffectExampleApp extends Application {

    private static final double WIDTH = 640;
    private static final double HEIGHT = 480;

    /* The parent layout manager */
    private final BorderPane parent = new BorderPane();

    @Override
    public void start(Stage stage) throws Exception {

        Scene scene = new Scene(this.parent, WIDTH, HEIGHT);

        // Sets the stage title
        stage.setTitle("InnerShadow Effect");

        // Set the stage scene
        stage.setScene(scene);

        // Center stage on screen
        stage.centerOnScreen();

        // Show stage on screen
        stage.show();

    }

    @Override
    public void init() throws Exception {
        super.init();

        Image image = new Image("scorpion.jpg");

        ImageView imageView = new ImageView(image);
        imageView.setPreserveRatio(true);
        imageView.setFitWidth(280);

        // Create the InnerShadow
        InnerShadow innerShadow = new InnerShadow();

        // Create the Control Panel for the InnerShadow
        InnerShadowControlPanel controlPanel = new InnerShadowControlPanel(innerShadow);

        // Apply the InnerShadow Effect to the ImageView
        imageView.setEffect(innerShadow);

        /* Add the ImageView to the BorderPane center region */
        this.parent.setCenter(imageView);
        BorderPane.setAlignment(imageView, Pos.CENTER_LEFT);
        BorderPane.setMargin(imageView, new Insets(20));

        /* Add the InnerShadowControlPanel to the BorderPane left region */
        this.parent.setLeft(controlPanel);

    }

}
In this example, we’ve created a JavaFX application with a simple UI. We load an image and apply an InnerShadow effect to it. The InnerShadowControlPanel class, which we’ll examine shortly, allows us to adjust the properties of the inner shadow in real-time.
Creating the InnerShadow Control Panel
The InnerShadowControlPanel class is essential to our example application. It provides a user-friendly interface for customizing the InnerShadow effect. Here’s the code for the InnerShadowControlPanel:
import javafx.beans.property.DoubleProperty;
import javafx.collections.FXCollections;
import javafx.collections.ObservableList;
import javafx.geometry.Insets;
import javafx.geometry.Pos;
import javafx.scene.Node;
import javafx.scene.control.ColorPicker;
import javafx.scene.control.ComboBox;
import javafx.scene.control.Label;
import javafx.scene.control.Slider;
import javafx.scene.effect.BlurType;
import javafx.scene.effect.InnerShadow;
import javafx.scene.layout.HBox;
import javafx.scene.layout.VBox;
import javafx.scene.paint.Color;

public class InnerShadowControlPanel extends VBox {

    public InnerShadowControlPanel(InnerShadow innerShadow) {
        super(5);

        // Create BlurTypes Collection
        ObservableList<BlurType> blurTypes = FXCollections.observableArrayList(
                BlurType.values()
        );

        // Create BlurType ComboBox, and provide the created BlurTypes
        ComboBox<BlurType> blurTypeComboBox = new ComboBox<>(blurTypes);
        blurTypeComboBox.getSelectionModel().selectFirst(); // Select the first BlurType

        // Bind the InnerShadow blurTypeProperty to the ComboBox valueProperty
        innerShadow.blurTypeProperty().bind(blurTypeComboBox.valueProperty());

        // Create the HBox to arrange the Label, and BlurType ComboBox
        HBox blurTypeContainer = this.createLabeledNode(5, blurTypeComboBox, "Blur Type");


        // Create the ColorPicker, and set BLACK as the default color
        ColorPicker colorPicker = new ColorPicker(Color.BLACK);

        // Create the HBox to arrange the Label, and the ColorPicker
        HBox colorContainer = this.createLabeledNode( 13, colorPicker, "Color" );

        // Bind the InnerShadow colorProperty to the ColorPicker valueProperty
        innerShadow.colorProperty().bind(colorPicker.valueProperty());

        // Create a VBox to arrange Sliders, the BlurType ComboBox, and the ColorPicker
        this.getChildren().addAll(
                this.createLabeledBoundSlider(innerShadow.offsetXProperty(),"Offset X", 0, 100, 0),
                this.createLabeledBoundSlider(innerShadow.offsetYProperty(),"Offset Y", 0, 100, 0),
                this.createLabeledBoundSlider(innerShadow.widthProperty(), "Width", 0, 255, 21),
                this.createLabeledBoundSlider(innerShadow.heightProperty(),"Height",0, 255, 21),
                this.createLabeledBoundSlider(innerShadow.radiusProperty(), "Radius",0, 127, 10),
                this.createLabeledBoundSlider(innerShadow.chokeProperty(), "Choke",0.0, 1.0, 0.0),
                blurTypeContainer,
                colorContainer
        );

        this.setAlignment(Pos.CENTER_LEFT);
        this.setPadding(new Insets(15));

    }

    private HBox createLabeledBoundSlider(DoubleProperty property, String label, double min, double max, double defaultValue) {

        Slider slider = new Slider(min, max, defaultValue);
        property.bind(slider.valueProperty());

        Label value = new Label();
        value.setMinWidth(50);

        // Format the slider value with two decimal places
        value.textProperty().bind(slider.valueProperty().asString("%.2f"));

        Label lblLabel = new Label(String.format("%-20s", label));
        lblLabel.setMinWidth(80);
        lblLabel.setAlignment(Pos.CENTER_RIGHT);

        // Create the HBox to arrange UI components
        return new HBox(5, lblLabel, slider, value);

    }

    private HBox createLabeledNode(double spacing, Node node, String label) {

        HBox container = new HBox(
                spacing,
                new Label(String.format("%-20s", label)),
                node
        );

        container.setAlignment(Pos.CENTER_LEFT);

        return container;

    }

}
The InnerShadowControlPanel class provides a user interface for adjusting the InnerShadow effect’s properties in real-time. It includes options for selecting the blur type, setting the shadow color, and fine-tuning various parameters like offset, size, and choke. This interactive control panel allows you to experiment with different settings to achieve the desired visual effect.

Conclusion
The InnerShadow effect in JavaFX is a valuable tool for enhancing the visual appeal of your user interface elements. By creating the illusion of depth through shadows cast within the boundaries of objects, you can make your applications more engaging and user-friendly. In this article, we explored the InnerShadow effect and demonstrated how to use it in a JavaFX application. With the provided example, you can start integrating InnerShadow effects into your own JavaFX projects and create visually captivating user interfaces.
I hope you found this article informative and useful. If you would like to receive more content, please consider subscribing to our newsletter.


