In the realm of modern software development, creating engaging and visually stunning user interfaces is crucial to capturing the attention of users. JavaFX, a robust framework for building cross-platform applications, offers a myriad of tools and effects to help you achieve this goal. One such tool is the MotionBlur Effect, which can add depth and dynamism to your JavaFX applications. In this article, we will explore the JavaFX MotionBlur Effect, its applications, implementation, and its potential to enhance your user interface.

with hands-on learning.
get the skills and confidence to land your next move.
What is MotionBlur?
MotionBlur is one of the many built-in visual effects in JavaFX. This effect simulates motion blur in your graphical elements, giving them a dynamic and realistic appearance. Motion blur is a phenomenon that occurs in the real world when an object moves rapidly, causing it to appear slightly blurred. This effect is often used in movies, games, and animations to convey a sense of speed and motion.
The MotionBlur effect has two key properties:
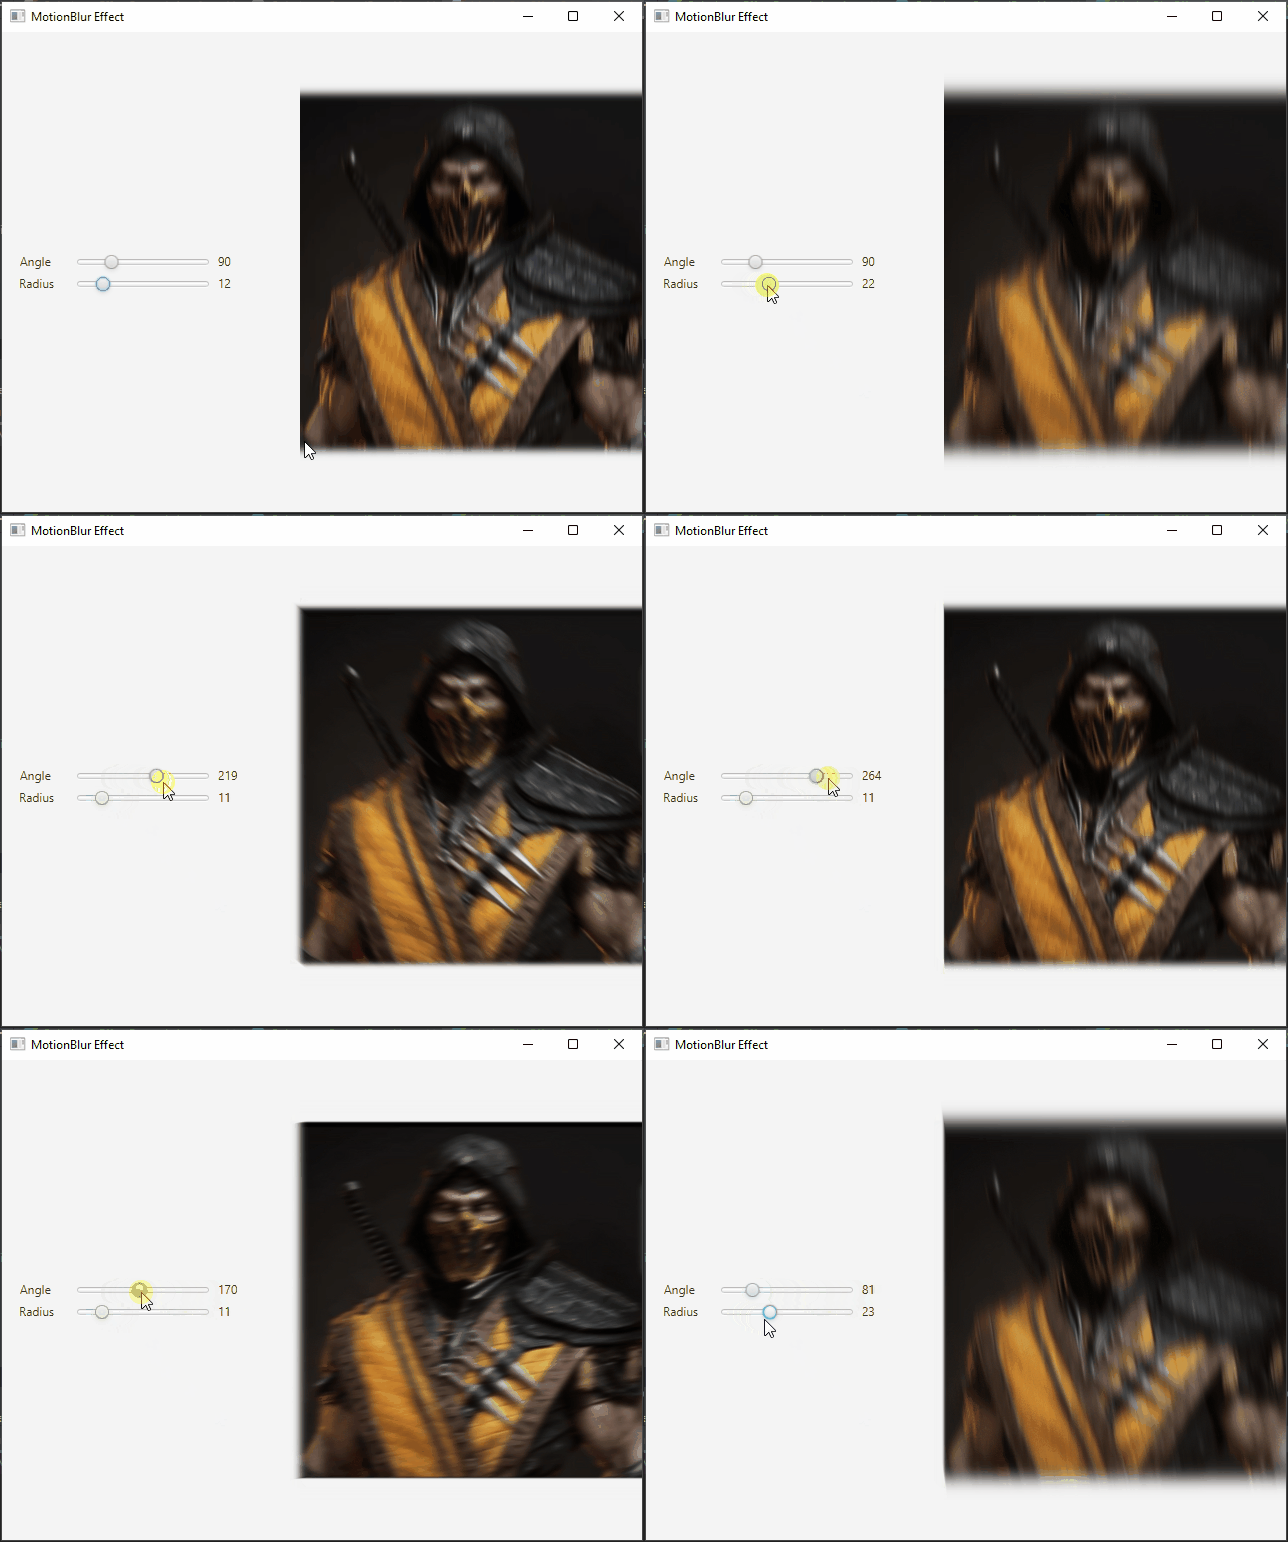
- angle: This property determines the direction of the motion blur. It specifies the angle, in degrees, at which the blur is applied.
- radius: The radius property controls the extent of the blur. It defines how far the blur spreads from the source object.
Example Application: MotionBlur Effect in Action
In this practical demonstration, we’ll create a JavaFX application that showcases the MotionBlur Effect in action. We’ll use an image and allow users to adjust the angle and radius of the blur using sliders.
Here’s the code for our example application:
import javafx.application.Application;
import javafx.geometry.Insets;
import javafx.geometry.Pos;
import javafx.scene.Scene;
import javafx.scene.control.Label;
import javafx.scene.control.Slider;
import javafx.scene.effect.MotionBlur;
import javafx.scene.image.Image;
import javafx.scene.image.ImageView;
import javafx.scene.layout.BorderPane;
import javafx.scene.layout.HBox;
import javafx.scene.layout.VBox;
import javafx.stage.Stage;
import javafx.util.Builder;

public class MotionBlurEffectExampleApp extends Application {

    private static final double WIDTH = 640;
    private static final double HEIGHT = 480;

    /* The parent layout manager */
    private final BorderPane parent = new BorderPane();

    @Override
    public void start(Stage stage) throws Exception {

        Scene scene = new Scene(this.parent, WIDTH, HEIGHT);

        // Sets the stage title
        stage.setTitle("MotionBlur Effect");

        // Set the stage scene
        stage.setScene(scene);

        // Center stage on screen
        stage.centerOnScreen();

        // Show stage on screen
        stage.show();

    }

    @Override
    public void init() throws Exception {
        super.init();

        Image image = new Image("scorpion.jpg");

        ImageView imageView = new ImageView(image);
        imageView.setPreserveRatio(true);
        imageView.setFitWidth(350);

        // Create the Slider to adjust the Glow level
        Slider sliderAngle = new Slider(0, 360, 90);
        Slider sliderRadius = new Slider(0, 63, 10);

        // Create the MotionBlur Effect
        MotionBlur motionBlur = new MotionBlur();

        // Bind MotionBlur properties to the Sliders value property
        motionBlur.angleProperty().bind(sliderAngle.valueProperty());
        motionBlur.radiusProperty().bind(sliderRadius.valueProperty());

        // Apply the MotionBlur Effect to the ImageView
        imageView.setEffect(motionBlur);

        /* Add the ImageView to the BorderPane center region */
        this.parent.setRight(imageView);
        BorderPane.setAlignment(imageView, Pos.CENTER);
        BorderPane.setMargin(imageView, new Insets(15));

        /* Create a VBox container to arrange angle, and radius sliders */
        VBox controlPanel = new VBox(
                5,
                (new LabeledValueSlider(sliderAngle, "Angle")).build(),
                (new LabeledValueSlider(sliderRadius, "Radius")).build()
        );

        controlPanel.setAlignment(Pos.CENTER);
        controlPanel.setPadding(new Insets(17.0));

        // Add the ControlPane to the BorderPane left region
        this.parent.setLeft(controlPanel);

    }

    static class LabeledValueSlider implements Builder<HBox> {

        private final Slider slider;
        private final String label;

        public LabeledValueSlider(Slider slider, String label) {
            this.slider = slider;
            this.label = label;
        }

        @Override
        public HBox build() {

            Label value = new Label();
            value.setMinWidth(50);

            // Format the slider value with two decimal places
            value.textProperty().bind(this.slider.valueProperty().asString("%.0f"));

            Label lblLabel = new Label(String.format("%-10s",this.label));

            // Create the HBox to arrange UI components
            HBox container = new HBox(5, lblLabel, this.slider, value);
            container.setAlignment(Pos.CENTER);

            return container;

        }

    }

}
In this example, we create a JavaFX application that loads an image and applies the MotionBlur effect to it. The user can interactively adjust the angle and radius properties using sliders, which instantly update the blur effect on the image.
Conclusion
In this article, we explored the MotionBlur Effect in JavaFX and created a practical example to demonstrate its capabilities. The MotionBlur Effect can be a valuable addition to your JavaFX applications, especially when you want to add a sense of motion and dynamism. Whether you’re building games, animations, or interactive user interfaces, MotionBlur is a powerful tool to have in your JavaFX toolkit. Feel free to experiment further with this effect to create stunning visual experiences in your applications.
I hope you found this article informative and useful. If you would like to receive more content, please consider subscribing to our newsletter.

