When creating graphical user interfaces (GUIs) with Python and Tkinter, organizing and positioning widgets is an essential skill. Tkinter provides several geometry managers to help you layout and place widgets on the window. One of these managers is the “place” geometry manager, which allows you to precisely position widgets within the container. In this article, we will explore how to use the “place” geometry manager in Tkinter.

with hands-on learning.
get the skills and confidence to land your next move.
Understanding the “place” Geometry Manager
The “place” geometry manager in Tkinter allows you to place widgets at specific coordinates within a container (usually a frame or the main window). Unlike other geometry managers like “pack” or “grid,” which arrange widgets automatically, the “place” manager gives you full control over the widget’s positioning.
The syntax for placing a widget using the “place” manager is as follows:
widget.place(x=<x-coordinate>, y=<y-coordinate>)
Here, x and y are the pixel coordinates representing the position of the top-left corner of the widget within the container.
You can also use optional parameters like anchor, width, and height to further customize the widget placement. The anchor parameter specifies how the widget is anchored to its designated position. It can take values like “n,” “s,” “e,” “w,” “nw,” “ne,” “sw,” “se,” or “center.”
Additionally, you can specify the width and height parameters to set the size of the widget explicitly.
Basic Example of Using the “place” Geometry Manager
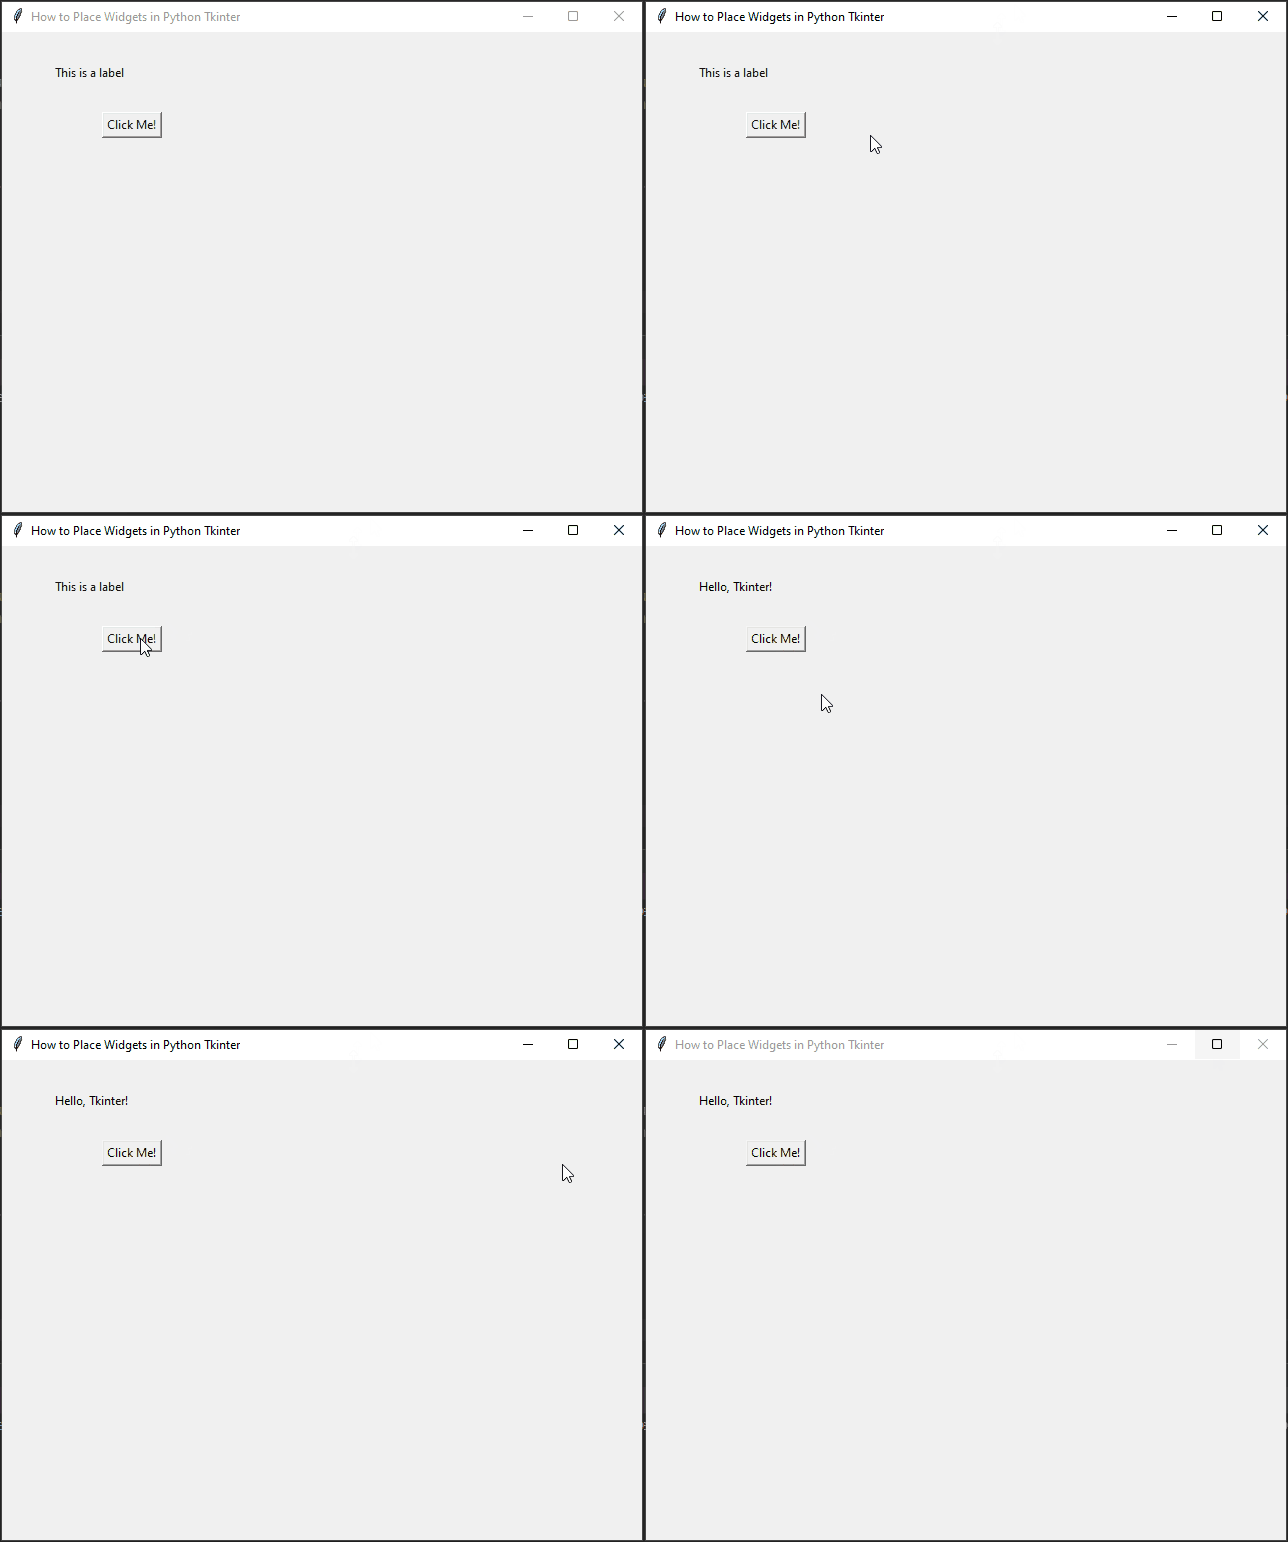
Let’s start with a simple example to demonstrate how to use the place geometry manager. We’ll create a Tkinter window and place a label and a button within it.
import tkinter as tk


class PyFrame(tk.Tk):

    def __init__(self, width, height):
        super().__init__()

        self.width = width
        self.height = height

        self.geometry(f"{self.width}x{self.height}")

    def center_on_screen(self):
        left = (self.winfo_screenwidth() - self.width) // 2
        top = (self.winfo_screenheight() - self.height) // 2

        self.geometry(f"{self.width}x{self.height}+{left}+{top}")


def on_button_click():
    label.config(text="Hello, Tkinter!")


if __name__ == '__main__':
    # Create the main application window
    root = PyFrame(640, 480)
    root.title("How to Place Widgets in Python Tkinter")

    # center window on the screen
    root.center_on_screen()

    # Create a label and place it at coordinates (50, 30)
    label = tk.Label(root, text="This is a label")
    label.place(x=50, y=30)

    # Create a button and place it at coordinates (100, 80)
    button = tk.Button(root, text="Click Me!", command=on_button_click)
    button.place(x=100, y=80)

    # Run the main event loop
    root.mainloop()
In this example, we create a simple window with a label and a button placed at specific coordinates using the place method.
Relative Placing
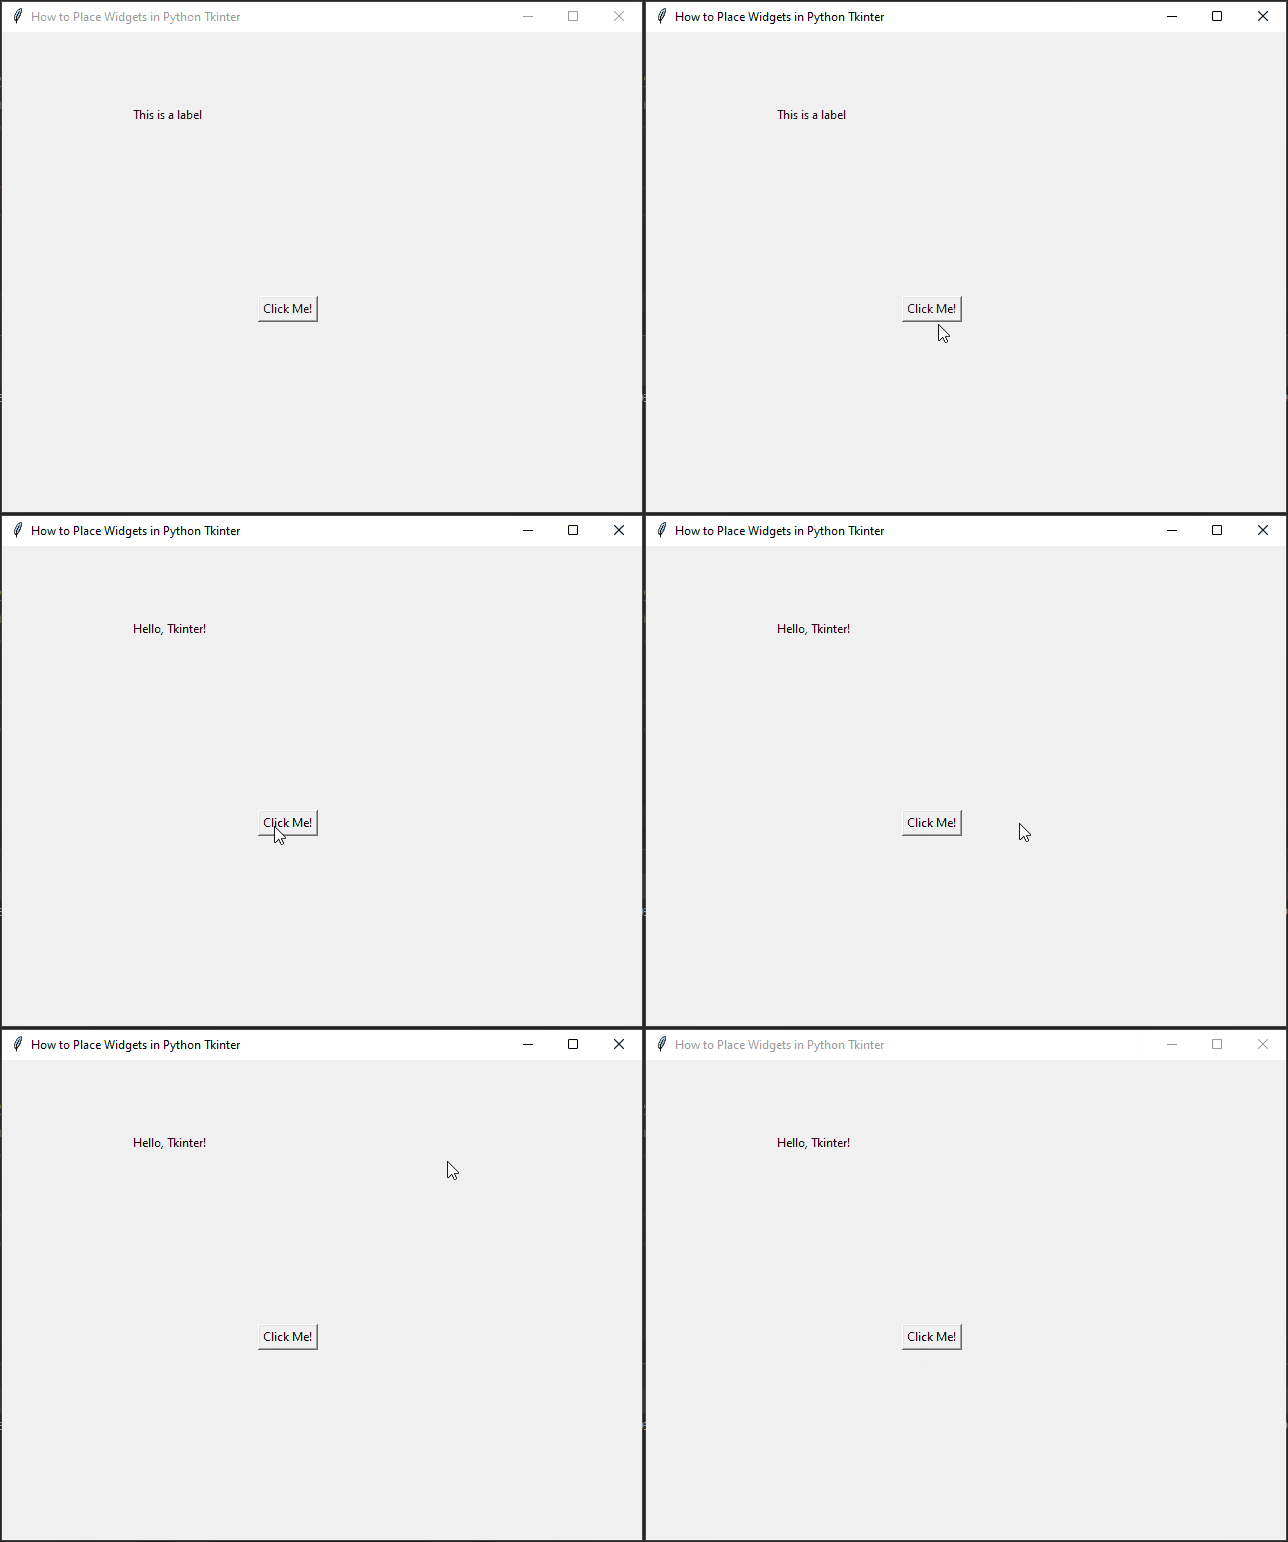
The place manager also allows us to place widgets relative to the parent widget’s edges using the special keywords relx, rely, relwidth, and relheight. These values range from 0.0 to 1.0, representing percentages of the parent’s size.
Let’s modify our previous example to use relative placing:
import tkinter as tk


class PyFrame(tk.Tk):

    def __init__(self, width, height):
        super().__init__()

        self.width = width
        self.height = height

        self.geometry(f"{self.width}x{self.height}")

    def center_on_screen(self):
        left = (self.winfo_screenwidth() - self.width) // 2
        top = (self.winfo_screenheight() - self.height) // 2

        self.geometry(f"{self.width}x{self.height}+{left}+{top}")


def on_button_click():
    label.config(text="Hello, Tkinter!")


if __name__ == '__main__':
    # Create the main application window
    root = PyFrame(640, 480)
    root.title("How to Place Widgets in Python Tkinter")

    # center window on the screen
    root.center_on_screen()

    # Create a label and place it 20% from the left and 15% from the top
    label = tk.Label(root, text="This is a label")
    label.place(relx=0.2, rely=0.15)

    # Create a button and place it 40% from the left and 55% from the top
    button = tk.Button(root, text="Click Me!", command=on_button_click)
    button.place(relx=0.4, rely=0.55)

    # Run the main event loop
    root.mainloop()
By using relx and rely, the widget’s position becomes relative to the parent’s size, allowing the interface to adapt better to different window sizes.
Overlapping Widgets
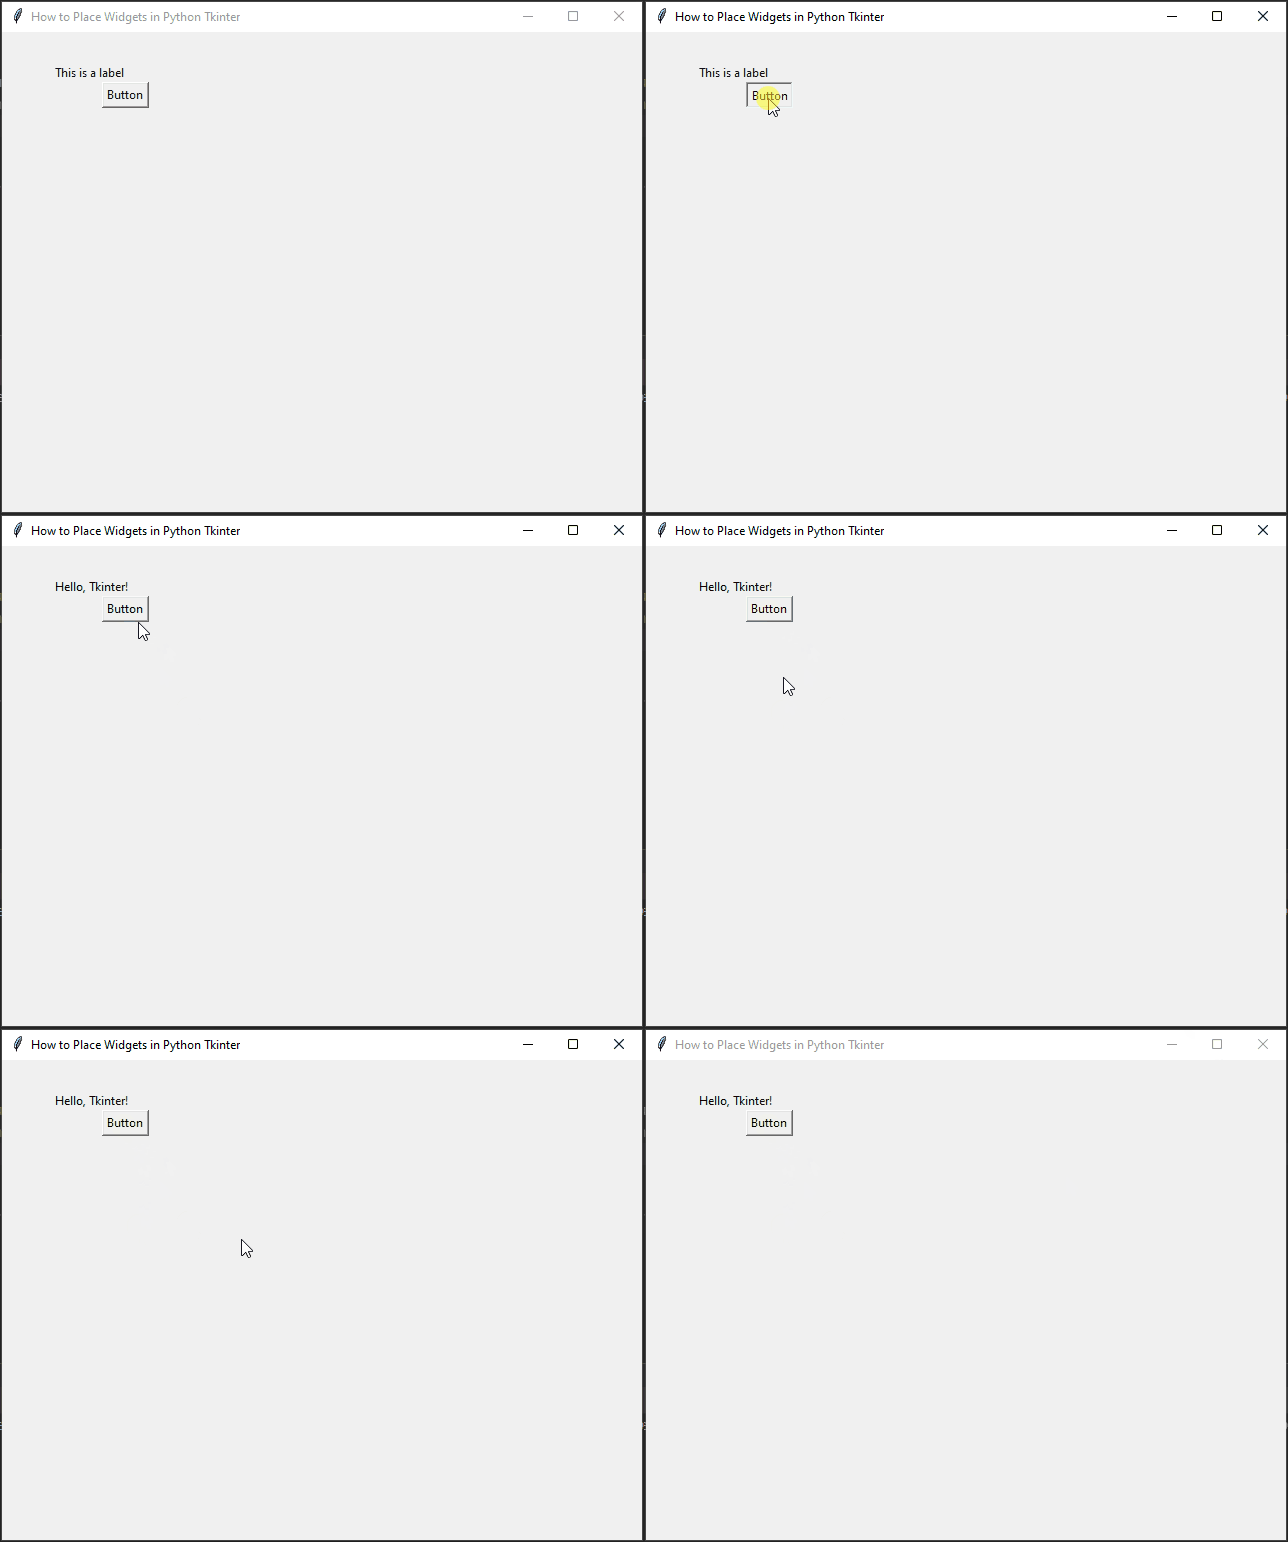
One of the unique features of the place geometry manager is the ability to overlap widgets. This can be useful when creating custom designs or implementing complex layouts.
Let’s create an example where a label partially overlaps a button:
import tkinter as tk


class PyFrame(tk.Tk):

    def __init__(self, width, height):
        super().__init__()

        self.width = width
        self.height = height

        self.geometry(f"{self.width}x{self.height}")

    def center_on_screen(self):
        left = (self.winfo_screenwidth() - self.width) // 2
        top = (self.winfo_screenheight() - self.height) // 2

        self.geometry(f"{self.width}x{self.height}+{left}+{top}")


def on_button_click():
    label.config(text="Hello, Tkinter!")


if __name__ == '__main__':
    # Create the main application window
    root = PyFrame(640, 480)
    root.title("How to Place Widgets in Python Tkinter")

    # center window on the screen
    root.center_on_screen()

    # Create a label and place it at coordinates (50, 30)
    label = tk.Label(root, text="This is a label")
    label.place(x=50, y=30)

    # Create a button and place it at coordinates (100, 50)
    button = tk.Button(root, text="Button", command=on_button_click)
    button.place(x=100, y=50)

    # Run the main event loop
    root.mainloop()
In this example, the label partially overlaps the button, creating a visually interesting effect.
Conclusion
The place geometry manager in Python Tkinter provides a flexible and powerful way to position widgets within a GUI. By using exact coordinates or relative positioning, you can create intricate layouts and custom designs that suit your application’s needs. Keep in mind that while the place manager offers precise control, it may require more effort to create responsive designs for various window sizes compared to the grid or pack managers.
Experiment with the place manager in your Tkinter projects and discover how it can help you build beautiful and interactive user interfaces.
I hope you found this code informative and useful. If you would like to receive more content, please consider subscribing to our newsletter!
