In the world of Java graphical user interface (GUI) development, JavaFX has established itself as a powerful toolkit. One notable extension to JavaFX is the ControlsFX library, which provides developers with a plethora of additional UI controls and utilities to enhance their applications. One particularly useful feature of ControlsFX is the Notifications API, which allows developers to display customizable, non-blocking notifications to users. In this article, we’ll dive deep into the JavaFX ControlsFX Notifications API, accompanied by detailed code examples to help you grasp its usage and capabilities.

with hands-on learning.
get the skills and confidence to land your next move.
Introduction to ControlsFX Notifications API
The ControlsFX library is an open-source project that extends the functionality of JavaFX by offering various custom controls and utilities that are not present in the core JavaFX library. The Notifications API is one such component of ControlsFX that simplifies the process of displaying notifications to users.
Notifications are a vital aspect of user interaction in modern applications. They provide timely feedback, alerts, and information to users, enhancing the overall user experience. The ControlsFX Notifications API makes it easier for developers to create and customize notifications without getting bogged down by the complexities of UI management.
Setting Up ControlsFX
Before diving into the Notifications API, it’s essential to set up the ControlsFX library in your JavaFX project. Here’s a step-by-step guide to help you get started:
- Download the ControlsFX library JAR file from the official repository or via a dependency management tool like Maven or Gradle.
- Add the downloaded JAR file to your project’s classpath.
With the setup complete, you’re ready to start using the Notifications API to create informative and visually appealing notifications in your JavaFX application.
Creating Basic Notifications
Let’s start by creating a simple notification using the ControlsFX Notifications API:
import javafx.application.Application;
import javafx.event.ActionEvent;
import javafx.scene.Scene;
import javafx.scene.control.Button;
import javafx.scene.layout.*;
import javafx.stage.Stage;
import org.controlsfx.control.Notifications;

public class Main extends Application {

    private final BorderPane parent = new BorderPane();

    @Override
    public void start(Stage stage) throws Exception {
        this.setupStage(stage);
    }

    @Override
    public void init() throws Exception {
        super.init();
        this.buildUI();
    }

    private void buildUI() {

        Button button = new Button("Open Notification");

        button.setOnAction(this::onOpenNotification);

        // Add the Button to the BorderPane layout manager
        this.parent.setCenter(button);

    }

    private void onOpenNotification(ActionEvent actionEvent) {

        // Create an informational notification
        Notifications.create()
                .title("Hello, World!")
                .text("This is a basic ControlsFX notification.")
                .showInformation();

    }

    private void setupStage(Stage stage) {

        Scene scene = new Scene(this.parent, 640, 480);

        // Set the stage title
        stage.setTitle("JavaFX ControlsFX Notifications API");

        // Set the stage scene
        stage.setScene(scene);

        // Center the stage on the screen
        stage.centerOnScreen();

        // Show the stage on the screen
        stage.show();

    }

}
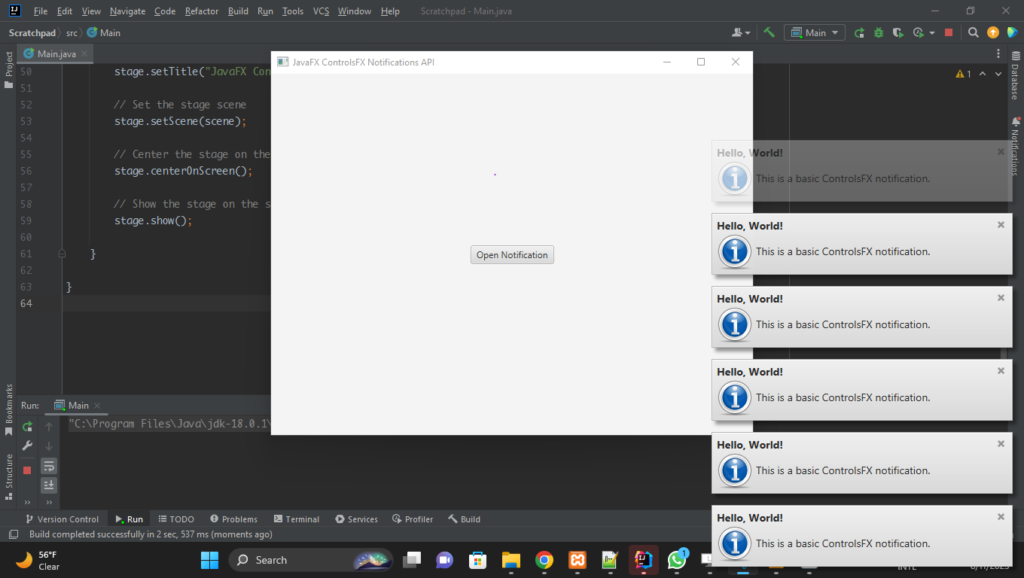
In this example, we’ve used the Notifications.create() method to create a new notification. We then set the title and text of the notification using the .title() and .text() methods, respectively. Finally, we call the .showInformation() method to display the notification to the user. You can replace .showInformation() with other methods like .showWarning(), .showError(), or .showConfirm() to change the notification’s appearance and behavior.
Customizing Notifications
The real power of the Notifications API lies in its ability to be highly customizable. You can control various aspects of the notification’s appearance and behavior to match your application’s design and requirements. Here’s an example of creating a customized notification:
import javafx.application.Application;
import javafx.event.ActionEvent;
import javafx.geometry.Pos;
import javafx.scene.Scene;
import javafx.scene.control.Button;
import javafx.scene.image.Image;
import javafx.scene.image.ImageView;
import javafx.scene.layout.*;
import javafx.stage.Stage;
import javafx.util.Duration;
import org.controlsfx.control.Notifications;

public class Main extends Application {

    private final BorderPane parent = new BorderPane();

    @Override
    public void start(Stage stage) throws Exception {
        this.setupStage(stage);
    }

    @Override
    public void init() throws Exception {
        super.init();
        this.buildUI();
    }

    private void buildUI() {

        Button button = new Button("Open Notification");

        button.setOnAction(this::onOpenNotification);

        // Add the Button to the BorderPane layout manager
        this.parent.setCenter(button);

    }

    private void onOpenNotification(ActionEvent actionEvent) {

        Image customIcon = new Image("java.png");

        // Create an informational notification
        Notifications.create()
                .title("Custom Notification")
                .text("This is a customized ControlsFX notification.")
                .graphic(new ImageView(customIcon))
                .hideAfter(Duration.seconds(5))
                .position(Pos.BOTTOM_RIGHT)
                .darkStyle()
                .show();

    }

    private void setupStage(Stage stage) {

        Scene scene = new Scene(this.parent, 640, 480);

        // Set the stage title
        stage.setTitle("JavaFX ControlsFX Notifications API");

        // Set the stage scene
        stage.setScene(scene);

        // Center the stage on the screen
        stage.centerOnScreen();

        // Show the stage on the screen
        stage.show();

    }

}
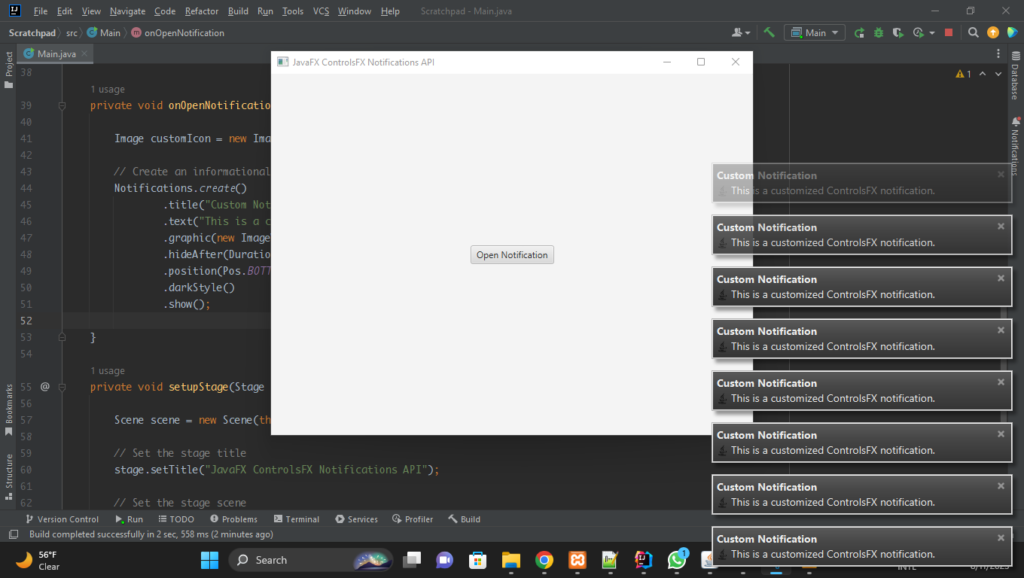
In this example, we set the notification title and message using the title() and text() methods. Additionally, we set a custom graphic for the notification using the graphic() method, which can be any JavaFX node. The hideAfter() method specifies the duration for which the notification should be visible. The position() method sets the position of the notification on the screen. The .darkStyle() method specifies that the notification should use the built-in dark styling, rather than the default ‘modena’ notification style (which is a light-gray).
Adding Actions
Notifications can also include action buttons that allow users to perform specific tasks directly from the notification. Use the .action() method to add actions:
import javafx.application.Application;
import javafx.event.ActionEvent;
import javafx.scene.Scene;
import javafx.scene.control.Button;
import javafx.scene.layout.*;
import javafx.stage.Stage;
import org.controlsfx.control.Notifications;
import org.controlsfx.control.action.Action;

public class Main extends Application {

    private final BorderPane parent = new BorderPane();

    @Override
    public void start(Stage stage) throws Exception {
        this.setupStage(stage);
    }

    @Override
    public void init() throws Exception {
        super.init();
        this.buildUI();
    }

    private void buildUI() {

        Button button = new Button("Open Notification");

        button.setOnAction(this::onOpenNotification);

        // Add the Button to the BorderPane layout manager
        this.parent.setCenter(button);

    }

    private void onOpenNotification(ActionEvent actionEvent) {

        Notifications.create()
                .title("Notification with Action")
                .text("Click the button below to perform an action.")
                .action(new Action("Button Label", event -> {

                    // Your action code here
                    System.out.println("Button Pressed!");

                })).showInformation();

    }

    private void setupStage(Stage stage) {

        Scene scene = new Scene(this.parent, 640, 480);

        // Set the stage title
        stage.setTitle("JavaFX ControlsFX Notifications API");

        // Set the stage scene
        stage.setScene(scene);

        // Center the stage on the screen
        stage.centerOnScreen();

        // Show the stage on the screen
        stage.show();

    }

}
In this example, we created a notification with a title, text content, and an action button labeled “Button Label” When the user clicks the action button, the specified action code (printing “Button Pressed!”) will be executed.
Collapsing Notifications
Collapsing notifications is a valuable feature that helps prevent overwhelming users with a flood of individual notifications. JavaFX ControlsFX Notifications API provides a way to achieve this by allowing you to collapse multiple notifications into a single notification when the number of notifications exceeds a specified threshold. This feature ensures that users are informed about various events without cluttering the user interface.
The threshold() method in the Notifications API is used to enable the collapsing behavior. When the number of notifications reaches or exceeds the specified threshold, the notifications are automatically collapsed into a single notification. Let’s see how to achieve this with code examples.
import javafx.application.Application;
import javafx.event.ActionEvent;
import javafx.geometry.Pos;
import javafx.scene.Scene;
import javafx.scene.control.Button;
import javafx.scene.layout.*;
import javafx.stage.Stage;
import org.controlsfx.control.Notifications;

public class Main extends Application {

    private final BorderPane parent = new BorderPane();

    @Override
    public void start(Stage stage) throws Exception {
        this.setupStage(stage);
    }

    @Override
    public void init() throws Exception {
        super.init();
        this.buildUI();
    }

    private void buildUI() {

        Button button = new Button("Open Notification");

        button.setOnAction(this::onOpenNotification);

        // Add the Button to the BorderPane layout manager
        this.parent.setCenter(button);

    }

    private void onOpenNotification(ActionEvent actionEvent) {

        Notifications.create()
                .title("Threshold Notification")
                .text("This is a notification.")
                .threshold(3, Notifications.create()
                        .title("Multiple Notifications")
                        .text("More than 3 notifications were collapsed into this summary.")
                        .position(Pos.BOTTOM_RIGHT)
                )
                .showInformation();

    }

    private void setupStage(Stage stage) {

        Scene scene = new Scene(this.parent, 640, 480);

        // Set the stage title
        stage.setTitle("JavaFX ControlsFX Notifications API");

        // Set the stage scene
        stage.setScene(scene);

        // Center the stage on the screen
        stage.centerOnScreen();

        // Show the stage on the screen
        stage.show();

    }

}
In this example, we created a collapsed notification with a title and text to summarize the collapsed notifications. The threshold() method takes two parameters: the threshold value and the notification that will be displayed when the threshold is exceeded
Once the threshold is exceeded (in this case, when more than 3 notifications are displayed), the specified collapsed notification will be shown. This helps keep the user interface tidy and prevents overwhelming the user with a large number of individual notifications.
Conclusion
The ControlsFX Notifications API is a valuable addition to the JavaFX toolkit, providing developers with a straightforward way to create and display notifications in their applications. Whether you need to inform users about updates, errors, or important events, the Notifications API streamlines the process and offers a range of customization options.
Sources:
I hope you found this code informative and useful. If you would like to receive more content, please consider subscribing to our newsletter!
