JavaFX is a powerful framework for building cross-platform desktop applications with rich user interfaces. It provides a set of Java libraries for creating desktop applications that can run on Windows, macOS, and Linux. Apache Maven, on the other hand, is a widely-used build automation tool and project management tool that simplifies the build process of Java projects. Combining JavaFX with Apache Maven can streamline the development and deployment of JavaFX applications. In this article, we will explore how to use JavaFX with Apache Maven to create and manage JavaFX projects efficiently.

with hands-on learning.
get the skills and confidence to land your next move.
Why Use Apache Maven with JavaFX?
Before diving into the details, let’s briefly discuss why it makes sense to use Apache Maven alongside JavaFX:
- Dependency Management: Maven simplifies the management of project dependencies. It allows you to declare your project’s dependencies in a pom.xml file, and it will automatically download and manage these dependencies for you.
- Build Automation: Maven provides a standardized way to build, test, and package your JavaFX application. It ensures that your project can be built consistently across different environments.
- Plugin Ecosystem: Maven has a vast ecosystem of plugins that can be integrated into your project to perform tasks such as code generation, testing, and deployment. This makes it flexible and extensible for various project needs.
- Packaging and Distribution: Maven can help you package your JavaFX application as a distributable artifact, such as a JAR or an executable package, making it easier to distribute and run your application on different platforms.
Prerequisites
Before we dive into using JavaFX with Apache Maven, ensure that you have the following prerequisites in place:
- Java Development Kit (JDK): Make sure you have the JDK installed on your system. Java 8 or later is recommended.
- Apache Maven: You should have Apache Maven installed on your machine. You can download it from the official Apache Maven website and follow the installation instructions.
- Integrated Development Environment (IDE): While not mandatory, using an IDE like IntelliJ IDEA or Eclipse can greatly simplify JavaFX application development.
Creating a JavaFX Project with Maven
Let’s create a JavaFX project using Apache Maven. We’ll use the javafx-maven-plugin, which simplifies the process of building and running JavaFX applications with Maven.
Create a New Maven Project
Open your terminal or command prompt and navigate to the directory where you want to create your project. Use the following Maven archetype to create a new JavaFX project:
mvn archetype:generate -DgroupId=com.example -DartifactId=hello-app -DarchetypeArtifactId=maven-archetype-quickstart -DinteractiveMode=false
Replace com.example with your desired package name and hello-app with your project’s name.
Configure the POM.xml File
The POM (Project Object Model) file is at the heart of any Maven project. To use JavaFX, you need to configure your POM.xml file with the necessary dependencies and plugins.
Here’s a sample POM.xml configuration for a JavaFX project:
<project xmlns="http://maven.apache.org/POM/4.0.0" xmlns:xsi="http://www.w3.org/2001/XMLSchema-instance"
         xsi:schemaLocation="http://maven.apache.org/POM/4.0.0 http://maven.apache.org/maven-v4_0_0.xsd">

    <modelVersion>4.0.0</modelVersion>
    <groupId>com.example</groupId>
    <artifactId>hello-app</artifactId>
    <packaging>jar</packaging>
    <version>1.0-SNAPSHOT</version>
    <name>hello-app</name>
    <url>http://maven.apache.org</url>

    <properties>
        <project.build.sourceEncoding>UTF-8</project.build.sourceEncoding>
        <javafx.version>18.0.1</javafx.version>
        <javafx.maven.plugin.version>0.0.8</javafx.maven.plugin.version>
        <maven.compiler.source>18</maven.compiler.source>
        <maven.compiler.target>18</maven.compiler.target>
    </properties>

    <dependencies>

        <dependency>
            <groupId>junit</groupId>
            <artifactId>junit</artifactId>
            <version>3.8.1</version>
            <scope>test</scope>
        </dependency>

        <!-- JavaFX Base -->
        <dependency>
            <groupId>org.openjfx</groupId>
            <artifactId>javafx-base</artifactId>
            <version>${javafx.version}</version>
        </dependency>

        <!-- JavaFX Controls -->
        <dependency>
            <groupId>org.openjfx</groupId>
            <artifactId>javafx-controls</artifactId>
            <version>${javafx.version}</version>
        </dependency>

        <!-- JavaFX Graphics -->
        <dependency>
            <groupId>org.openjfx</groupId>
            <artifactId>javafx-graphics</artifactId>
            <version>${javafx.version}</version>
        </dependency>

        <!-- JavaFX Media -->
        <dependency>
            <groupId>org.openjfx</groupId>
            <artifactId>javafx-media</artifactId>
            <version>${javafx.version}</version>
        </dependency>

        <!-- JavaFX Swing -->
        <dependency>
            <groupId>org.openjfx</groupId>
            <artifactId>javafx-swing</artifactId>
            <version>${javafx.version}</version>
        </dependency>

        <!-- JavaFX Web -->
        <dependency>
            <groupId>org.openjfx</groupId>
            <artifactId>javafx-web</artifactId>
            <version>${javafx.version}</version>
        </dependency>

        <!-- JavaFX FXML -->
        <dependency>
            <groupId>org.openjfx</groupId>
            <artifactId>javafx-fxml</artifactId>
            <version>${javafx.version}</version>
        </dependency>

    </dependencies>

    <build>
        <plugins>
            <plugin>
                <groupId>org.openjfx</groupId>
                <artifactId>javafx-maven-plugin</artifactId>
                <version>${javafx.maven.plugin.version}</version>
                <configuration>
                    <mainClass>com.example.App</mainClass>
                </configuration>
            </plugin>
        </plugins>
    </build>

</project>
Ensure the version numbers match the JavaFX version you want to use. You can find the latest JavaFX version on the official OpenJFX website. Replace com.example.App with the fully-qualified name of your JavaFX application’s main class.
Create a JavaFX Application
Now, you can create your JavaFX application by creating a class that extends javafx.application.Application. Here’s a simple example:
package com.example;

import javafx.application.Application;
import javafx.scene.Scene;
import javafx.scene.control.Label;
import javafx.scene.layout.StackPane;
import javafx.stage.Stage;

public class App extends Application {

    @Override
    public void start(Stage stage) {

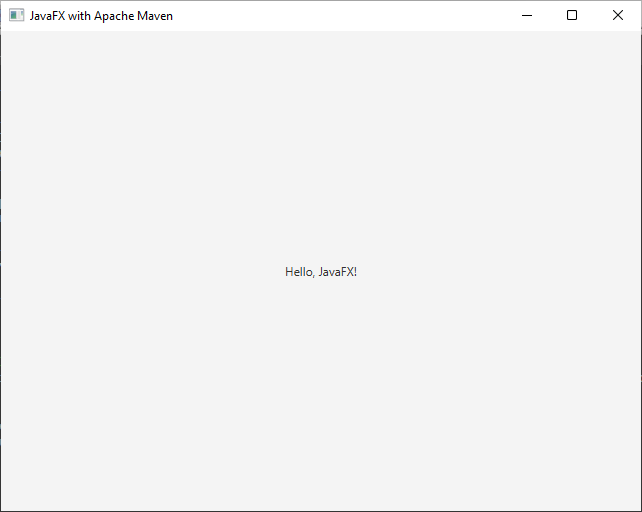
        stage.setTitle("JavaFX with Apache Maven");

        Label label = new Label("Hello, JavaFX!");

        StackPane root = new StackPane(label);

        stage.setScene(new Scene(root, 300, 200));

        stage.show();

    }

}
Build and Run
You can now build and run your JavaFX application using Maven. Open your terminal, navigate to your project’s directory, and use the following commands:
To build the project:
mvn clean package
To run the application:
mvn javafx:run
Your JavaFX application should now launch, displaying the “Hello, JavaFX!” message.

Conclusion
Using JavaFX with Apache Maven is a convenient way to manage dependencies, build, and run your JavaFX applications. By configuring your project’s POM.xml file and using the javafx-maven-plugin, you can streamline the development and deployment process, making it easier to create cross-platform desktop applications with JavaFX. This combination of technologies empowers developers to focus on building feature-rich and visually appealing desktop applications while Maven handles the build and dependency management aspects. To learn more about the subject, please refer to the article Getting Started with JavaFX (Maven).
I hope you found this article informative and useful. If you would like to receive more content, please consider subscribing to our newsletter.


